Windows
Getting Started
1. Install the SDK
The Localytics Windows SDK supports apps running on any platform using WinRT including Windows Phone 8+, Windows Store (Desktop) 8.1+, Universal Windows Platform (UWP), and Windows 10. The fastest and easiest way to use Localytics in your project is with NuGet.
- Open the Package Manager Console by navigating to the Tools menu > Library Package Manager > Package Manager Console.
-
Install the Localytics SDK by executing the following in the Package Manager Console.
Install-Package Localytics
2. Install the SQLite dependency
The Localytics SDK requires SQLite which cannot be installed as a NuGet package dependency. If your app already uses SQLite directly or as a dependency of another package, you may skip the steps related to SQLite.
- Open the Visual Studio Extension Manager by navigating to Tools > Extensions and Updates.
-
Install one of the following packages.
- Visual Studio Extension package for SQLite Windows Runtime (Windows 8.1) (sqlite-winrt81-3080803.vsix)
- SQLite Windows Phone 8.1 (Windows 8.1) (sqlite-wp81-winrt-3080803.vsix)
- VSIX package for Universal App Platform development using Visual Studio 2015 (sqlite-uap-3090200.vsix)
- Right-click on your project in Solution Explorer.
- Click Add > Reference > Windows (Phone) 8.1 > Extensions.
- Check the box next to the appropriate SQLite extension.
- To meet SQLite Extension requirements, go to the Visual Studio build configuration manager in the Configuration Properties menu of your solution's Properties window. Make sure a platform (ARM, x86, x64) is selected, because SQLite doesn't support the Any CPU platform option.
3. Initialize the SDK
In order to run the Localytics SDK, you must initialize the SDK using your Localytics app key. You can find your app key in the Localytics Dashboard.
-
In your application's App class, add the following line to the end of the existing using section.
using LocalyticsComponent;
-
Add the following code to the begining of the OnLaunched method.
protected override void OnLaunched(LaunchActivatedEventArgs e)
{
Localytics.AutoIntegrate("YOUR-LOCALYTICS-APP-KEY");
// rest of method
}
4. Next steps
Congratulations! You have successfully performed the basic Localytics integration and are now sending session data to Localytics.
Note that it may take a few minutes for your first datapoints to show up within the Localytics Dashboard. In the meantime, we suggest reading the next few sections to learn how to:
We recommend doing these things before releasing your app for the first time with Localytics.
Session lifecycle
With just the basic setup above, the Localytics SDK automatically tracks user engagement and retention by tracking patterns of foregrounding and backgrounding of your app. Upon foregrounding, the Localytics SDK automatically creates and uploads a "start session" datapoint that captures many details about the user's device (e.g., device model, OS version, device IDs) and is used for powering charts within Localytics.
Upon backgrounding, the SDK marks the current time. When the user returns to the app later and it has been more than 15 seconds (or a manually set session timeout) since the user had last backgrounded the app, the SDK will close the previous session by creating a "close session" datapoint, create a new "start session" datapoint, and upload both of these datapoints. If the user foregrounds the app within the session timeout of the previous backgrounding, the previous session is resumed as if the user had not left the app at all. Due to this automatic session lifecycle tracking, Localytics is able to derive session length, session interval, session counts, session trending, and a number of other core metrics for exploration in the Localytics Dashboard.
Whenever the app transitions to the foreground or background, the Localytics SDK attempts to upload any datapoints which are cached on the device. Uploads are performed in batches to reduce network use and increase the likelihood of successful uploads. Data remains on the device until it is successfully uploaded, and only then does the SDK remove it from the device.
Tagging events
Track user actions in your app using events in Localytics. All events must have a name, but you can also track the details of the action with event attributes. Event attributes help to provide context about why and how the action occurred. Every event can have up to 50 attributes unique to that event with each attribute having a limit of 255 characters.
Simple event
Localytics.TagEvent("Item Purchased");
Event with attributes
Dictionary<string, string> attributes = new Dictionary<string, string>()
{
    { "Item Name", "Stickers"}
};

Localytics.TagEvent("Item Purchased", attributes);
Identifying users
The Localytics SDK automatically captures and uploads device IDs which the Localytics backend uses to uniquely identify users. Some apps connect to their own backend systems that use different IDs for uniquely identifying users. There is often additional identifying information, such as name and email address, connected with the external IDs. Localytics provides various setters for passing this information to Localytics when it is available in your app. Using these setters ensures that you will be able to properly connect Localytics IDs to the IDs available in other systems.
User ID
Localytics.SetCustomerId("3neRKTxbNWYKM4NJ");
User first name
Localytics.SetCustomerFirstName("John");
User last name
Localytics.SetCustomerLastName("Smith");
User full name
Localytics.SetCustomerFullName("Sir John Smith, III");
User email address
Localytics.SetCustomerEmail("sir.john@smith.com");
User profiles
Track user properties using profile attributes in Localytics. Each profile has one or more named properties that describe that user. Because they contain rich user data, profiles are excellent for creating audiences to target with personalized messaging. Each profile is identified by a unique user ID that you provide to Localytics via the SDK. If you do not set a known user ID, then the Localytics SDK automatically generates an anonymous profile ID.
Each time you set the value of a profile attribute, you can set the scope to "app-level" or "org-level". App-level profile attributes are only stored in relation to that specific Localytics app key, so they can only be used for building audiences for that one app. Org-level profile attributes are available to all apps in the org, so they can be used across multiple Localytics app keys, which might represent the same app on a different platform or multiple apps produced by your company. If you choose not to set a scope, the SDK defaults to "app-level" scope.
If you repeatedly set the same profile attribute value, the Localytics SDK and backend will take care of deduplicating the values for you so only the most recent value gets stored for that profile.
Setting a profile attribute value
Numeric value
Localytics.SetProfileAttribute("Age", 45, Profiles.SCOPE_ORG);
Numeric values in a set
Localytics.SetProfileAttribute("Lucky Numbers", new long[] {8, 13}, Profiles.SCOPE_APP);
Date value
Localytics.SetProfileAttribute("Last Purchase Date", DateTimeOffset.Now, Profiles.SCOPE_ORG);
Date values in a set
Localytics.SetProfileAttribute("Upcoming Milestone Dates", new DateTimeOffset[] {DateTimeOffset.Now, DateTimeOffset.Now}, Profiles.SCOPE_APP);
String value
Localytics.SetProfileAttribute("Hometown", "New York, New York", Profiles.SCOPE_ORG);
String values in a set
Localytics.SetProfileAttribute("States Visited", new string[] {"New York", "California", "South Dakota"}, Profiles.SCOPE_APP);
Removing a profile attribute
Localytics.DeleteProfileAttribute("Days Until Graduation", Profiles.SCOPE_APP);
Adding to a set of profile attribute values
Adding a numeric value to a set
Localytics.AddProfileAttributesToSet("Lucky Numbers", 666, Profiles.SCOPE_APP);
Adding a date value to a set
Localytics.AddProfileAttributesToSet("Purchase Dates", DateTimeOffset.Now, Profiles.SCOPE_APP);
Adding a string value to a set
Localytics.AddProfileAttributesToSet("States Visited", "North Dakota", Profiles.SCOPE_APP);
Removing from a set of profile attribute values
Removing numeric values from a set
Localytics.RemoveProfileAttributesFromSet("Lucky Numbers", 8, Profiles.SCOPE_APP);
Removing date values from a set
Localytics.RemoveProfileAttributesFromSet("Upcoming Milestone Dates", DateTimeOffset.Now, Profiles.SCOPE_APP);
Removing string values from a set
Localytics.RemoveProfileAttributesFromSet("States Visited", "California", Profiles.SCOPE_APP);
Incrementing a numeric profile attribute value
Localytics.IncrementProfileAttribute("Age", 1, Profiles.SCOPE_ORG);
Decrementing a numeric profile attribute value
Localytics.DecrementProfileAttribute("Days Until Graduation", 3, Profiles.SCOPE_APP);
Tracking user flow
Track screens or views within your app so you can visualize user flow within the Localytics Dashboard. We recommend exhaustively tagging every visible view in your app.
The Localytics SDK will perform duplicate suppression on two identical tagged screens that occur in a row within a single session. For example, in the set of screens {"Screen 1", "Screen 1"}, the second screen would be suppressed. However, in the set {"Screen 1", "Screen 2", "Screen 1"}, no duplicate suppression would occur.
Localytics.TagScreen("Item List");
Tracking revenue
There are two ways to think about Lifetime Value (LTV) in Localytics: monetary and non-monetary. If your app allows real currency transactions, our Dashboard can show LTV in USD. If your app uses virtual currencies like coins or tokens, you can configure your app to report LTV as the raw data you pass in.
You can configure each Mobile App in Localytics to have either a monetary value or raw data for Lifetime Value:
Tracking Monetary LTV
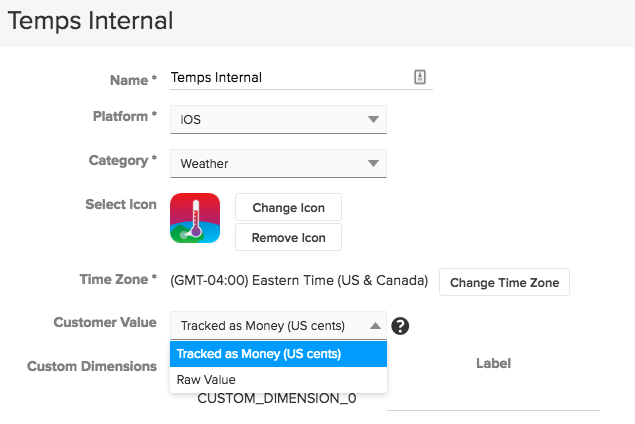
If you'd like to track LTV as monetary-based revenue, you should increment the value upon the completion of a purchase by the purchase amount. Make sure to configure your app in Localytics to show LTV as "Tracked as Money (US cents)".
LTV must be an integer amount, and the Localytics system requires you pass the number of USD cents as the LTV value in order to track money. For example, if the purchase amount is "USD $2.99", you should pass the integer "299" as the LTV. If the cents don't matter to you, feel free to round up to whole dollar values, but continue to pass the value as cents. If you want to track the rounded value of "USD $3.00", you should pass "300" as the value.
Currently, Localyics only allows LTV tracking in USD. If you want to track other currencies, you could convert the monetary amount to USD on the device before sending to Localytics.
Tracking Non-Monetary LTV
Another way to measure LTV is to track a non-monetary value important to your app. Examples include the number seconds spent engaged with content, or the amount of virtual currency earned. To track these values, send the corresponding integer value to Localytics. Make sure to configure your app in Localytics to show LTV as "Raw Value". Otherwise, Localytics will automatically divide your values by 100 and display a "$" in front of the values in the Dashboard.
LTV Examples
Increment user lifetime value (LTV) on any event using the optional LTV incrementer parameter as seen below.
Dictionary<string, string> attributes = new Dictionary<string, string>()
{
    { "Item Name", "Stickers"}
};

Localytics.TagEvent("Item Purchased", attributes, 499);
Setting custom dimensions
Custom dimensions are special fields that are used for splitting and filtering data within the Localytics Dashboard and are useful for storing user-level information. Custom dimensions are like sticky event attributes in the sense that once their value is set, it remains set until the value is changed again. Unlike event attributes, custom dimension values are attached to all three types of datapoints (session start, session close, and event) the same way that standard dimensions are which makes their values available within almost every report in the Localytics Dashboard.
Your app can have up to 20 custom dimensions, and they will be indexed between 0 and 19. Name all of your custom dimensions in the Localytics Dashboard > Settings > Apps > (find app) > Gear icon > Custom Dimensions.
Whenever a datapoint is created, all custom dimension values are attached to the datapoint. Therefore, it is ideal to set custom dimensions as soon as their value is known in all code paths in your app. It is not uncommon to set custom dimension values before the start of a session (and the creation of a "session start" datapoint).
Set value
Localytics.SetCustomDimension(0, "Trial");
Clear value
Localytics.SetCustomDimension(0, null);
Advanced
Alternative session management
The standard Localytics session management approach relies on the Localytics SDK to automatically listen for indications of state change (e.g. foreground / background transitions) in your app and then to track the state change accordingly. Most apps are able to use the standard approach. If you are unable to use the standard session management approach, the instructions below will help you to initialize the SDK to achieve the same result as the standard approach.
Use the following initialization insructions instead of those in Getting started.
protected override void OnLaunched(LaunchActivatedEventArgs e) {
    Localytics.Integrate("YOUR-LOCALYTICS-APP-KEY");
    CoreWindow.GetForCurrentThread().VisibilityChanged += (sender, args) => {
        if (args.Visible) {
            Localytics.OpenSession();
            Localytics.Upload();
        } else {
            Localytics.CloseSession();
            Localytics.Upload();
        }
    };
    // rest of method
}
Changing session timeout interval
By default, a new session is opened when a user foregrounds your app after having the app in the background for 15 seconds or more. This 15 seconds is called the session timeout interval. Use the following code if you would like the Localytics SDK to use a different time interval for determining when to resume a session and when to start a new session. Changing the session timeout interval works independently of your installation and initialization approach. Changing the session timeout interval is not recommended for most apps.
Localytics.SessionTimeoutInterval = TimeSpan.FromSeconds(60);
Tracking location
The Localytics SDK will attach a user's location to a datapoint automatically when a user triggers a geofence (via Places) or whenever you manually set a user's location. Since most apps don't track user geolocation, Localytics also uses an IP-to-location lookup service as a backup measure if no other data is provided. Localytics will always attach the most recently provided location to each datapoint, similar to custom dimensions. Location data is available in the export logs.
Geolocator geoLocator = new Geolocator();
geoLocator.DesiredAccuracyInMeters = 100;
geoLocator.ReportInterval = 0;
Geoposition location = geoLocator.GetGeopositionAsync().AsTask().Result;
Localytics.SetLocation(location);
Setting a custom identifier
Once a custom identifier is set, it is attached to each subsequent datapoint, similar to the behavior of custom dimensions. Unlike custom dimensions, however, custom identifiers only end up in export data. They are useful for attaching multiple unique identifiers to a given datapoint for use in joining your Localytics export data with other sources in an enterprise data warehouse. Custom identifiers are not used by the Localytics backend or Dashboard for anything and are just passed through to the export data.
SetIdentifier("Hair Color", "Black");
Troubleshooting
To gain more insights into whether your Localytics tagging is occurring when expected, you can use the live monitor (requiring SDK 5.5 and later) and make sure that all analytics tags, such as Events and Customer ID, are being sent with the correct values.
You can also enable logging in your app using the code below. When looking at logs, a 202 response code indicates that an upload was successful. Be sure to disable logging in production builds. Localytics log output is required when contacting support.
The Windows SDK will write logs to a directory named log, which is in the directory returned by ApplicationData.Current.LocalFolder.
Localytics.SetLoggingEnabled(true);