Android
Data types collected by Localytics Android SDK
Google requires developers to provide information about your app’s data collection and privacy practices for Google Play’s Data Safety Section in your Google Play Console. We highly recommend you confirm the data types that you and/or your third-party partners (including Localytics) collect from your app before answering the questions in Google Play Store.
This section lists the data types collected by Localytics Android SDKs. Your answers to Google Play’s Data Safety Section will be based on your app’s data collection practices, your configurations of the Localytics SDKs and other third-party partners. You are solely responsible for keeping your responses accurate and updated.
Prominent Disclosure and Consent
In addition to reviewing the information below, we also highly recommend
that you continue to stay abreast of and ensure compliance with
the following policies and requirements:
This section lists both mandatory and optional types of data that are collected by default (on AutoIntegrate or through manual integration).
Note Optional data can be opted out; mandatory data cannot be opted out.
SDK, App & Runtime Info (collected upon integration; mandatory, not optional)
- SDK_VERSION (Localytics SDK version)
- API_LEVEL (Android version)
- APP_VERSION
- DEVICE_MANUFACTURER
- DEVICE_MODEL
- DEVICE_LANGUAGE
Device Identifiers (collected upon integration; optional)
- ADVERTISING_ID
- APP_SET_ID (Google App Set ID and scope; SDK 7.1.3+)
Telephony Info (collected upon integration; mandatory, not optional)
- NETWORK_TYPE
- NETWORK_CARRIER
Location (collected upon integration; optional)
- Real-time tracking
User Identifiers (handled through app developer; optional)
- Customer ID, name, and email
App Usage Data (tagged by app developer; optional)
- Tagged visited screens, tagged clicked buttons, and other custom data
Google Play Console inputs needed
Fill out additional information for the Google Play Console sections.
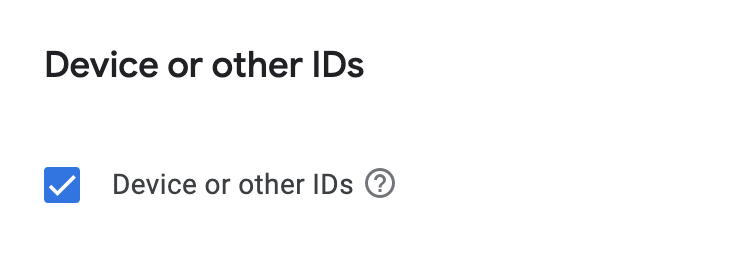
Device Identifiers (collected upon integration; optional)
Important, please note: Complete this information based on your collection and usage of Advertising ID and, for SDK 7.1.3+, the Google App Set ID. Both identifiers fall under Device or other IDs in Google Play’s Data safety form. See also the App Set ID section.
-
Advertising ID – Option 1: If you opt out of Advertising ID by setting
ll_collect_adid to false in the Localytics.xml file, remove the AD_ID
permission from your Manifest as well.
Note: Opting out of Advertising ID alone is not enough to leave Device or other IDs unchecked if App Set ID collection remains enabled (the default in SDK 7.1.3+).
<uses-permission android:name="com.google.android.gms.permission.AD_ID"
tools:node="remove"/>
- Advertising ID – Option 2: Select the Device or other IDs checkbox and Yes if you choose to collect the Advertising ID, which is enabled by default.
- App Set ID (SDK 7.1.3+): If ll_collect_app_set_id is true (default), select Device or other IDs, indicate that the data is collected and shared, and choose Analytics as the purpose. App Set ID must not be used for ads personalization or ads measurement. To stop collecting it, set ll_collect_app_set_id to false (see App Set ID).

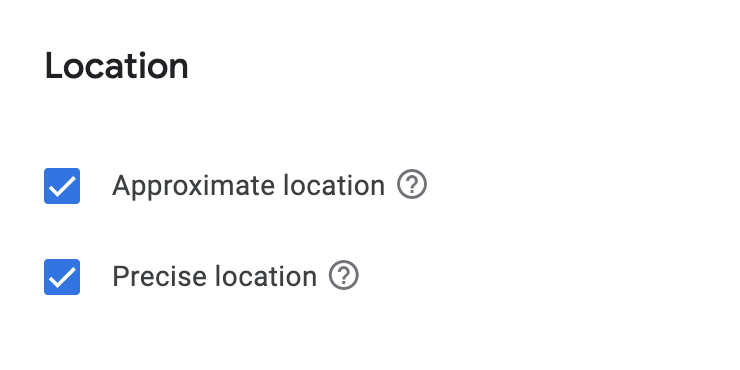
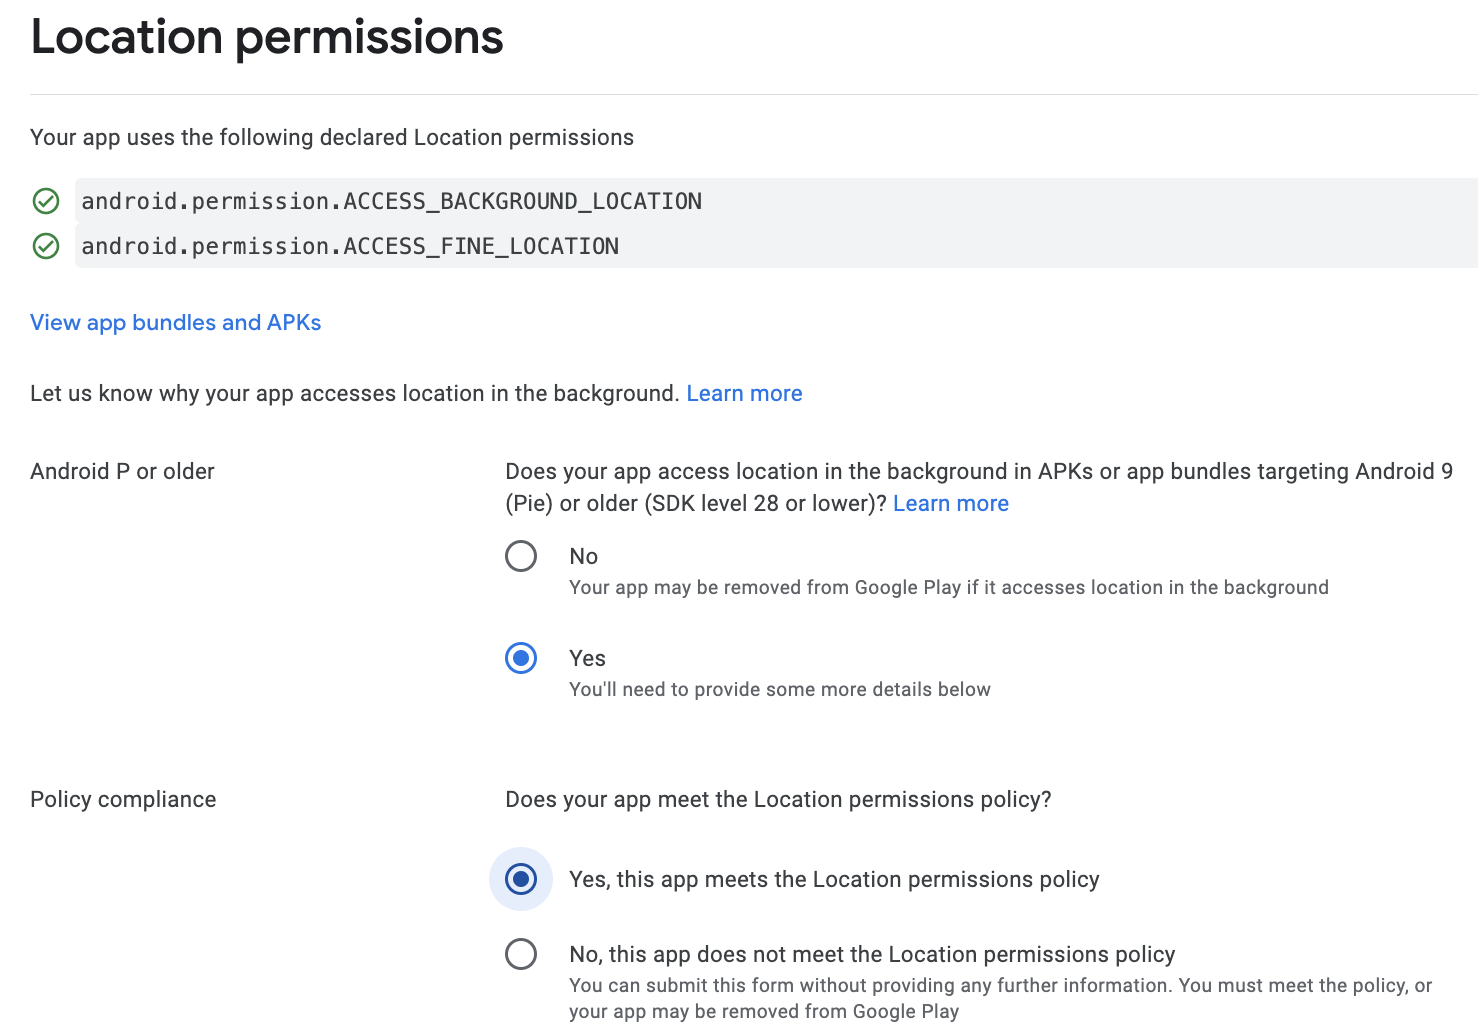
Location (collected upon integration; optional)
Note: This section requires that both location accuracy checkboxes (Approximate and Precise) are selected inside the Data-Safety consent and that the Location-Permissions consent in the App-Content form is filled in.
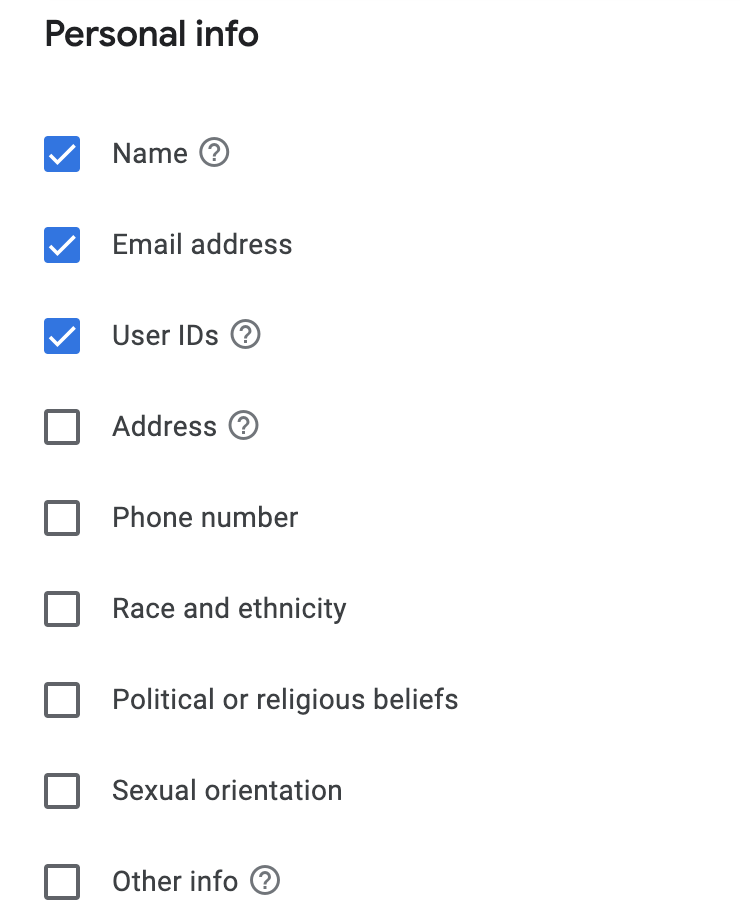
User Identifiers (handled through app developer; optional)
Note: This section only requires that the Name, Email address, and User IDs checkboxes are selected inside the Personal Info consent.
Firebase Migration Documentation
This documentation outlines an important change related to Firebase Cloud Messaging (FCM). Localytics uses Firebase Cloud Messaging (FCM) APIs to deliver push notifications to Android devices.
Firebase Cloud Messaging (FCM) is deprecating its legacy API by June 20, 2024, and has advised all customers using push to transition to their latest HTTP v1 API. To support this Firebase upgrade, we have been working on the necessary infrastructural changes that will use the latest FCM HTTP v1 API.
Localytics customers must complete the following action item to ensure compliance with the new FCM HTTP v1 APIs to maintain the push functionality for your Android apps and avoid any disruption in your push message delivery once the legacy API is deprecated on June 20, 2024.
Action required by all Localytics Customers
To make this change, you are required to complete the following steps:
-
STEP 1: Download the Service JSON file from your Firebase Console.
-
STEP 2: Configure push notifications for your Android apps using the downloaded Service JSON file in the Localytics dashboard. IMPORTANT: Please Note: While uploading the JSON file, please ensure you don't edit or remove the current Server API key for your Android app from the Localytics dashboard, since this method is still being used to send push via Firebase Cloud Messaging till June 20, 2024.
STEP 1: Download the Service JSON file from your Firebase Console.
-
Log into your Firebase Console and click the Firebase Project that contains your Android apps.
-
Verify that Firebase Cloud Messaging (FCM) API V1 is enabled
-
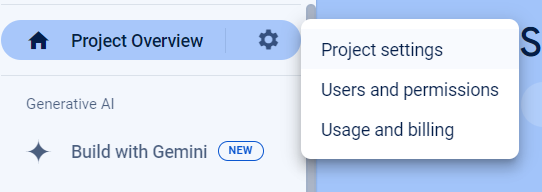
Click the settings icon next to “Project Overview” and select the “Project Settings” option.
-
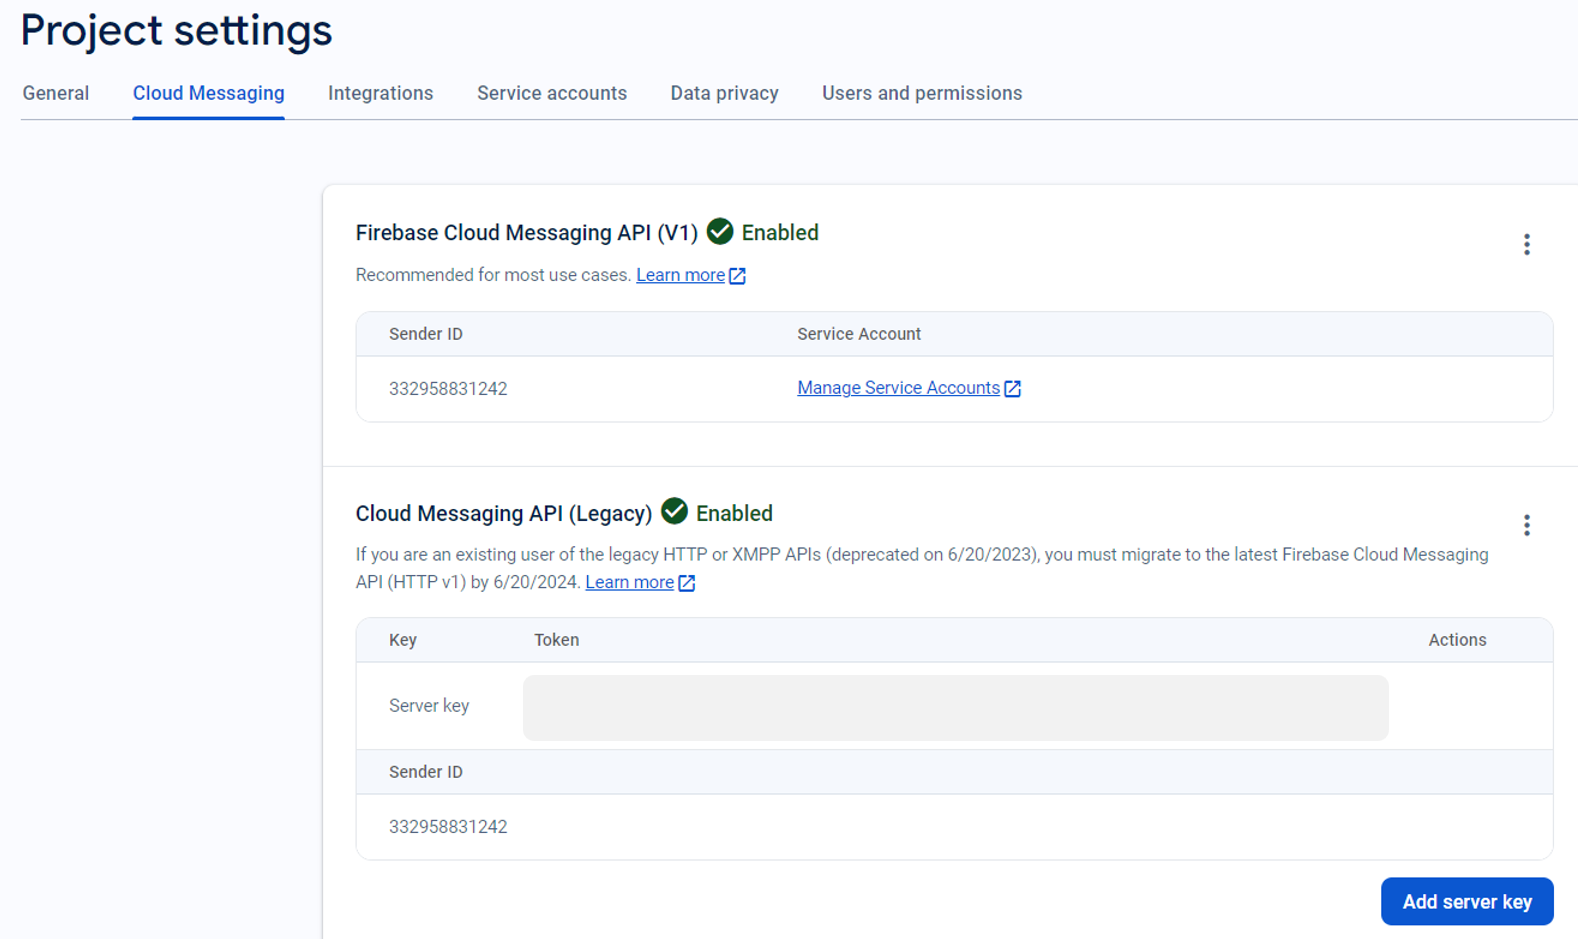
Navigate to the “Cloud Messaging” tab and confirm that the FCM API V1 is enabled.
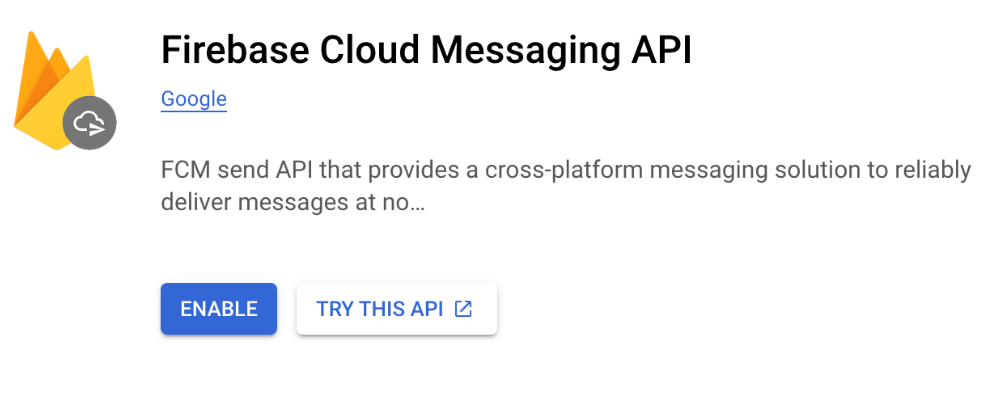
-
If it is disabled, you can enable it by clicking the three dots icon (on the right side) and selecting the “Enable” option.
-
-
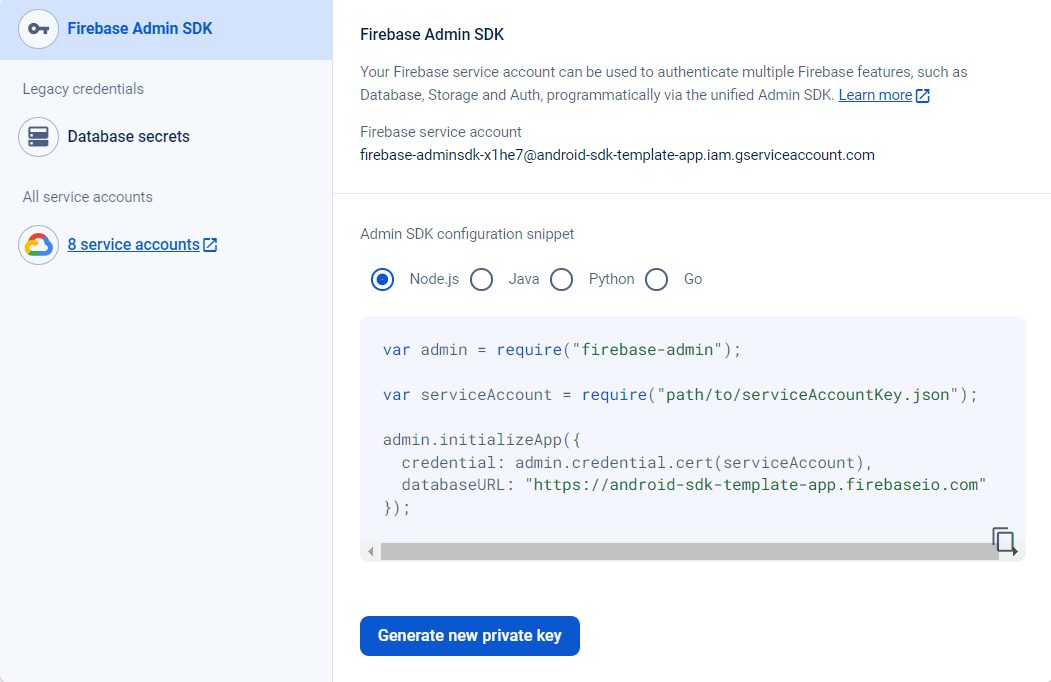
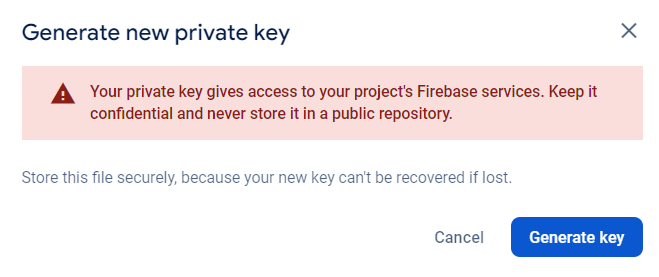
Navigate to the “Service Accounts” tab and click the “Generate new private key” button below the Admin SDK configuration snippet. You will see a warning message with the option to generate the key. Click the “Generate Key” button and a JSON file will be downloaded. This JSON file will be required for Step 2 in the migration process.

STEP 2: Configure push notifications in the Localytics dashboard
Configure push notifications for your Android apps using the downloaded Service JSON file in the Localytics dashboard.
-
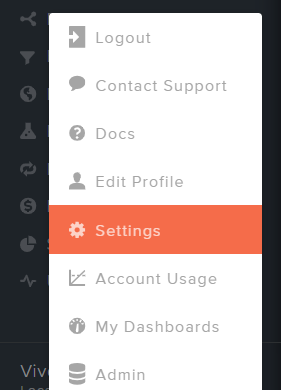
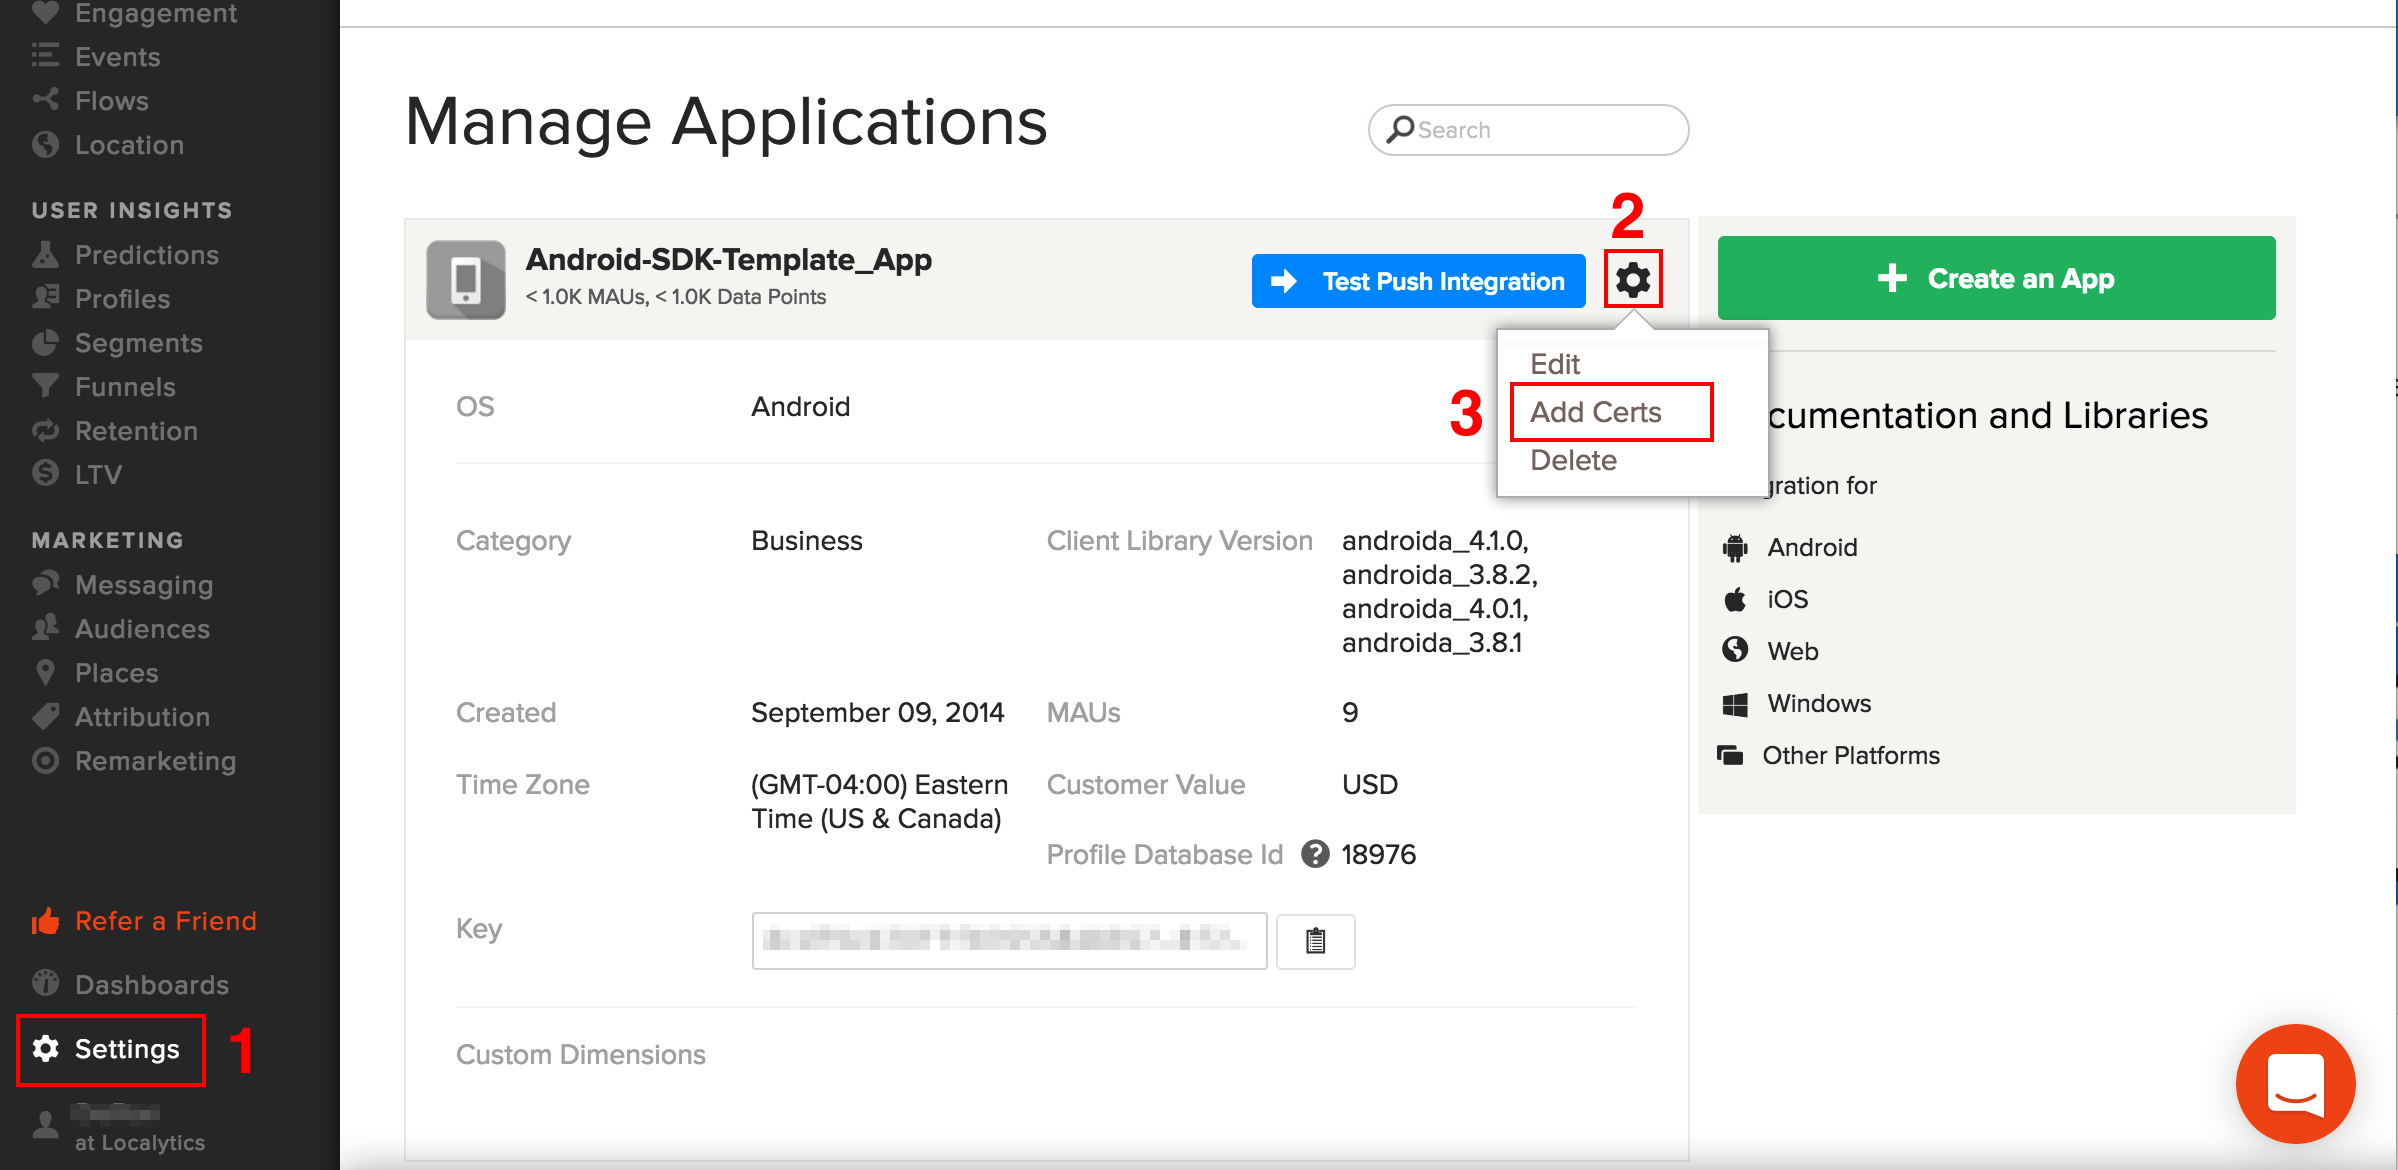
Log into the Localytics dashboard, click the three dots icon next to your account name, and select the “Settings” option.
-
Search and select the Android app belonging to the Firebase project that you downloaded the JSON file from. Click the “Settings”icon on the right side and select the “Change Certs” option.

-
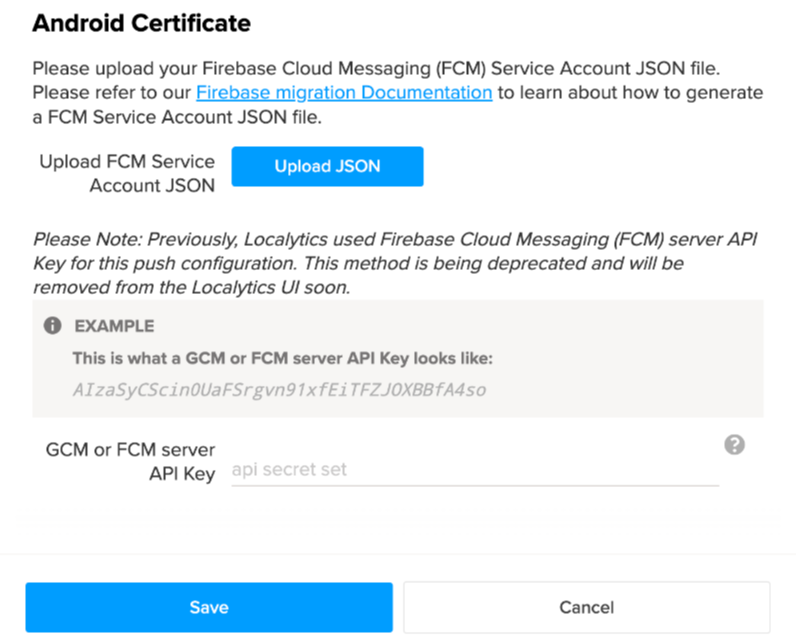
Click the “Upload JSON” button and upload the FCM Service Account JSON file downloaded in Step 1. Our system will validate the uploaded JSON file. If the file is invalid, an error message will be displayed.
IMPORTANT: Please Note: While uploading the JSON file, please ensure you don't edit or remove the current Server API key for your Android app from the Localytics dashboard, since this method is still being used to send push via Firebase Cloud Messaging till June 20,2024.
-
Send a Test Push message from the dashboard
After completing the JSON upload process, you can create a test campaign to send yourself a push message to be sure that everything is properly configured.
Your test push message will appear on your connected device. If the push does not immediately appear, we recommend you enter the Server API key and upload the JSON file again for your app, then wait a few minutes and retry.
FCM Push Token Expiration Update
Google’s Firebase Cloud Messaging (FCM) Service announced updates to their push token expiration policies as part of Google FCM’s migration from their legacy API to the latest FCM HTTP v1 API.
Key Update: Push Token Expiration Policy
-
Starting May 15, 2024, Google’s Firebase Cloud Messaging (FCM) service will begin expiring stale push tokens for devices that have been inactive for more than 270 days.
How This Affects You
To comply with Firebase's upgrade, we completed all the necessary infrastructural changes to fully migrate to the latest FCM HTTP v1 API by June 20, 2024. Following this migration:
-
Any push token linked to a device inactive for over 270 days will be marked as expired.
-
If the device reopens the app, it will generate a new push token, making it reachable again.
Impact on Android Push Send Volumes
Due to these changes, Google's metrics are now more accurate in relaying the count of messages that were successfully delivered, and consequently the Localytics metrics have also become more precise.
Due to this update, you may see a drop in the push send volumes shown. Send attempts to old tokens which were previously reported as successful through Google’s platform now no longer do. This results in a much tighter definition of 'Sent', and more accurately reflects the reachable audience. Please note that the actual reachable audience remains largely unaffected, but the relayed count is now more accurate.
For detailed guidance, refer to Google’s Best Practices for FCM Registration and Token Management.
Getting started
1. Install the SDK
You can install the SDK using Maven or manually.
If you are upgrading from a previous version of the SDK, please refer to documentation for upgrading the SDK.
Note: Version 6.0 of the Localytics SDK requires a minSdkVersion of at least 21. Versions starting from 6.3.8 and above targets Android 14 (targetSdkVersion 34). If you require support for Android versions between 17 and 21, please use SDK 5.9.
Installing with Maven
The fastest and easiest way to use Localytics in your project is with Maven.
-
Update your project’s top-level build.gradle script to include the Localytics Maven repository.
repositories {
  jcenter()
  maven { url 'https://maven.localytics.com/public' }
}
-
In your project's app-level build.gradle, add dependencies for Localytics, Android Support v4, and Google Mobile Ads.
dependencies {
  implementation platform('com.google.firebase:firebase-bom')
  implementation 'com.google.firebase:firebase-messaging'
  implementation 'androidx.work:work-runtime:2.8.1'
  implementation 'com.localytics.androidx:library:7.1.3'
}
Manual Installation
If you do not wish to use Maven, you can manually include the Localytics package in your project.
-
Download the latest version of the SDK here.
-
Unzip the archive and drag the JAR into your project's libs directory.
-
Update your project's app-level build.gradle to add dependencies for the Localytics JAR, Android Support v4, and Google Mobile Ads as follows.
dependencies {
  implementation platform('com.google.firebase:firebase-bom')
  implementation 'com.google.firebase:firebase-messaging'
  implementation 'androidx.work:work-runtime:2.8.1'
  implementation 'com.localytics.androidx:library:7.1.3'
  implementation 'com.android.installreferrer:installreferrer:1.1'
}
-
Add the following to your AndroidManifest.xml:
-
Localytics ReferralReceiver within the application element:
<receiver
  android:name="com.localytics.androidx.ReferralReceiver"
  android:exported="true">
  <intent-filter>
    <action android:name="com.android.vending.INSTALL_REFERRER" />
  </intent-filter>
</receiver>
-
Permissions above the application element:
For apps targetting Android 13+ and containig Ads, add the follwing permission:
<uses-permission android:name="android.permission.INTERNET" />
<uses-permission android:name="android.permission.WAKE_LOCK" />
If your app targets Android 13+ and doesn't contain any Ads, consider adding this element:<uses-permission android:name="com.google.android.gms.permission.AD_ID"/>
<uses-permission android:name="com.google.android.gms.permission.AD_ID"
tools:node="remove"/>
-
Localytics LocationUpdateReceiver to be able to receive location updates:
<receiver android:name="com.localytics.androidx.LocationUpdateReceiver"/>
-
Localytics ReferralReceiver within the application element:
2. The localytics.xml file
SDK 5.0 takes advantage of manifest merging in Android. This will help you quickly set up Localytics in your project by automatically including receivers and services in your Android Manifest.
To use manifest merging, the Localytics SDK relies on the presence of a localytics.xml file in the main/res/values directory of your project. You can download a sample localytics.xml file here.
Additionally, should you need to change any values, you can take a look at the full list of possible keys and how they are used.
Uploading Data
Localytics attempts to upload user data quickly to our backend to power time sensitive messaging use cases. By default, Localytics will upload data periodically based on the state of a user's network connection. However, you have full flexibility over this behavior. While not recommended, you can change the upload intervals for each type of connection, and even remove this type of behavior entirely and depend on your own Localytics.upload() calls to upload data whenever you wish.
To use the default intervals provided by Localytics, you can omit any or all in keys from your localytics.xml file. If you would like to disable scheduled uploads, set -1 as the value for all keys.
To specify your custom upload intervals, update the localytics.xml file with the following keys.
- ll_wifi_upload_interval_seconds Configure the interval at which the Localytics SDK will attempt to upload data in the case of a WiFi connection. Having a WiFi connection will supersede any mobile data connection. Default value is 5 seconds.
- ll_great_network_upload_interval_seconds Configure the interval at which the Localytics SDK will attempt to upload data in the case of 4G or LTE connections. Default value is 10 seconds.
- ll_decent_network_upload_interval_seconds Configure the interval at which the Localytics SDK will attempt to upload data in the case of a 3G connection. Default value is 30 seconds.
- ll_bad_network_upload_interval_seconds Configure the interval at which the Localytics SDK will attempt to upload data in the case of 2G or EDGE connections. Default value is 90 seconds.
Build Variants
Many apps find it useful to be able to ship with different app keys or configurations for different app types. The localytics.xml can support this by taking advantage of Android's build variants and product flavors. Simply include one localytics.xml in each build variant or product flavor, and modify the resources inside of it as you desire.
3. Setup Test Mode
In the AndroidManifest.xml file, find your main Activity element (the one with android.intent.action.MAIN as an intent filter) add a second intent-filter for Localytics test mode as follows.
<intent-filter>
  <data android:scheme="ampYOUR-LOCALYTICS-APP-KEY" />
  <action android:name="android.intent.action.VIEW" />
  <category android:name="android.intent.category.DEFAULT" />
  <category android:name="android.intent.category.BROWSABLE" />
</intent-filter>
Make sure to replace YOUR-LOCALYTICS-APP-KEY with your Localytics app key and be sure to prepend YOUR-LOCALYTICS-APP-KEY with amp as shown.
4. Modify your MainActivity
Override onNewIntent in your MainActivity as follows.
@Override
protected void onNewIntent(Intent intent) {
  super.onNewIntent(intent);

  Localytics.onNewIntent(this, intent);
}
override fun onNewIntent(intent: Intent?) {
  super.onNewIntent(intent)
  Localytics.onNewIntent(this, intent)
}
5. Initialize the SDK
-
If you don't have a custom Application class, create one and specify the name in your AndroidManifest.xml as follows.
<application
  android:name=".MyApplication">
-
Import the Localytics package in your Application class.
import com.localytics.androidx.*;
-
Integrate Localytics in your Application class.
If you have an app with extensive, engaged usage in the background, or you require more fine control over the session lifecycle (most apps don't), use manual integration.
For SDK v6.4.5 and below, use the following code:
@Override
public void onCreate() {
  super.onCreate();
  Localytics.autoIntegrate(this);
}
override fun onCreate() {
  super.onCreate()
  Localytics.autoIntegrate(this);
}
For SDK v7.0.0 and above, use the following code:
@Override
public void onCreate() {
  super.onCreate();
  new Localytics.Builder().autoIntegrate(this);
}
override fun onCreate() {
  super.onCreate()
  Localytics.Builder().autoIntegrate(this);
}
6. Next steps
Congratulations! You have successfully performed the basic Localytics integration and are now sending session data to Localytics. You can also use Localytics In-App Messaging to message users in your app, and you have everything you need to track where your most highly engaged users are coming from.
Note that it may take a few minutes for your first datapoints to show up within the Localytics Dashboard. In the meantime, we suggest reading the next few sections to learn how to:
- Track one user action as an event
- Track one user property as a profile attribute
- Integrate push messaging
We recommend doing these things before releasing your app for the first time with Localytics.
Session lifecycle
With just the basic setup above, the Localytics SDK automatically tracks user engagement and retention by tracking patterns of foregrounding and backgrounding of your app. Upon foregrounding, the Localytics SDK automatically creates and uploads a "start session" datapoint that captures many details about the user's device (e.g., device model, OS version, device IDs) and is used for powering charts within Localytics.
Upon backgrounding, the SDK marks the current time. When the user returns to the app later and it has been more than 15 seconds (or a manually set session timeout) since the user had last backgrounded the app, the SDK will close the previous session by creating a "close session" datapoint, create a new "start session" datapoint, and upload both of these datapoints. If the user foregrounds the app within the session timeout of the previous backgrounding, the previous session is resumed as if the user had not left the app at all. Due to this automatic session lifecycle tracking, Localytics is able to derive session length, session interval, session counts, session trending, and a number of other core metrics for exploration in the Localytics Dashboard.
Whenever the app transitions to the foreground or background, the Localytics SDK attempts to upload any datapoints which are cached on the device. Uploads are performed in batches to reduce network use and increase the likelihood of successful uploads. Data remains on the device until it is successfully uploaded, and only then does the SDK remove it from the device.
Starting in SDK v5.0, the Localytics SDK also will attempt to upload any datapoints periodically using set intervals based on a user's network connection.
Tagging events
Track user actions in your app using events in Localytics. All events must have a name, but you can also track the details of the action with event attributes. Event attributes help to provide context about why and how the action occurred. Every event can have up to 50 attributes unique to that event with each attribute having a limit of 255 characters.
Standard events
Standard events make it easier to analyze user behavior and optimize your app marketing around common business goals such as driving user registrations or purchases. You can also tag custom events for other user behavior in your app that doesn't match one of the standard events.
Purchased
Localytics.tagPurchased("Shirt", "sku-123", "Apparel", 15, extraAttributes);
Added to Cart
Localytics.tagAddedToCart("Shirt", "sku-123", "Apparel", 15, extraAttributes);
Started Checkout
Localytics.tagStartedCheckout(50, 2, extraAttributes);
Completed Checkout
Localytics.tagCompletedCheckout(50, 2, extraAttributes);
Content Viewed
Localytics.tagContentViewed("Top 10", "e8z7319zbe", "Article", extraAttributes);
Searched
Localytics.tagSearched("Celtics", "Sports", 15, extraAttributes);
Content Rated
Localytics.tagContentRated("Headlines", "8a4z5j9q", "Song", 5, extraAttributes);
Customer Registered
The Customer parameter is optional - you can pass in null. However, if you do choose to include an Customer object, the appropriate identifying users properties will be automatically set.
Localytics.tagCustomerRegistered(new Customer.Builder()
    .setCustomerId("3neRKTxbNWYKM4NJ")
    .setFirstName("John")
    .setLastName("Smith")
    .setFullName("Sir John Smith, III")
    .setEmailAddress("sir.john@smith.com")
    .build(),
    "Facebook",
    extraAttributes
);
Localytics.tagCustomerRegistered(
  Customer.Builder()
      .setCustomerId("3neRKTxbNWYKM4NJ")
      .setFirstName("John")
      .setLastName("Smith")
      .setFullName("Sir John Smith, III")
      .setEmailAddress("sir.john@smith.com")
      .build(),
  "Facebook",
  extraAttributes
)
Customer Logged In
The Customer parameter is optional - you can pass in null. However, if you do choose to include an Customer object, the appropriate identifying users properties will be automatically set.
Localytics.tagCustomerLoggedIn(new Customer.Builder()
    .setCustomerId("3neRKTxbNWYKM4NJ")
    .setFirstName("John")
    .setLastName("Smith")
    .setFullName("Sir John Smith, III")
    .setEmailAddress("sir.john@smith.com")
    .build(),
    "Native",
    extraAttributes
);
Localytics.tagCustomerLoggedIn(
  Customer.Builder()
      .setCustomerId("3neRKTxbNWYKM4NJ")
      .setFirstName("John")
      .setLastName("Smith")
      .setFullName("Sir John Smith, III")
      .setEmailAddress("sir.john@smith.com")
      .build(),
  "Facebook",
  extraAttributes
)
Customer Logged Out
Localytics.tagLoggedOut(extraAttributes);
Invited
Localytics.tagInvited("SMS", extraAttributes);
Custom event
Localytics.tagEvent("Team Favorited");
Custom event with attributes
Map<String, String> attributes = new HashMap<String, String>();
attributes.put("Team Name", "Celtics");
attributes.put("City", "Boston");
Localytics.tagEvent("Team Favorited", attributes);
Localytics.tagEvent("Team Favorited", mapOf(
  "Team Name" to "Celtics",
  "City" to "Boston"
))
Identifying users
The Localytics SDK automatically captures and uploads device IDs which the Localytics backend uses to uniquely identify users. Some apps connect to their own backend systems that use different IDs for uniquely identifying users. There is often additional identifying information, such as name and email address, connected with the external IDs. Localytics provides various setters for passing this information to Localytics when it is available in your app. Using these setters ensures that you will be able to properly connect Localytics IDs to the IDs available in other systems.
For customers who grant their users the ability to opt out of data collection, please follow the log in and log out flows mentioned in the advanced section.
To easily identify your users during your login and/or registration flow, use our customer registered and customer logged in standard events.
Customer ID
Localytics.setCustomerId("3neRKTxbNWYKM4NJ");
Customer first name
Localytics.setCustomerFirstName("John");
Customer last name
Localytics.setCustomerLastName("Smith");
Customer full name
Localytics.setCustomerFullName("Sir John Smith, III");
Customer email address
Localytics.setCustomerEmail("sir.john@smith.com");
User profiles
Track user properties using profile attributes in Localytics. Each profile has one or more named properties that describe that user. Because they contain rich user data, profiles are excellent for creating audiences to target with personalized messaging. Each profile is identified by a unique user ID that you provide to Localytics via the SDK. If you do not set a known user ID, then the Localytics SDK automatically generates an anonymous profile ID.
Each time you set the value of a profile attribute, you can set the scope to "app-level" or "org-level". App-level profile attributes are only stored in relation to that specific Localytics app key, so they can only be used for building audiences for that one app. Org-level profile attributes are available to all apps in the org, so they can be used across multiple Localytics app keys, which might represent the same app on a different platform or multiple apps produced by your company. If you choose not to set a scope, the SDK defaults to "app-level" scope.
If you repeatedly set the same profile attribute value, the Localytics SDK and backend will take care of deduplicating the values for you so only the most recent value gets stored for that profile.
Setting a profile attribute value
Numeric value
Localytics.setProfileAttribute("Age", 45, Localytics.ProfileScope.ORGANIZATION);
Numeric values in a set
Localytics.setProfileAttribute(
	"Lucky numbers",
	new long[]{8, 13},
	Localytics.ProfileScope.APPLICATION
);
Localytics.setProfileAttribute(
	"Lucky numbers",
	longArrayOf(8, 13),
	Localytics.ProfileScope.APPLICATION
)
Date value
Localytics.setProfileAttribute(
	"Birthday",
	new GregorianCalendar(1962, 11, 23).getTime(),
	Localytics.ProfileScope.ORGANIZATION
);
Localytics.setProfileAttribute(
	"Birthday",
	GregorianCalendar(1962, 11, 23).time,
	Localytics.ProfileScope.ORGANIZATION
)
Date values in a set
Localytics.setProfileAttribute(
	"Upcoming Milestone Dates",
	new Date[]{
		new GregorianCalendar(2015, 10, 1).getTime(),
		new GregorianCalendar(2016, 3, 17).getTime()
	},
	Localytics.ProfileScope.APPLICATION
);
Localytics.setProfileAttribute(
	"Upcoming Milestone Dates", arrayOf<Date>(
			GregorianCalendar(2015, 10, 1).time,
			GregorianCalendar(2016, 3, 17).time
	),
	Localytics.ProfileScope.APPLICATION
)
String value
Localytics.setProfileAttribute(
	"Hometown",
	"New York, New York",
	Localytics.ProfileScope.ORGANIZATION
);
String values in a set
Localytics.setProfileAttribute(
	"States visited",
	new String[]{
		"New York",
		"California",
		"South Dakota"
	},
	Localytics.ProfileScope.APPLICATION
);
Localytics.setProfileAttribute(
	"States visited",
	arrayOf(
		"New York",
		"California",
		"South Dakota"
	),
	Localytics.ProfileScope.APPLICATION
)
Removing a profile attribute
Localytics.deleteProfileAttribute("Days until graduation", Localytics.ProfileScope.APPLICATION);
Adding to a set of profile attribute values
Adding a numeric value to a set
Localytics.addProfileAttributesToSet(
	"Lucky numbers",
	new long[]{8,13},
	Localytics.ProfileScope.APPLICATION
);
Localytics.addProfileAttributesToSet(
	"Lucky numbers",
	longArrayOf(8, 13),
	Localytics.ProfileScope.APPLICATION
)
Adding a date value to a set
Localytics.addProfileAttributesToSet(
	"Upcoming Milestone Dates",
	new Date[]{
		new GregorianCalendar(2015, 4, 19).getTime(),
		new GregorianCalendar(2015, 12, 24).getTime()
	},
	Localytics.ProfileScope.APPLICATION
);
Localytics.addProfileAttributesToSet(
	"Upcoming Milestone Dates",
	arrayOf<Date>(
		GregorianCalendar(2015, 4, 19).time,
		GregorianCalendar(2015, 12, 24).time
	),
	Localytics.ProfileScope.APPLICATION
)
Adding a string value to a set
Localytics.addProfileAttributesToSet(
	"States visited",
	new String[]{"North Dakota", "South Dakota"},
	Localytics.ProfileScope.APPLICATION
);
Localytics.addProfileAttributesToSet(
	"States visited",
	arrayOf("North Dakota", "South Dakota"),
	Localytics.ProfileScope.APPLICATION
)
Removing from a set of profile attribute values
Removing numeric values from a set
Localytics.removeProfileAttributesFromSet(
	"Lucky numbers",
	new long[]{8,13},
	Localytics.ProfileScope.APPLICATION
);
Localytics.removeProfileAttributesFromSet(
	"Lucky numbers",
	longArrayOf(8, 13),
	Localytics.ProfileScope.APPLICATION
)
Removing date values from a set
Localytics.removeProfileAttributesFromSet(
	"Upcoming Milestone Dates",
	new Date[]{
		new GregorianCalendar(2015, 4, 19).getTime(),
		new GregorianCalendar(2015, 12, 24).getTime()
	},
	Localytics.ProfileScope.APPLICATION
);
Localytics.removeProfileAttributesFromSet(
	"Upcoming Milestone Dates",
	arrayOf<Date>(
		GregorianCalendar(2015, 4, 19).time,
		GregorianCalendar(2015, 12, 24).time
	),
	Localytics.ProfileScope.APPLICATION
)
Removing string values from a set
Localytics.removeProfileAttributesFromSet(
	"States visited",
	new String[]{"North Dakota", "South Dakota"},
	Localytics.ProfileScope.APPLICATION
);
Localytics.removeProfileAttributesFromSet(
	"States visited",
	arrayOf("North Dakota", "South Dakota"),
	Localytics.ProfileScope.APPLICATION
)
Incrementing a numeric profile attribute value
Localytics.incrementProfileAttribute("Age", 1, Localytics.ProfileScope.ORGANIZATION);
Decrementing a numeric profile attribute value
Localytics.decrementProfileAttribute("Days until graduation", 3, Localytics.ProfileScope.APPLICATION);
In-app messaging
In-app messaging allows you to engage with your users while they are inside your app using templated or custom HTML creatives that you define within the Localytics Dashboard.
Triggering an in-app message
When creating in-app campaigns in the Localytics Dashboard, you decide under which conditions the in-app creative should display. You can trigger in-app messages to display at session start. You can also trigger in-app messages to display when a particular event is tagged using the event name alone or using the event name combined with attribute conditions.
Sometimes, you just want to display an in-app message, but there is not an existing event tag of which to take advantage, and you don't want to create an additional event datapoint solely to display a message. In this situation, Localytics marketing triggers allow you to trigger in-app messages off of specific user behaviors that you do not have tagged as an event in the Localytics dashboard.
There are a variety of scenarios where these triggers might be relevant:
- You have a lot of Summary Events tagged, and Summary Events do not allow for granular behavioral triggering of messages.
- You do not want to pass a particular behavior as an Event to the Localytics dashboard because the behavior is so frequent that an Event tag would incur high data point usage.
Instrumenting marketing triggers
Instrumenting Marketing Triggers in the app’s code base is simple. It’s essentially the same as tagging an Event, but rather than using [Localytics.tagEvent_Name] you will use the following
Localytics.triggerInAppMessage("Item Purchased");
Marketing triggers with attributes
To create a trigger with additional attribute conditions, use
Map<String, String> values = new HashMap<String, String>();
values.put("Item Name", "Stickers");
Localytics.triggerInAppMessage("Item Purchased", values);
Localytics.triggerInAppMessage("Item Purchased", mapOf(
  "Item Name" to "Stickers"
))
Because there’s no data about that trigger in the Localytics backend, you’ll need to manually send the trigger attribute mappings to Localytics via a reported Event instead, at least one time. Essentially, you must fire an actual Event that reaches Localytics server once. You can do this by:
For one session tied to your app key - for example, just in your dev build but tagged with your production key temporarily - switch that triggerInAppMessage call to a standard tagEvent call instead, and run the app through that code to actually send the event to Localytics.
This will populate the event name and attributes in the autocomplete dialog within 10 minutes. Then you can switch the tag back from tagEvent to triggerInAppMessage. From there, you will be able to target on the trigger & attributes as if it were a normal event in the dashboard.
Selecting marketing triggers in the dashboard
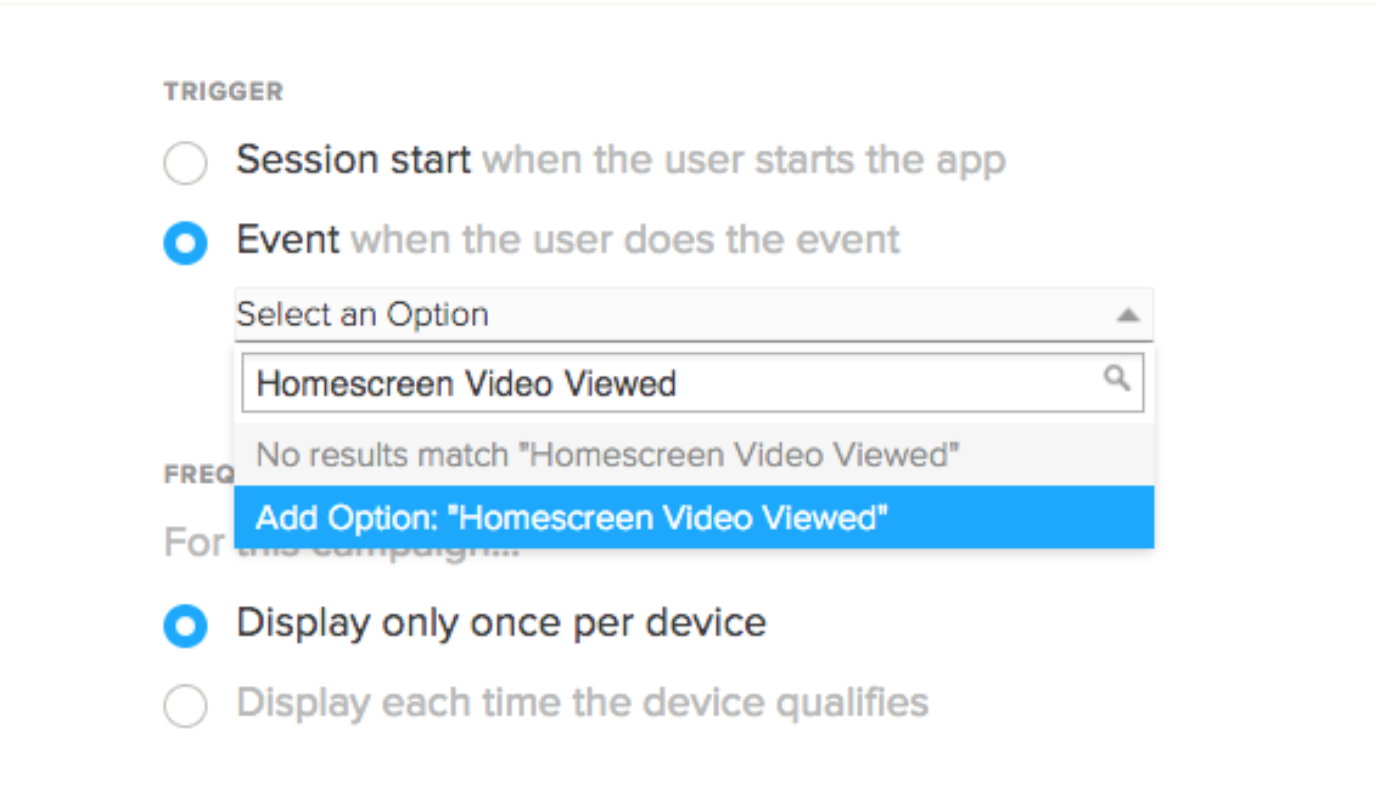
Once the marketing trigger has been instrumented in the app’s code base, you can use these to trigger in-app messages in the Localytics dashboard. When you get to the Scheduling page of the campaign setup process, you will chose the “Event” trigger. For these marketing triggers, you will need to type in the name of the marketing trigger in the drop down (as seen below) - it will not automatically populate as the dashboard events do.
Customizing in-app messages
Customize In-Apps using HTML (SDK 5.4+)
As of SDK 5.4 you can modify some native elements of In App messages by modifying the index.html file of your creative. To do so, attach a data-localytics attribute to the meta name="viewport" element. The attributes should be a String containing a number of key values seperated by commas. An example might look as follows:
<html>
  <head>
    <meta http-equiv="content-type" content="text/html; charset=utf-8" />
    <meta name="viewport" content="width=device-width, initial-scale=1.0" data-localytics="notch_fullscreen=true, close_button_visibility=visible, close_button_position=right, offset=50, aspect_ratio=1.5, background_alpha=0.8 video_conversion_percentage=80" />
The list of available modifications is as follows:
- close_button_visibility: Modify the visibility of the dismiss button. Valid values are hidden and visible. This option should only be used if the creative provides it's own close button.
- close_button_position: Modify the position of the dismiss button. Valid values are right and left.
- banner_offset: Only relevant to banner In App campaigns, this key defines an offset in density independent pixel from the top or bottom of the screen. Valid values are any positive integer value.
- aspect_ratio: Only relevant to center In App campaigns, this key modifies the aspect ratio of the native window. Valid values are any float, although we suggest keeping the range within 1.0 and 3.0. Starting in SDK 5.6, this attribute also applies to banner campaigns.
- background_alpha: Only relevant to fullscreen and center In App campaigns, this key modifies the transparency of the native window. Valid values are any float between 0.0 (transparent) and 1.0 (opaque).
- notch_fullscreen: Only available in SDK 5.6 and up - Only relevant to fullscreen In App campaigns, this key modifies if the In App will render across the entirety of the screen (outside of the safe area) on devices with a notch such as the Pixel 3 XL. If set to true, this will render into the space surrounding the notch.
- video_conversion_percentage: Only available in SDK 5.7 and up - If a video is present in the campaign, this sets a percentage of the video, that is watched will trigger the Localytics SDK to tag a Localytics Video Played event.
Customize In-Apps with a Callback
Using a messaging callback, as described in the advanced section, can allow for customization of individual in-apps right before they are shown to the user. The list of configurable properties are available on an object passed through the callback, the InAppConfiguration. Modification of these values will result in different displays for an individual creative. The list is as follows:
- Aspect Ratio: The value passed in should be a float value representing a ratio of height to width. This property is only relevant for center in-app creatives and banner creatives in SDK 5.6+.
- Offset: The value passed in should always be a positive density independent pixel offset from the top or bottom of the screen. This property is only relevant for top and bottom banner in-app creatives.
- Background Alpha: The value passed in should be a float value between 0.0 (transparent) and 1.0 (opaque).
- Dismiss Button Image: The values passed in should be a reference to the app's Resource and either a Bitmap or a resource ID. This value will override any values set globally with Localytics.setInAppMessageDismissButtonImage().
- Dismiss Button Location: The value passed in should be either InAppMessageDismissButtonLocation.LEFT for in-app creatives with a dismiss button on the left, or InAppMessageDismissButtonLocation.RIGHT for in-app creatives with a dismiss button on the right. This value will override any values set globally with Localytics.setInAppMessageDismissButtonLocation().
- Dismiss Button Visibility: The value passed in should be an int corresponding to the values of View.GONE, View.INVISIBLE, or View.VISIBLE. If View.GONE or View.INVISIBLE is passed in then the dismiss button will be hidden for this in app creative.
A simple example of using the callbacks to modify an in-app creative may look as follows:
@NonNull
@Override
public InAppConfiguration localyticsWillDisplayInAppMessage(@NonNull final InAppCampaign campaign, @NonNull final InAppConfiguration configuration) {
  if (configuration.isCenterCampaign()) {
    configuration.setAspectRatio(1.2f);
  } else if (configuration.isTopBannerCampaign() || configuration .isBottomBannerCampaign()) {
    configuration.setBannerOffsetDps(50);
  }
  configuration.setBackgroundAlpha(0f);

  configuration.setDismissButtonImage(getResources(), R.id.dismiss_button_image);
  configuration.setDismissButtonLocation(Localytics.InAppMessageDismissButtonLocation.RIGHT);
  configuration.setDismissButtonVisibility(View.VISIBLE);

  return configuration;
}
fun localyticsWillDisplayInAppMessage(campaign: InAppCampaign, configuration: InAppConfiguration): InAppConfiguration {
  if (configuration.isCenterCampaign()) {
    configuration.setAspectRatio(1.2f)
  } else if (configuration.isTopBannerCampaign() || configuration.isBottomBannerCampaign()) {
    configuration.setBannerOffsetDps(50)
  }
  configuration.setBackgroundAlpha(0f)
  configuration.setDismissButtonImage(resources, R.id.dismiss_button_image)
  configuration.setDismissButtonLocation(Localytics.InAppMessageDismissButtonLocation.RIGHT)
  configuration.setDismissButtonVisibility(View.VISIBLE)
  return configuration
}
Custom Creative Javascript API
The Localytics SDK adds a localytics Javascript function to the in-app HTML that provides access to several native SDK methods and properties and handles URL navigation and in-app dismissal.
The localytics Javascript function is only added to the in-app after the web view has finished loading, and initial rendering has completed. As a result, if you are trying to render content based on Localytics data (such as a custom dimension), we suggest calling Localytics asynchronously and including some type of loading indicator.
The sections below cover the details of the in-app Javascript API. It is crucial to understand these APIs when designing and uploading your own custom creatives. Note: When using the in-app message builder, calls to these APIs will be handled automatically.
Properties Accessors
-
localytics.campaign (Only available on SDK 4.3 and later): Returns a Javascript object containing information about the campaign that triggered this In-App message. The javascript object contains the campaign name as it would appear on the dashboard (name), the campaign ID (campaignId), the name of the event that triggered the In-App (eventName), and the attribute keys and values tagged on the event or trigger that launched the in-app message (eventAttributes).
var campaign = localytics.campaign; // {"name": "App Upgrade Campaign", "campaignId": "449859", "eventName": "App Launch", "eventAttributes": {"isFirstSession": "NO"}};
-
localytics.identifiers: Returns a Javascript object containing a user's identifying data: customer_id, first_name, last_name, full_name, and email. Note: These values will only be populated if you have set them for the user directly via the SDK.
var identifiers = localytics.identifiers; // {"customer_id": "3neRKTxbNWYKM4NJ", "first_name": "John", "last_name": "Smith", "full_name": "Sir John Smith, III", "email": "sir.john@smith.com"};
-
localytics.customDimensions: Returns a Javascript object containing the current session's custom dimensions. The keys of the object will be "c0", "c1", etc. for dimensions that have been set.
var dimensions = localytics.customDimensions; // {"c0": "Paid", "c1": "Logged In"};
-
localytics.attributes: Returns a Javascript object containing the attribute keys and values tagged on the event or trigger that launched the in-app message.
var eventAttributes = localytics.attributes; // {"Team Name": "Celtics", "City": "Boston"};
-
localytics.libraryVersion: Returns the Localytics SDK version as a string.
var sdkVersion = localytics.libraryVersion; // "iOSa_4.3.0"
Methods
-
localytics.tagClickEvent(action) (Only available on SDK 4.3 and later): Tags an in-app clickthrough (also kown as a conversion) with an optional action attribute. If the action attribute is omitted, the default of click will be used. This method can only be called once per in-app. The first time this method is called an event will be recorded, and any subsequent calls will be ignored.
localytics.tagClickEvent("Share");
-
localytics.tagEvent(event, attributes, customerValueIncrease): Tags an event with optional attributes and an optional custom value increase.
function submitNPS(ratingValue) {
  var attributes = {"Raw Rating": ratingValue};
  if (ratingValue >= 9) {
    attributes["Rating"] = "Promoter";
  } else if (ratingValue <= 6) {
    attributes["Rating"] = "Detractor";
  } else {
    attributes["Rating"] = "Neutral";
  }
  localytics.tagEvent("In-App Rating Result", attributes);
}
-
localytics.setCustomDimension(index, value): Sets a custom dimension value for a particular index.
localytics.setCustomDimension(0, "Trial");
-
localytics.close(): Closes the in-app. If an in-app message viewed event hasn't been tagged (i.e. ampView), an event with ampAction equal to "X" will be tagged.
function formSubmit() {
  localytics.tagEvent("Form Submit", {"Email": "john@smith.com"});
  localytics.close();
}
-
localytics.setProfileAttribute(name, value, scope) (Only available on SDK 4.3 and later): Sets a profile attribute with an optional scope ("app" or "org").
localytics.setProfileAttribute("Favorite Team", "Red Sox", "app");
-
localytics.deleteProfileAttribute(name, scope) (Only available on SDK 4.3 and later): Delete a profile attribute with an optional scope ("app" or "org").
localytics.deleteProfileAttribute("Favorite Team", "app");
-
localytics.addProfileAttributesToSet(name, values, scope) (Only available on SDK 4.3 and later): Add profile attributes with an optional scope ("app" or "org").
localytics.addProfileAttributesToSet("Favorite Team", ["Red Sox", "Celtics"], "org");
-
localytics.removeProfileAttributesFromSet(name, values, scope) (Only available on SDK 4.3 and later): Remove profile attributes with an optional scope ("app" or "org").
localytics.removeProfileAttributesFromSet("Favorite Team", ["Red Sox", "Celtics"], "org");
-
localytics.incrementProfileAttribute(name, value, scope) (Only available on SDK 4.3 and later): Increment a profile attribute with an optional scope ("app" or "org").
localytics.incrementProfileAttribute("Age", 1, "app");
-
localytics.decrementProfileAttribute(name, value, scope) (Only available on SDK 4.3 and later): Decrement a profile attribute with an optional scope ("app" or "org").
localytics.decrementProfileAttribute("Days Until Graduation", 3, "org");
-
localytics.setCustomerFirstName(name, value, scope) (Only available on SDK 4.3 and later): Set the user's first name.
localytics.setCustomerFirstName("John");
-
localytics.setCustomerLastName(name, value, scope) (Only available on SDK 4.3 and later): Set the user's last name.
localytics.setCustomerLastName("Smith");
-
localytics.setCustomerFullName(name, value, scope) (Only available on SDK 4.3 and later): Set the user's full name.
localytics.setCustomerFullName("Sir John Smith, III");
-
localytics.setCustomerEmail(name, value, scope) (Only available on SDK 4.3 and later): Set the user's email.
localytics.setCustomerEmail("sir.john@smith.com");
-
localytics.setOptedOut(optedOut) (Only available on SDK 5.2 and later): Opt the user into or out of data collection. See the advanced section for more details on the implications of this call.
localytics.setOptedOut([true/false]);
-
localytics.setPrivacyOptedOut(optedOut) (Only available on SDK 5.2 and later): Opt the user into or out of data collection. See the advanced section for more details on the implications of this call.
localytics.setPrivacyOptedOut([true/false]);
-
localytics.getIdentifiers() (Only available on SDK 5.2 and later): Returns a String representing a Javascript object that contains a user's identifying data: customer_id, first_name, last_name, full_name, and email. Note: These values will only be populated if you have set them for the user directly via the SDK. To retrieve values from this object, you will need to call JSON.parse().
var localyticsIdentifiers = JSON.parse(localytics.getIdentifiers()); //{"customer_id": "3neRKTxbNWYKM4NJ", "first_name": "John", "last_name": "Smith", "full_name": "Sir John Smith, III", "email": "sir.john@smith.com"};
-
localytics.getIdentifier(identifier) (Only available on SDK 5.2 and later): Returns the specific value that corresponds to the identifier requested, or null if nothing has been set. Possible keys include: customer_id, first_name, last_name, full_name,and email. Note: These values will only be populated if you have set them for the user directly via the SDK.
var customerId = localytics.getIdentifier('customer_id'); //"3neRKTxbNWYKM4NJ"
-
localytics.getCustomDimensions() (Only available on SDK 5.2 and later): Returns a String representing a Javascript object that contains the custom dimensions that have been set for this device. Keys for this dictionary can be values between c0 and c19. Note: These values will only be populated if you have set them for the device directly via the SDK. To retrieve values from this object, you will need to call JSON.parse().
var localyticsCustomDimensions = JSON.parse(localytics.getCustomDimensions());
var customDimension1 = localyticsCustomDimensions['c1']; // {"c0": "Paid", "c1": "Logged In"};
-
localytics.getCustomDimension(dimension) (Only available on SDK 5.2 and later): Returns the specific value that corresponds to the dimension requested, or null if nothing has been set. Note: These values will only be populated if you have set them for the user directly via the SDK.
var customDimension1 = localytics.getCustomDimension(1); //"Logged In"
-
localytics.getEventAttributes() (Only available on SDK 5.2 and later): Returns a String representing a Javascript object that contains the attribute keys and values tagged on the event or trigger that launched the in-app message. Note: To retrieve values from this object, you will need to call JSON.parse().
var localyticsEventAttributes = JSON.parse(localytics.getEventAttributes()); // {"Team Name": "Celtics", "City": "Boston"};
-
localytics.getCampaign() (Only available on SDK 5.2 and later): Returns a String representing a Javascript object that contains information about the campaign that triggered this In-App message. The javascript object contains the campaign name as it would appear on the dashboard (name), the campaign ID (campaignId), the name of the event that triggered the In-App (eventName), and the attribute keys and values tagged on the event or trigger that launched the in-app message (eventAttributes). Note: To retrieve values from this object, you will need to call JSON.parse().
var localyticsCamapign = JSON.parse(localytics.getCampaign()); // {"name": "App Upgrade Campaign", "campaignId": "449859", "eventName": "App Launch", "eventAttributes": {"isFirstSession": "NO"}};
-
localytics.getLibraryVersion() (Only available on SDK 5.2 and later): Returns the Localytics SDK version as a string.
var libraryVersion = localytics.getLibraryVersion(); //"androida_5.2.0"
-
localytics.getLocationAuthorizationStatus() (Only available on SDK 5.3 and later): Returns the devices current location authorization status (true/false).
var locationAuthorized = localytics.getLocationAuthorizationStatus(); //"true"
-
localytics.getNotificationAuthorizationStatus() (Only available on SDK 5.3 and later): Returns the devices current notification authorization status (true/false).
var locationAuthorized = localytics.getNotificationAuthorizationStatus(); //"true"
-
localytics.getSystemGestureInsets() (Only available on SDK 5.6 and later): Returns a String representing a Javascript object that contains the devices system gesture insets, or the area of the device that touch events may be overridden by system gestures. The value is a representation in pixels that may be affected from the edge of the device. It may be best to ensure certain UI elements (such as sliders) are not rendered into this area.
var systemGestureInsets = JSON.parse(localytics.getSystemGestureInsets()); //{"top": 0, "bottom": 0, "left": 100, "right": 0};
-
localytics.promptForNotificationPermissions(action) (Only available on SDK 6.3.7 and later): Prompt the user for notification permissions using the OS specific permission prompt. This method can only be called once per in-app. The first time this method is called it will tag a conversion event with the action parameter, prompt the user for notification permissions, and then dismiss the In-App. If the action attribute is omitted, the default of click will be used as the conversion event.
localytics.promptForNotificationPermissions("Notification Prompt Accepted");
This method will not prompt the user for Notification permissions if any of the following are true:
- If the device is running an Android OS Version below 13.
- If the AndroidManifest.xml is missing the permission android.permission.POST_NOTIFICATIONS
- If the permission has already been granted.
- If the permission has been denied and the user has requested that no more prompts be shown.
-
localytics.promptForLocationPermissions(action) (Only available on SDK 5.2 and later): Prompt the user for location permissions using the OS specific permission prompt. This method can only be called once per in-app. The first time this method is called it will tag a conversion event with the action parameter, prompt the user for location permissions, and then dismiss the In-App. If the action attribute is omitted, the default of click will be used as the conversion event.
localytics.promptForLocationPermissions("Location Prompt Accepted");
This method will not prompt the user for Location permissions if any of the following are true:
- If the AndroidManifest.xml is missing the permission android.permission.ACCESS_FINE_LOCATION
- If the permission has already been granted.
- If the permission has been denied and the user has requested that no more prompts be shown.
-
localytics.promptForLocationAlwaysPermissions(action) (Only available on SDK 5.6 and later): Prompt the user for background location permissions on Android Q using the OS specific permission prompt. This method can only be called once per In-App. The first time this method is called it will tag a conversion event with the action parameter, prompt the user for location permissions, and then dismiss the In-App. If the action attribute is omitted, the default of click will be used as the conversion event.
localytics.promptForLocationAlwaysPermissions("Location Prompt Accepted");
This method will not prompt the user for Location permissions if any of the following are true:
- If the AndroidManifest.xml is missing the permission android.permission.ACCESS_FINE_LOCATION or android.permission.ACCESS_BACKGROUND_LOCATION
- If the permissions have already been granted.
- If the permissions have been denied and the user has requested that no more prompts be shown.
-
localytics.promptForLocationWhenInUsePermissions(action) (Only available on SDK 5.6 and later): Prompt the user for location permissions when the app is in use using the OS specific permission prompt. This method can only be called once per in-app. The first time this method is called it will tag a conversion event with the action parameter, prompt the user for location permissions, and then dismiss the In-App. If the action attribute is omitted, the default of click will be used as the conversion event.
localytics.promptForLocationWhenInUsePermissions("Location Prompt Accepted");
This method will not prompt the user for Location permissions if any of the following are true:
- If the AndroidManifest.xml is missing the permission android.permission.ACCESS_FINE_LOCATION
- If the the permission has already been granted.
- If the the permission has been denied and the user has requested that no more prompts be shown.
-
localytics.deeplinkToSettings(action) (Only available on SDK 5.3 and later): Trigger a deeplink to the phone's settings screen. This method can only be called once per in-app. The first time this method is called it will tag a conversion event with the action parameter and then deeplink to the settings page. If the action attribute is omitted, the default of click will be used as the conversion event.
localytics.deeplinkToSettings("Deeplink");
-
localytics.deeplinkToNotificationSettings(action) (Only available on SDK 5.3 and later): Trigger a deeplink to the phone's notification specific settings screen. This method can only be called once per in-app. The first time this method is called it will tag a conversion event with the action parameter and then deeplink to the notification specific settings page. If the action attribute is omitted, the default of click will be used as the conversion event.
localytics.deeplinkToNotificationSettings("Deeplink");
Push messaging
Push messaging allows you to keep your users up-to-date and reengage them with your app after periods of inactivity.
Before continuing, please be sure that you have completed all of the steps in Getting Started. If you are already using Firebase Cloud Messaging follow our custom push configuration instructions.
If you are using the v4 version of the Localytics SDK, follow our guide for Push messaging in v4 in the Legacy SDKs section.
Localytics push messaging can be integrated with Firebase Cloud Messaging (FCM). FCM is the latest push platform for Android and is fully supported. To use FCM, follow our Firebase Cloud Messaging Integration guide.
Firebase Cloud Messaging Integration
A sample project for using Localytics with Firebase Cloud Messaging is available in our Android samples Github repository.
1. Add Firebase to your Android project
Follow the instructions for Adding Firebase to your Android project. Ensure that you have followed both steps for Adding Firebase to your app and Adding the SDK.
2. Add the Firebase Cloud Messaging dependency
Update your project's app-level build.gradle to include the dependency for Firebase Cloud Messaging (FCM) as follows.
dependencies {
  implementation 'com.android.support:support-compat:26.0.2'
  implementation 'com.google.firebase:firebase-messaging:17.1.0'
  implementation 'com.google.android.gms:play-services-ads-identifier:18.2.0'
  implementation 'com.localytics.androidx:library:6.2+'
  implementation 'com.android.installreferrer:installreferrer:1.1'
}
3. Existing FirebaseMessagingService
If you already have a FirebaseMessagingService in your codebase, you can add Localytics push notification handling directly within your existing service.
Implement the onNewToken callback to listen for when the push token is updated and pass that new token to Localytics:
@Override
public void onNewToken(String token) {
    super.onNewToken(token);
    Localytics.setPushRegistrationId(token);
}
override fun onNewToken(token: String) {
  super.onNewToken(token);
  Localytics.setPushRegistrationId(token);
}
Use the following code snippet in your onMessageReceived method to check whether an incoming message originated from Localytics and handle it accordingly:
/**
 * Localytics.handleFirebaseMessage will return true if Localytics identified the message
 * as one originating from Localytics. If it returns false, you should handle the message yourself.
 */
@Override
public void onMessageReceived(RemoteMessage remoteMessage) {
  Map<String, String> data = remoteMessage.getData();
  if (Localytics.handleFirebaseMessage(data)) {
    // Localytics handled the message; no need to continue.
    return;
  } else {
    // The notification is not from Localytics or the Firebase Dashboard, so the app must handle it.
    renderYourAppLevelPush(data.get("message"));
  }
}
/**
 * Localytics.handleFirebaseMessage will return true if Localytics identified the message
 * as one originating from Localytics. If it returns false, you should handle the message yourself.
 */
override fun onMessageReceived(remoteMessage: RemoteMessage) {
  val data = remoteMessage.data
  if (Localytics.handleFirebaseMessage(data)) {
    // Localytics handled the message; no need to continue.
    return
  } else {
    // The notification is not from Localytics or the Firebase Dashboard, so the app must handle it.
    renderYourAppLevelPush(data["message"])
  }
}
4. Update the localytics.xml file
The localytics.xml file allows for easy integration of the default Localytics Firebase receivers. Set the following keys to ensure a proper push integration depending on your installation:
-
ll_fcm_push_services_enabled to true.
If you installed via Maven,
Localytics FirebaseService will be included in your manifest. This service will handle collecting
of push tokens as well as the rendering of incoming notifications from FCM.
Otherwise, if you installed the SDK manually, you will need to include the following in your manifest:
  <intent-filter>
    <action android:name="com.google.firebase.INSTANCE_ID_EVENT"/>
  </intent-filter>
</service>

<service android:name="com.localytics.androidx.FirebaseService"
    android:exported="true"
    android:enabled="true">
  <intent-filter>
    <action android:name="com.google.firebase.MESSAGING_EVENT"/>
  </intent-filter>
</service>
-
ll_push_tracking_activity_enabled to true.
If you installed the SDK manually, you will need to include the following in your manifest:
<activity android:name="com.localytics.androidx.PushTrackingActivity"
  android:enabled="true"/>
Note, that the PushTrackingActivity is launched through a pending intent that has the following flags: Intent.FLAG_ACTIVITY_NEW_TASK and Intent.FLAG_ACTIVITY_CLEAR_TASK, those two flags will ensure that if the app is running and the user presses the notification for action, the app tasks will all be closed and the PushTrackingActivity will lanch as the first activity. if you don't like this behavior and don't want your current activity to be closed you can follow this technique, And include the following in your manifest:
<activity
    android:name="com.localytics.androidx.PushTrackingActivity"
    android:enabled="@bool/ll_push_tracking_activity_enabled"
    android:exported="false"
    android:launchMode="singleTask"
    android:taskAffinity=""
    android:excludeFromRecents="true"/>
- ll_default_push_channel_id: Set this value to define the notification channel that push messaging will use if no channel is set in the dashboard.
- ll_default_push_channel_name: Set this value to define the notification channel's name that push messaging will use if no channel is set in the dashboard. This name will be visible to the end user.
- ll_default_push_channel_description: Set this value to define the notification channel's description that push messaging will use if no channel is set in the dashboard. This description will be visible to the end user.
If you are using multiple push providers, or prefer to handle push token registration and rendering manually, then set the value of ll_fcm_push_services_enabled to false and refer to Using Custom FCM Services in the advanced section for setup.
5. Handling Notification Permissions in Android
Effective with Android 13 (API level 33), applications are required to request the POST_NOTIFICATIONS permission to send notifications. The following outlines how to manage notification permissions, including code snippets for both Java and Kotlin.
-
Android Versions Below 13:
No explicit permission is necessary for sending notifications.
-
Android 13 and Above:
Applications must request the POST_NOTIFICATIONS permission at runtime. Users have the option to grant or deny this permission.
import android.Manifest;
import android.content.pm.PackageManager;
import android.os.Build;
import android.annotation.RequiresApi;
import androidx.core.app.ActivityCompat;
import androidx.core.content.ContextCompat;

public class NotificationPermissionHelper {

    private static final int NOTIFICATION_PERMISSION_REQUEST_CODE = 100;

    public static void requestNotificationPermission(Activity activity) {
        if (Build.VERSION.SDK_INT >= Build.VERSION_CODES.TIRAMISU) {
            if (ContextCompat.checkSelfPermission(activity,
                    Manifest.permission.POST_NOTIFICATIONS)
                    != PackageManager.PERMISSION_GRANTED) {
                ActivityCompat.requestPermissions(activity,
                        new String[]{Manifest.permission.POST_NOTIFICATIONS},
                        NOTIFICATION_PERMISSION_REQUEST_CODE);
            }
        }
    }

    @RequiresApi(api = Build.VERSION_CODES.TIRAMISU)
    public static boolean isNotificationPermissionGranted(Context context) {
        return ContextCompat.checkSelfPermission(context,
                Manifest.permission.POST_NOTIFICATIONS)
                == PackageManager.PERMISSION_GRANTED;
    }
}
import android.Manifest
import android.content.pm.PackageManager
import android.os.Build
import androidx.core.app.ActivityCompat
import androidx.core.content.ContextCompat

object NotificationPermissionHelper {

    private const val NOTIFICATION_PERMISSION_REQUEST_CODE = 100

    fun requestNotificationPermission(activity: Activity) {
        if (Build.VERSION.SDK_INT >= Build.VERSION_CODES.TIRAMISU) {
            if (ContextCompat.checkSelfPermission(activity,
                    Manifest.permission.POST_NOTIFICATIONS)
                    != PackageManager.PERMISSION_GRANTED) {
                ActivityCompat.requestPermissions(
                    activity,
                    arrayOf(Manifest.permission.POST_NOTIFICATIONS),
                    NOTIFICATION_PERMISSION_REQUEST_CODE
                )
            }
        }
    }

    fun isNotificationPermissionGranted(context: Context): Boolean {
        return if (Build.VERSION.SDK_INT >= Build.VERSION_CODES.TIRAMISU) {
            ContextCompat.checkSelfPermission(context,
                Manifest.permission.POST_NOTIFICATIONS)
                == PackageManager.PERMISSION_GRANTED
        } else {
            true
        }
    }
}
6. Register for push notifications in your app
Register for push within onCreate() of your app's MainActivity.
Localytics.registerPush();
Also, make sure that the user's device has the latest version of Google Play Services installed by following our guide for updating Play Services.
7. Add your server API key to the Localytics Dashboard
-
Retrieve your server API key from your Firebase project's settings as shown in the steps in the image below.

-
Log in to the Localytics Dashboard, navigate to Settings > Apps, and input your server API key within Add Certs as shown in the steps in the image below.
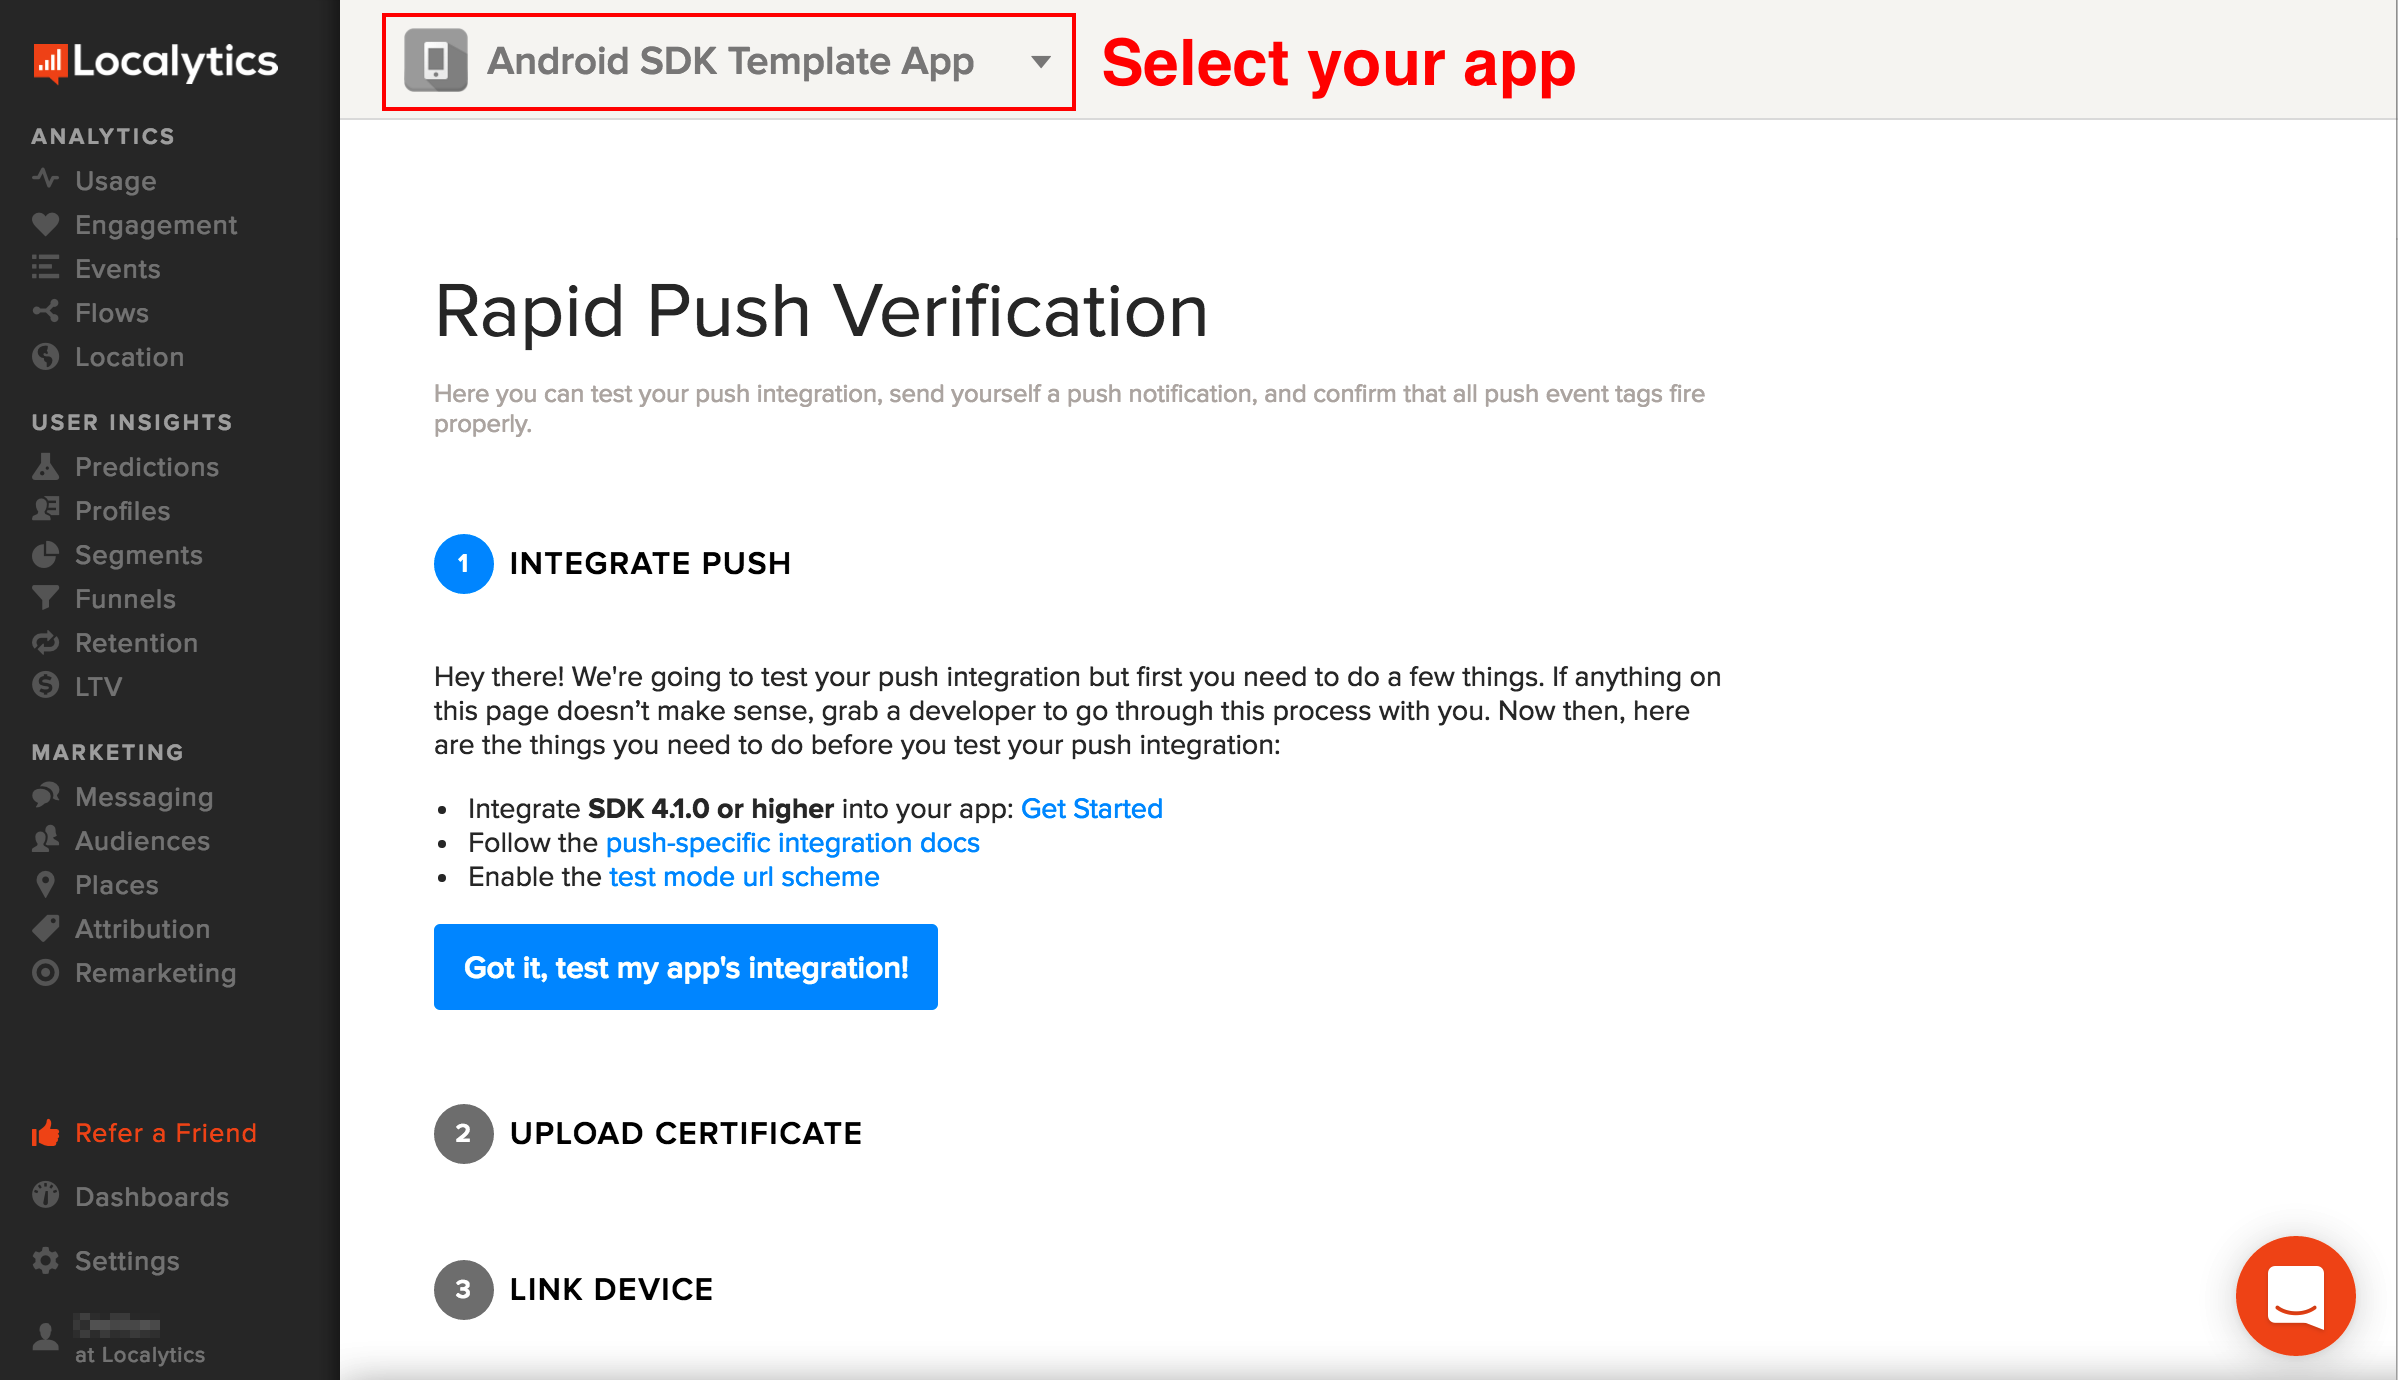
8. Test push integration
If you have integrated SDK version 4.1 or later, use the Rapid Push Verification page to confirm that you have integrated push correctly. Be sure to select the correct app in the dropdown at the top of the page.
9. Next steps
Since the release of Lollipop (API 21), the material design style dictates that all non-alpha channels in notification icons be ignored. Therefore, depending on the shape of your app icon, your notification icon may not appear as desired on devices running Lollipop or later. To change the notification icon and accent color, use MessagingListener#localyticsWillShowPushNotification to modify the NotificationCompat.Builder to meet your UI needs by following the steps in Modifying push notifications.
Notification Channels
Android O introduced support for notification channels. These are displayed as "categories" throughout the system interface and are ways for users to subscribe to certain types of notifications that you specify.
If you do not specify a channel in your push campaign, Localytics SDK (v4.5 and up) will create and use a default channel for Localytics messages for all apps targeting and running on Android O. On SDK 5.0, the default channel can be configured using the localytics.xml file.
To set the proper channel id, name, and description, use the ll_default_push_channel_id, ll_default_push_channel_name, and ll_default_push_channel_description keys respectively. You can still support channels on versions of the SDK below v5.0 by modifying your app code.
Rich Push
To send rich pushes on Android using SDK versions 4.3 and higher, there is no additional setup required within your app. If you are using an SDK version below 4.3, you can still send rich pushes by handling the key ll_attachment_url while you're rendering the notification:
// handle an intent that starts a Service, parse the url, and load it into an image
private void handleIntent(final Intent intent) {
  if (!TextUtils.isEmpty(intent.getStringExtra("ll_attachment_url"))) {
    String attachmentUrl = intent.getStringExtra("ll_attachment_url")

    MyImageLoader.setOnBitMapLoaded(new onBitMapLoadedListener() {
      public void onBitMapLoaded(Bitmap bitmap) {
        showNotification(intent, bitmap);
      }
    });

    MyImageLoader.load(attachmentUrl);
  }
}

// set the image while rendering the notification
public void showNotification(Intent intent, Bitmap bitmap) {
  // ...
  if (bitmap != null) {
    builder.setStyle(
      new NotificationCompat.BigPictureStyle().bigPicture(bitmap).setSummaryText(message));
  } else {
    builder.setStyle(new NotificationCompat.BigTextStyle().bigText(message));
  }
  // ...
}
// handle an intent that starts a Service, parse the url, and load it into an image
private fun handleIntent(intent: Intent) {
  if (intent.getStringExtra("ll_attachment_url").isNullOrEmpty()) {
    val attachmentUrl: String = intent.getStringExtra("ll_attachment_url")

    MyImageLoader.setOnBitMapLoaded(onBitMapLoadedListener() {
      override fun onBitMapLoaded(bitmap: Bitmap) {
        showNotification(intent, bitmap);
      }
    });

    MyImageLoader.load(attachmentUrl);
  }
}

fun showNotification(intent: Intent?, bitmap: Bitmap?) {
  // ...
  if (bitmap != null) {
    builder.setStyle(NotificationCompat.BigPictureStyle().bigPicture(bitmap).setSummaryText(message))
  } else {
    builder.setStyle(NotificationCompat.BigTextStyle().bigText(message))
  }
  // ...
}
You can check out our github project for a sample that contains custom notification handling.
App Inbox
App Inbox allows you to deliver personalized content to users through a dedicated inbox inside your app. Create Inbox Campaigns using templated or custom HTML creatives from within the Localytics Dashboard. Inbox messages will display in your users' inbox for a scheduled amount of time.
Before continuing, please be sure that you have completed all of the steps in Getting Started.
To add App Inbox to your app you need to include a list of inbox messages within your app's user interface and then handle displaying the inbox message detail view. The instructions below will walk your through the process.
1. Include a list of inbox messages
You have 2 options for adding a list of inbox messages to your app:
- Using InboxListAdapter, which is the recommended and simplest approach.
- Getting inbox campaigns from the Localytics class static methods and displaying them in your own View.
Using InboxListAdapter (recommended)
-
Add a ListView and a TextView to be used as the empty view to an Activity or Fragment layout as follows.
<?xml version="1.0" encoding="utf-8"?>
<FrameLayout
    xmlns:android="http://schemas.android.com/apk/res/android"
    android:layout_width="match_parent"
    android:layout_height="match_parent">

    <ListView
        android:id="@+id/lv_inbox"
        android:layout_width="match_parent"
        android:layout_height="match_parent"
        android:background="@android:color/white"
        android:divider="?android:attr/listDivider"/>

    <TextView
        android:id="@+id/tv_empty_inbox"
        android:layout_width="wrap_content"
        android:layout_height="wrap_content"
        android:layout_gravity="center"
        android:text="@string/no_messages"/>

</FrameLayout>
-
Set the TextView as the empty view of your ListView and then create an InboxListAdapter and set it as the Adapter of the ListView in your Activity or Fragment as follows.
@Override
protected void onCreate(Bundle savedInstanceState) {
	super.onCreate(savedInstanceState);
	setContentView(R.layout.activity_inbox);

	ListView listView = (ListView) findViewById(R.id.lv_inbox);
	listView.setEmptyView(findViewById(R.id.tv_empty_inbox));
	InboxListAdapter inboxListAdapter = new InboxListAdapter(this);
	listView.setAdapter(inboxListAdapter);

	// ...
}
override fun onCreate(savedInstanceState: Bundle?) {
	super.onCreate(savedInstanceState)
	setContentView(R.layout.activity_inbox)

	val listView: ListView = findViewById(R.id.lv_inbox) as ListView
	listView.setEmptyView(findViewById(R.id.tv_empty_inbox))

	val inboxListAdapter = InboxListAdapter(this)
	listView.setAdapter(inboxListAdapter)
	// ...
}
-
Tell the InboxListAdapter to retrieve campaign data as follows. You can optionally include a callback interface to be notified when the refresh has completed.
@Override
protected void onCreate(Bundle savedInstanceState) {
		// ...

		listView.setAdapter(inboxListAdapter);
		inboxListAdapter.getData(new InboxListAdapter.Listener() {
				@Override
				public void didFinishLoadingCampaigns() {
						// optionally hide a ProgressBar
				}
		});

		// ...
}
override fun onCreate(savedInstanceState: Bundle?) { // ...
	listView.setAdapter(inboxListAdapter)
	inboxListAdapter.getData(InboxListAdapter.Listener {
			// optionally hide a ProgressBar
	})
	// ...
}
Using your own View
If you prefer to not use InboxListAdapter, you can get inbox data directly via the Localytics class static methods. These methods are useful if you would rather use a RecyclerView or another interface for displaying a list of inbox messages.
To retrieve cached inbox campaign data, call Localytics.getDisplayableInboxCampaigns() from a background thread as follows.
new AsyncTask<Void, Void, List<InboxCampaign>>()
{
	@Override
	protected List<InboxCampaign> doInBackground(Void... params) {
		return Localytics.getDisplayableInboxCampaigns();
	}

	@Override
	protected void onPostExecute(List<InboxCampaign> campaigns) {
		// create UI using campaigns
	}
}.execute();
withContext(Dispatchers.Default) {
	val output = Localytics.getDisplayableInboxCampaigns()
	withContext(Dispatchers.Main) {
		//create UI using campaigns
	}
}
To refresh inbox campaign data from the network, call Localytics.refreshInboxCampaigns(InboxRefreshListener listener) as follows.
Localytics.refreshInboxCampaigns(new InboxRefreshListener() {
	@Override
	public void localyticsRefreshedInboxCampaigns(List<InboxCampaign> campaigns) {
		// refresh UI using campaigns
	}
});
Localytics.refreshInboxCampaigns {
	// refresh UI using campaigns
}
2. Display an inbox message detail view
If you are using the v3 version of the Localytics SDK, follow our guide for Displaying an inbox message detail view in v3 in the Legacy SDKs section.
You must use InboxDetailFragment or InboxDetailSupportFragment to display an inbox message detail view. These classes extend android.app.Fragment and android.support.v4.app.Fragment respectively. If your Activity extends FragmentActivity, ActionBarActivity, or AppCompatActivity use InboxDetailSupportFragment and the Android Support v4 FragmentManager. Otherwise, use InboxDetailFragment.
Create a new InboxDetailFragment using an InboxCampaign object as follows. If you need to use the Support Library, replace InboxDetailFragment with InboxDetailSupportFragment and getFragmentManager() with getSupportFragmentManager().
InboxCampaign campaign = /* campaign from InboxListAdapter or Localytics.getDisplayableInboxCampaigns */;
InboxDetailFragment fragment = InboxDetailFragment.newInstance(campaign);
val campaign: InboxCampaign = /* campaign from InboxListAdapter or Localytics.getDisplayableInboxCampaigns */
val fragment = InboxDetailFragment.newInstance(campaign)
If you are using InboxListAdapter, you should add an AdapterView.OnItemClickListener to your ListView that handles marking the campaign as read, refreshing the adapter, and showing the detail view in a separate Activity or Fragment as follows. The InboxCampaign class implements the Parcelable interface so you can add it to any Intent.
public class MyInboxActivity extends Activity implements AdapterView.OnItemClickListener
{
		@Override
		protected void onCreate(Bundle savedInstanceState) {
				super.onCreate(savedInstanceState);
				setContentView(R.layout.activity_inbox);

				ListView listView = (ListView) findViewById(R.id.lv_inbox);
				listView.setOnItemClickListener(this);
				InboxListAdapter inboxListAdapter = new InboxListAdapter(this, listView);
				listView.setAdapter(inboxListAdapter);
				inboxListAdapter.getData(null);
		}

		@Override
		public void onItemClick(AdapterView<?> parent, View view, int position, long id) {
				InboxListAdapter inboxListAdapter = (InboxListAdapter) parent.getAdapter();
				InboxCampaign campaign = inboxListAdapter.getItem(position);
				campaign.setRead(true);

				inboxListAdapter.notifyDataSetChanged();

				if (campaign.hasCreative()) {
						Intent intent = new Intent(this, MyInboxDetailActivity.class);
						intent.putExtra("campaign", campaign);
						startActivity(intent);
				} else {
						Localytics.inboxListItemTapped(campaign)
				}
		}
}
open class MyInboxActivity : Activity(), AdapterView.OnItemClickListener {
	override fun onCreate(savedInstanceState: Bundle?) {
		super.onCreate(savedInstanceState)
		setContentView(R.layout.activity_inbox)
		val listView: ListView = findViewById(R.id.lv_inbox) as ListView
		listView.setOnItemClickListener(this)
		val inboxListAdapter = InboxListAdapter(this, listView)
		listView.setAdapter(inboxListAdapter)
		inboxListAdapter.getData(null)
	}

	override fun onItemClick(parent: AdapterView<?>, view: View, position: Int, id: Long) {
		val inboxListAdapter: InboxListAdapter = parent.getAdapter() as InboxListAdapter
		val campaign: InboxCampaign = inboxListAdapter.getItem(position)
		campaign.setRead(true)

		inboxListAdapter.notifyDataSetChanged()

		if (campaign.hasCreative()) {
			val intent: Intent = Intent(this, MyInboxActivity::java.class)
			intent.putExtra("campaign", campaign)
			startActivity(intent)
		} else {
			Localytics.inboxListItemTapped(campaign)
		}
	}
}
public class MyInboxDetailActivity extends Activity {
		@Override
		protected void onCreate(Bundle savedInstanceState) {
				super.onCreate(savedInstanceState);
				setContentView(R.layout.activity_inbox_detail);

				if (savedInstanceState == null) {
						InboxCampaign campaign = getIntent().getParcelableExtra("campaign");
						InboxDetailFragment fragment = InboxDetailFragment.newInstance(campaign);
						getFragmentManager().beginTransaction()
										.add(R.id.container, fragment)
										.commit();
				}
		}
}
open class MyInboxActivity : Activity() {
	override fun onCreate(savedInstanceState: Bundle?) {
		super.onCreate(savedInstanceState);
		setContentView(R.layout.activity_inbox_detail);

		if (savedInstanceState == null) {
				val campaign: InboxCampaign = getIntent().getParcelableExtra("campaign");
				val fragment: InboxDetailFragment = InboxDetailFragment.newInstance(campaign);
				getFragmentManager()
					.beginTransaction()
					.add(R.id.container, fragment)
					.commit();
		}
	}
}
<?xml version="1.0" encoding="utf-8"?>
<FrameLayout
    xmlns:android="http://schemas.android.com/apk/res/android"
    android:id="@+id/container"
    android:layout_width="match_parent"
    android:layout_height="match_parent"/>
3. Customize the appearance and behavior
To match the look and feel of your app, there are several customization options available for App Inbox.
Changing fonts and color
To change the InboxListItem unread indicator color and text size, color, and font, subclass InboxListAdapter and override getView(int position, View convertView, ViewGroup parent) as follows.
public class MyInboxListAdapter extends InboxListAdapter {
		public MyInboxListAdapter(Context context) {
				super(context);
		}

		@Override
		public View getView(int position, View convertView, ViewGroup parent) {
				InboxListItem item;
				if (convertView == null) {
						item = new InboxListItem(getContext());

						// customize TextViews and UnreadIndicatorView
						item.getTitleTextView().setTextSize(TypedValue.COMPLEX_UNIT_SP, 16);
						item.getSummaryTextView().setTextColor(ContextCompat.getColor(getContext(), R.color.text_color));
						item.getUnreadIndicatorView().setColor(ContextCompat.getColor(getContext(), R.color.unread_color));
				} else {
						item = (InboxListItem) convertView;
				}

				item.populateViews(getItem(position), true);

				return item;
		}
}
open class MyInboxListAdapter : InboxListAdapter(context: Context) {
	override fun getView(position: Int, convertView: View, parent: ViewGroup): View {
		var item: InboxListItem
		if (convertView == null) {
			item = InboxListItem(getContext())

			// customize TextViews and UnreadIndicatorView
			item.getTitleTextView().setTextSize(TypedValue.COMPLEX_UNIT_SP, 16)
			item.getSummaryTextView().setTextColor(ContextCompat.getColor(getContext(), R.color.text_color))
			item.getUnreadIndicatorView().setColor(ContextCompat.getColor(getContext(), R.color.unread_color))
		} else {
			item = convertView as InboxListItem
		}

		item.populateViews(getItem(position), true)

		return item
	}
}
Manually managing thumbnails
To manually manage InboxListItem thumbnail downloading and caching, subclass InboxListAdapter and disable thumbnail downloading before you add it to the ListView. Next, override getView(int position, View convertView, ViewGroup parent) to handle thumbnail images as follows.
@Override
protected void onCreate(Bundle savedInstanceState) {
		super.onCreate(savedInstanceState);
		setContentView(R.layout.activity_inbox);

		ListView listView = (ListView) findViewById(R.id.lv_inbox);
		MyInboxListAdapter inboxListAdapter = new MyInboxListAdapter(this);
		inboxListAdapter.setDownloadsThumbnails(false);
		listView.setAdapter(inboxListAdapter);

		// ...
}
public class MyInboxListAdapter extends InboxListAdapter {
		public MyInboxListAdapter(Context context) {
				super(context);
		}

		@Override
		public View getView(int position, View convertView, ViewGroup parent) {
				if (convertView == null) {
						convertView = new InboxListItem(getContext());
				}

				InboxListItem item = (InboxListItem) convertView;
				InboxCampaign campaign = getItem(position);
				item.populateViews(campaign, false);

				ImageView thumbnailImageView = item.getThumbnailImageView();
				if (campaign.hasThumbnail()) {
						thumbnailImageView.setVisibility(View.VISIBLE);
						Uri thumbnailUri = campaign.getThumbnailUri();
						// load thumbnail URI into ImageView
				} else {
						thumbnailImageView.setImageURI(null);
						thumbnailImageView.setVisibility(View.GONE);
				}

				return item;
		}
}
override fun onCreate(savedInstanceState: Bundle?) {
	super.onCreate(savedInstanceState)
	setContentView(R.layout.activity_inbox)

	val listView: ListView = findViewById(R.id.lv_inbox) as ListView
	val inboxListAdapter = MyInboxListAdapter(this)

	inboxListAdapter.setDownloadsThumbnails(false)
	listView.setAdapter(inboxListAdapter)
	// ...
}
open class MyInboxListAdapter : InboxListAdapter(context: Context) {
	override fun getView(position: Int, convertView: View?, parent: ViewGroup?): View? {
		var convertView = convertView
		if (convertView == null) {
			convertView = InboxListItem(getContext())
		}
		val item = convertView as InboxListItem
		val campaign: InboxCampaign = getItem(position)

		item.populateViews(campaign, false)
		val thumbnailImageView: ImageView = item.thumbnailImageView
		if (campaign.hasThumbnail()) {
			thumbnailImageView.setVisibility(View.VISIBLE)
			val thumbnailUri: Uri? = campaign.thumbnailUri
			// load thumbnail URI into ImageView
		} else {
			thumbnailImageView.setImageURI(null)
			thumbnailImageView.setVisibility(View.GONE)
		}
		return item
	}
}
Using a custom list item view
To use your own inflated view within InboxListAdapter, subclass InboxListAdapter and disable thumbnail downloading before you add it to the ListView. Next, override getView(int position, View convertView, ViewGroup parent) to inflate and populate your own view as follows.
@Override
protected void onCreate(Bundle savedInstanceState) {
		super.onCreate(savedInstanceState);
		setContentView(R.layout.activity_inbox);

		ListView listView = (ListView) findViewById(R.id.lv_inbox);
		MyInboxListAdapter inboxListAdapter = new MyInboxListAdapter(this);
		inboxListAdapter.setDownloadsThumbnails(false);
		listView.setAdapter(inboxListAdapter);

		// ...
}
public class MyInboxListAdapter extends InboxListAdapter {
		public MyInboxListAdapter(Context context) {
				super(context);
		}

		@Override
		public View getView(int position, View convertView, ViewGroup parent) {
				if (convertView == null) {
						LayoutInflater inflater = (LayoutInflater) getContext()
										.getSystemService(Context.LAYOUT_INFLATER_SERVICE);
						convertView = inflater.inflate(R.layout.item_inbox, parent, false);
						convertView.setTag(new ViewHolder(convertView));
				}

				ViewHolder holder = (ViewHolder) convertView.getTag();
				InboxCampaign campaign = getItem(position);

				holder.title.setText(campaign.getTitle());
				holder.summary.setText(campaign.getSummary());

				return convertView;
		}

		static class ViewHolder {
				TextView title;
				TextView summary;

				public ViewHolder(View view) {
						title = (TextView) view.findViewById(R.id.tv_title);
						summary = (TextView) view.findViewById(R.id.tv_summary);
				}
		}
}
override fun onCreate(savedInstanceState: Bundle?) {
	super.onCreate(savedInstanceState)
	setContentView(R.layout.activity_inbox)
	val listView: ListView = findViewById(R.id.lv_inbox) as ListView
	val inboxListAdapter = MyInboxListAdapter(this)
	inboxListAdapter.setDownloadsThumbnails(false)
	listView.setAdapter(inboxListAdapter)
	// ...
}
open class MyInboxListAdapter : InboxListAdapter(context: Context) {
	override fun getView(position: Int, convertView: View?, parent: ViewGroup?): View? {
		var convertView = convertView
		if (convertView == null) {
				val inflater = context.getSystemService(Context.LAYOUT_INFLATER_SERVICE) as LayoutInflater
				convertView = inflater.inflate(R.layout.item_inbox, parent, false)
				convertView!!.tag = ViewHolder(convertView)
		}
		val holder: ViewHolder = convertView.tag as ViewHolder
		val campaign: InboxCampaign = getItem(position)
		holder.title.setText(campaign.title)
		holder.summary.setText(campaign.summary)
		return convertView
	}

	internal class ViewHolder(view: View) {
		var title: TextView
		var summary: TextView

		init {
			title = view.findViewById<View>(R.id.tv_title) as TextView
			summary = view.findViewById<View>(R.id.tv_summary) as TextView
		}
	}
}
Handling message detail errors
If you are using the v3 version of the Localytics SDK, follow our guide for Handling detail message errors in v3 in the Legacy SDKs section.
In rare cases the inbox message detail view may fail to load. By default, InboxDetailFragment will display a gray "X" in the center of the view when this occurs. To provide your own custom error view, implement the InboxDetailCallback interface in the attached Activity as follows.
public class MyInboxActivity extends Activity implements InboxDetailCallback
{
	@Override
	protected void onCreate(Bundle savedInstanceState) {
		super.onCreate(savedInstanceState);
		setContentView(R.layout.activity_inbox_campaign);

		if (savedInstanceState == null) {
				InboxCampaign campaign = getIntent().getParcelableExtra("campaign");
				InboxDetailFragment fragment = InboxDetailFragment.newInstance(campaign);
				getFragmentManager().beginTransaction()
								.add(R.id.container, fragment)
								.commit();
		}
	}

	@Override
	public void onCreativeLoadError() {
		findViewById(R.id.error_view).setVisibility(View.VISIBLE);
	}
}
class MyInboxActivity : Activity(), InboxDetailCallback {
	override fun onCreate(savedInstanceState: Bundle?) {
		super.onCreate(savedInstanceState)
		setContentView(R.layout.activity_inbox_campaign)
		if (savedInstanceState == null) {
				val campaign: InboxCampaign = intent.getParcelableExtra("campaign")
				val fragment = InboxDetailFragment.newInstance(campaign)
				fragmentManager.beginTransaction()
						.add(R.id.container, fragment)
						.commit()
		}
	}

	override fun onCreativeLoadError() {
		findViewById(R.id.error_view).setVisibility(View.VISIBLE)
	}
}
Deleting Inbox Campaigns (SDK v5.2+)
Starting in SDK v5.2 Inbox campaigns can be deleted. To delete an Inbox Campaign, you can call either of the following methods:
Localytics.deleteInboxCampaign(InboxCampaign campaign);
((InboxCampaign) campaign).delete();
Any deleted inbox campaign will not be considered displayable. As a result they will be excluded from the list of campaigns retrieved by calling getDisplayableInboxCampaigns, getInboxCampaigns and refreshInboxCampaigns. Additionally, they will be excluded from the count returned by getInboxCampaignsUnreadCount.
If you need the list of deleted Inbox campaigns, you can call Localytics.getAllInboxCampaigns() or Localytics.refreshAllInboxCampaigns() and filter for campaigns with the property deleted set to true.
Additionally, if you are using the Localytics provided inbox view, swiping to delete an item can be enabled by passing the ListView as an additional parameter to the InboxListAdapter.
@Override
protected void onCreate(Bundle savedInstanceState) {
		super.onCreate(savedInstanceState);
		setContentView(R.layout.activity_inbox);

		ListView listView = (ListView) findViewById(R.id.lv_inbox);
		listView.setOnItemClickListener(this);
		InboxListAdapter inboxListAdapter = new InboxListAdapter(this, listView);
		listView.setAdapter(inboxListAdapter);
		inboxListAdapter.getData(null);
}
override fun onCreate(savedInstanceState: Bundle?) {
	super.onCreate(savedInstanceState)
	setContentView(R.layout.activity_inbox)

	val listView: ListView = findViewById(R.id.lv_inbox) as ListView
	listView.setOnItemClickListener(this)
	val inboxListAdapter = InboxListAdapter(this, listView)
	listView.setAdapter(inboxListAdapter)
	inboxListAdapter.getData(null)
}
Places
One of the unique aspects of mobile is that users always have their devices with them. Places lets you take advantage of this by sending users content that's personalized to their current location. With Places, you can send notifications to users the instant they enter or exit a specific location. Additionally, you can analyze data about visits to physical locations, giving you access to insights that have never before been available. Read more about setting up Places geofences.
Before continuing, please be sure that you have completed all of the steps in Getting Started. If you want to manually monitor geofences, follow our custom places integration instructions.
1. Add the Google Play Services Location dependency
Update your project's app-level build.gradle to include the Google Play Services location dependency and the GCM dependency as follows.
dependencies {
  implementation 'com.android.support:support-compat:26.0.2'
  implementation 'com.google.android.gms:play-services-location:16.0.0'
  implementation 'com.google.android.gms:play-services-gcm:16.0.0'
  implementation 'com.google.android.gms:play-services-ads-identifier:18.2.0'
  implementation 'com.localytics.androidx:library:6.2+'
  implementation 'com.android.installreferrer:installreferrer:1.1'
}
2. Modify AndroidManifest.xml
Add the following to your AndroidManifest.xml as follows.
-
Permissions for accessing fine location and receiving boot completed intents above the application element.
<uses-permission android:name="android.permission.ACCESS_FINE_LOCATION" />
<uses-permission android:name="android.permission.RECEIVE_BOOT_COMPLETED" />
<uses-permission android:name="android.permission.ACCESS_BACKGROUND_LOCATION"/>
-
The Google Play Services version within the application element.
<meta-data
  android:name="com.google.android.gms.version"
  android:value="@integer/google_play_services_version" />
3. Update the localytics.xml file
The localytics.xml file allows for easy integration of the default Localytics places receivers. Set the following keys to ensure a proper places integration:
-
ll_places_enabled to true.
If you installed via Maven, this will include the
Localytics LocationUpdateReceiver and BootReceiver
to your manifest. These services will handle location updates, geofence triggers,
and restarting location monitoring when the app is restarted.
Otherwise, if you installed the SDK manually, you will need to include the following in your manifest:
<receiver android:name="com.localytics.androidx.LocationUpdateReceiver"
    android:enabled="true"/>

<receiver android:name="com.localytics.androidx.BootReceiver"
    android:enabled="true">
  <intent-filter>
    <action android:name="android.intent.action.BOOT_COMPLETED" />
  </intent-filter>
</receiver>
-
ll_push_tracking_activity_enabled to true.
If you installed the SDK manually, you will need to include the following in your manifest:
<activity android:name="com.localytics.androidx.PushTrackingActivity"
  android:enabled="true"/>
Note, that the PushTrackingActivity is launched through a pending intent that has the following flags: Intent.FLAG_ACTIVITY_NEW_TASK and Intent.FLAG_ACTIVITY_CLEAR_TASK, those two flags will ensure that if the app is running and the user presses the notification for action, the app tasks will all be closed and the PushTrackingActivity will lanch as the first activity. if you don't like this behavior and don't want your current activity to be closed you can follow this technique, And include the following in your manifest:
<activity
    android:name="com.localytics.androidx.PushTrackingActivity"
    android:enabled="@bool/ll_push_tracking_activity_enabled"
    android:exported="false"
    android:launchMode="singleTask"
    android:taskAffinity=""
    android:excludeFromRecents="true"/>
-
SDK v5.3+ only Optionally, you can set the ll_places_background_service_enabled key to true. Setting this value will enable the Localytics BackgroundService which will greatly improve the reliability of places.
Although Google Cloud Messaging has been deprecated and shut down, the client dependency still holds many useful tools, such as the GCMNetworkManager which are not deprecated and have not been moved. As a result, we will continue to use this client dependency. - ll_default_places_channel_id: Set this value to define the notification channel that places messaging will use if no channel is set in the dashboard.
- ll_default_places_channel_name: Set this value to define the notification channel's name that places messaging will use if no channel is set in the dashboard. This name will be visible to the end user.
- ll_default_places_channel_description: Set this value to define the notification channel's description that places messaging will use if no channel is set in the dashboard. The description will be visible to the user.
- ll_location_update_interval_minutes (Available in SDK 5.1+): Set this value to define the interval at which the Android OS should poll for location updates as defined in LocationRequest. The Localytics SDK expects a value in minutes, and will default to 10 minutes.
- ll_location_fastest_update_interval_minutes (Available in SDK 5.1+): Set this value to define the quickest interval at which the Android OS will return location updates as defined in LocationRequest. The Localytics SDK expects a value in minutes, and will default to 6 minute.
- ll_location_max_wait_time_minutes (Available in SDK 5.1+): Set this value to define the maximum interval at which the Android OS will wait to return location updates as defined in LocationRequest. The Localytics SDK expects a value in minutes, and will default to 3 times the ll_location_update_interval_minutes.
- ll_location_priority (Available in SDK 5.1+): Set this value to define the location update priority which the app will request location updates from the Android OS. This setting will directly affect location accuracy and battery drain within the app as defined in LocationRequest. The Localytics SDK expects a value equal to one of the integer values defined in LocationRequest. Those values are 100 (High Accuracy), 102 (Balanced Power and Accuracy) 104 (Low Power) or 105 (No Power) The Localytics SDK defaults to 102 (Balanced Power and Accuracy) and anything with lower accuracy could have dramatic negative impacts on the reliability of Places.
4. Enable location monitoring
Enable location monitoring in your Application class after integrating Localytics as follows.
For SDK v6.4.5 and below, use the following code:
@Override
  public void onCreate() {
    super.onCreate();

    Localytics.autoIntegrate(this);
    Localytics.setLocationMonitoringEnabled(true);
  }
override fun onCreate() {
  super.onCreate()

  Localytics.autoIntegrate(this)
  Localytics.setLocationMonitoringEnabled(true)
}
For SDK v7.0.0 and above, use the following code:
@Override
public void onCreate() {
super.onCreate();

new Localytics.Builder()
.setLocationMonitoringEnabled(true);
.autoIntegrate(this);

}
override fun onCreate() {
super.onCreate()

Localytics.Builder()
.setLocationMonitoringEnabled(true)
.autoIntegrate(this);

}
For customers who grant their users the ability to opt out of data collection, please refer to with integration in the advanced section.
5. Make sure the user has the latest Google Play Services
Follow the guide on updating Google Play Services.
6. Request location permissions for Android Marshmallow
If you app is targeting Marshmallow (targetSdkVersion of 23 or higher), you need to request location permissions at runtime. If the reason that your app needs location permissions is not obvious, we recommend showing the user an explanation before presenting the permission prompt.
Request the location permission at runtime as follows.
-
Create a unique request code for your Activity as follows.
private static final int REQUEST_LOCATION_PERMISSION = 101;
private val REQUEST_LOCATION_PERMISSION = 101
-
In your Activity check for the location permission and request it if it is not granted as follows.
if (ActivityCompat.checkSelfPermission(this, Manifest.permission.ACCESS_FINE_LOCATION) != PackageManager.PERMISSION_GRANTED) {
  ActivityCompat.requestPermissions(
    this,
    new String[] {Manifest.permission.ACCESS_FINE_LOCATION},
    REQUEST_LOCATION_PERMISSION
  );
}
if (ActivityCompat.checkSelfPermission(this, Manifest.permission.ACCESS_FINE_LOCATION) != PackageManager.PERMISSION_GRANTED) {
  ActivityCompat.requestPermissions(
    this,
    arrayOf(Manifest.permission.ACCESS_FINE_LOCATION),
    REQUEST_LOCATION_PERMISSION
  )
}
-
In your Activity handle the permissions request result as follows.
@Override
public void onRequestPermissionsResult(
    int requestCode,
    @NonNull String[] permissions,
    @NonNull int[] grantResults) {
  super.onRequestPermissionsResult(requestCode, permissions, grantResults);

  switch (requestCode) {
    case REQUEST_LOCATION_PERMISSION:
      if (permissions.length > 0 && permissions[0].equals(Manifest.permission.ACCESS_FINE_LOCATION)
            && grantResults[0] == PackageManager.PERMISSION_GRANTED) {
        Localytics.setLocationMonitoringEnabled(true);
      } else {
        // Show an explanation toast or dialog
        Toast.makeText(this, "The app needs location permissions to continue.", Toast.LENGTH_LONG).show();
      }
      break;
    }
  }
override fun onRequestPermissionsResult(requestCode: Int, permissions: Array<String>, grantResults: IntArray) {
  super.onRequestPermissionsResult(requestCode, permissions, grantResults)
  when (requestCode) {
    REQUEST_LOCATION_PERMISSION ->
      if (permissions.isNotEmpty() && permissions[0] == Manifest.permission.ACCESS_FINE_LOCATION && grantResults[0] == PackageManager.PERMISSION_GRANTED) {
          Localytics.setLocationMonitoringEnabled(true)
      } else { // Show an explanation toast or dialog
          Toast.makeText(this, "The app needs location permissions to continue.", Toast.LENGTH_LONG).show()
      }
  }
}
Uninstall Tracking
Localytics Uninstall Tracking reports an analytics event for users that uninstall your app at high accuracy within 24 hours. Those uninstalls can be used in charts, funnels, campaign performance reports, and remarketing so you can find and address the root causes of user loss.
Before continuing, please be sure that you have completed all of the steps in Getting Started and Push Messaging. You'll need a subscription to Uninstall Tracking to use this feature.
1. Register for a push token
Localytics Uninstall Tracking requires Localytics push integrated in your app. To properly track uninstalls for all users - regardless of notification permissions - you need to register for a push token as early as possible.
Basic Integration
Follow our standard guide for integrating push, ensuring you call Localytics.registerPush in your main Activity’s onCreate method.
Custom Integration
If your app is registering for push directly with FCM rather than using Localytics.registerPush, follow the Localytics custom push configuration instructions. Ensure your app registers with FCM and calls Localytics.setPushRegistrationId in your main Activity's onCreate.
2. Ensuring Your App Ignores Uninstall Tracking Pushes (Custom Integrations Only)
If you are performing any custom push notification handling or are integrating with other push providers, you should ensure that the Localytics silent uninstall tracking pushes do not trigger any local notification display in your code.
The Localytics uninstall tracking push includes a key/value of localyticsUninstallTrackingPush: "true" which you can use to detect when an app launch is coming from a background uninstall tracking push. Your application's onCreate will also be called if a push is received while the app is closed; if you are performing any server checks assuming that the app has been launched in the foreground by the user, you should prevent that if the app launch was triggered from an incoming push notification.
3. Provisioning Uninstalls
Once your app's integration has been set up, contact your account manager or our support team to enable Uninstall Tracking for your app. You'll need an active subscription to Uninstalls. Let us know which Localytics apps are configured for uninstalls so only apps that have completed integration are provisioned.
Tracking user flow
Track screens or views within your app so you can visualize user flow within the Localytics Dashboard. We recommend exhaustively tagging every visible view in your app.
The Localytics SDK will perform duplicate suppression on two identical tagged screens that occur in a row within a single session. For example, in the set of screens {"Screen 1", "Screen 1"}, the second screen would be suppressed. However, in the set {"Screen 1", "Screen 2", "Screen 1"}, no duplicate suppression would occur.
@Override
protected void onResume()
{
		super.onResume();
		Localytics.tagScreen("Item List");
}
protected override fun onResume() {
     super.onResume()
     Localytics.tagScreen("Item List")
 	}
Tracking revenue
There are two ways to think about Lifetime Value (LTV) in Localytics: monetary and non-monetary. If your app allows real currency transactions, our Dashboard can show LTV in USD. If your app uses virtual currencies like coins or tokens, you can configure your app to report LTV as the raw data you pass in.
You can configure each Mobile App in Localytics to have either a monetary value or raw data for Lifetime Value:
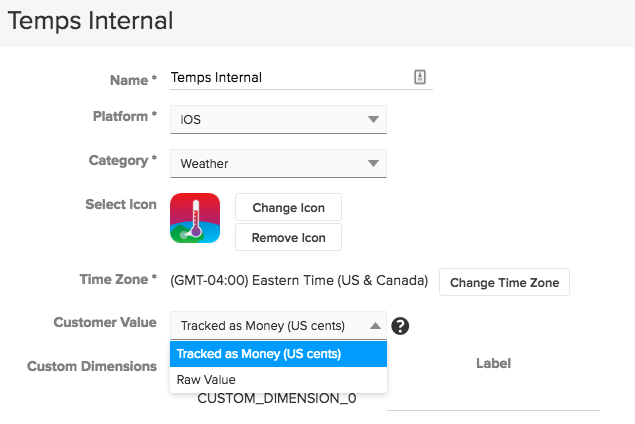
Tracking Monetary LTV
If you'd like to track LTV as monetary-based revenue, you should increment the value upon the completion of a purchase by the purchase amount. Make sure to configure your app in Localytics to show LTV as "Tracked as Money (US cents)".
LTV must be an integer amount, and the Localytics system requires you pass the number of USD cents as the LTV value in order to track money. For example, if the purchase amount is "USD $2.99", you should pass the integer "299" as the LTV. If the cents don't matter to you, feel free to round up to whole dollar values, but continue to pass the value as cents. If you want to track the rounded value of "USD $3.00", you should pass "300" as the value.
Currently, Localyics only allows LTV tracking in USD. If you want to track other currencies, you could convert the monetary amount to USD on the device before sending to Localytics.
Tracking Non-Monetary LTV
Another way to measure LTV is to track a non-monetary value important to your app. Examples include the number seconds spent engaged with content, or the amount of virtual currency earned. To track these values, send the corresponding integer value to Localytics. Make sure to configure your app in Localytics to show LTV as "Raw Value". Otherwise, Localytics will automatically divide your values by 100 and display a "$" in front of the values in the Dashboard.
LTV Examples
Increment user lifetime value (LTV) on any event using the optional LTV incrementer parameter as seen below.
You can increment LTV with our standard purchased and completed checkout events as follows. The item price and total price values will be used respectively.
Localytics.tagPurchased("Shirt", "sku-123", "Apparel", 15, extraAttributes);
Localytics.tagCompletedCheckout(50, 2, extraAttributes);
You can also increment LTV using a custom event by including a customer value increase value.
Map<String, String> values = new HashMap<String, String>();
values.put("Item name", "Stickers");
values.put("Aisle", "Knick-Knacks");
Localytics.tagEvent("Item Purchased", values, 499);
 val values = mapOf("Item Name" to "Stickers", "Aisle" to "Knick-Knacks"),
Localytics.tagEvent("Item Purchased", values, 499)
Setting custom dimensions
Custom dimensions are special fields that are used for splitting and filtering data within the Localytics Dashboard and are useful for storing user-level information. Custom dimensions are like sticky event attributes in the sense that once their value is set, it remains set until the value is changed again. Unlike event attributes, custom dimension values are attached to all three types of datapoints (session start, session close, and event) the same way that standard dimensions are which makes their values available within almost every report in the Localytics Dashboard.
Your app can have up to 20 custom dimensions, and they will be indexed between 0 and 19. Name all of your custom dimensions in the Localytics Dashboard > Settings > Apps > (find app) > Gear icon > Custom Dimensions.
Whenever a datapoint is created, all custom dimension values are attached to the datapoint. Therefore, it is ideal to set custom dimensions as soon as their value is known in all code paths in your app. It is not uncommon to use an analytics callback to set custom dimension values before the start of a session (and the creation of a "session start" datapoint).
Setting a value
Localytics.setCustomDimension(0, "Trial");
Initializing dimensions before session start
Set the value of all custom dimensions as early as possible in your app's code path even if you only set the value to "Not applicable" or "Not available". Having at least some value for each custom dimension instead of nothing will prevent the display of "[Unspecified]" values in the Dashboard and help to make it much more obvious to distinguish intentionally missing values from unintentionally missing values.
Use the AnalyticsListener to initialize your custom dimension values on the user's first session. The isFirst value will be true in the localyticsSessionWillOpen callback on the user's first session.
In your Application class implement the AnalyticsListener interface and set your default values in localyticsSessionWillOpen as follows.
For SDK v6.4.5 and below, use the following code:
public class MyApplication extends Application implements AnalyticsListener {

  @Override
  public void onCreate() {
    super.onCreate();

    Localytics.autoIntegrate(this);
    Localytics.setAnalyticsListener(this);
  }

  @Override
  public void localyticsSessionWillOpen(boolean isFirst, boolean isUpgrade, boolean isResume) {
    if (isFirst) {
      Localytics.setCustomDimension(0, "Logged Out");
      Localytics.setCustomDimension(1, "0");
    }
  }

  @Override
  public void localyticsSessionDidOpen(boolean isFirst, boolean isUpgrade, boolean isResume) {
  }

  @Override
  public void localyticsSessionWillClose() {
  }

  @Override
  public void localyticsDidTagEvent(String eventName, Map<String, String> attributes, long customerValueIncrease) {
  }
}
class MyApplication : Application(), AnalyticsListener {
  override fun onCreate() {
    super.onCreate();

    Localytics.autoIntegrate(this);
    Localytics.setAnalyticsListener(this);
  }

  override fun localyticsSessionWillOpen(isFirst: Boolean, isUpgrade: Boolean, isResume: Boolean) {
    if (isFirst) {
      Localytics.setCustomDimension(0, "Logged Out");
      Localytics.setCustomDimension(1, "0");
    }
  }

  override fun localyticsSessionDidOpen(isFirst: Boolean, isUpgrade: Boolean, isResume: Boolean) {}
  override fun localyticsSessionWillClose() {}
  override fun localyticsDidTagEvent(eventName: String, attributes: Map<String, String>, customerValueIncrease: Long) {}
}
Alternatively, you can use the AnalyticsListenerAdapter class to implement only localyticsSessionWillOpen as follows.
public class MyApplication extends Application {

  @Override
  public void onCreate() {
    super.onCreate();

    Localytics.autoIntegrate(this);
    Localytics.setAnalyticsListener(new AnalyticsListenerAdapter() {

      @Override
      public void localyticsSessionWillOpen(boolean isFirst, boolean isUpgrade, boolean isResume) {
        if (isFirst) {
          Localytics.setCustomDimension(0, "Logged Out");
          Localytics.setCustomDimension(1, "0");
        }
      }

    });
  }
}
class MyApplication : Application() {
  override fun onCreate() {
    super.onCreate()
    Localytics.autoIntegrate(this)
    Localytics.setAnalyticsListener(object : AnalyticsListenerAdapter() {
      override fun localyticsSessionWillOpen(isFirst: Boolean, isUpgrade: Boolean, isResume: Boolean) {
        if (isFirst) {
          Localytics.setCustomDimension(0, "Logged Out")
          Localytics.setCustomDimension(1, "0")
        }
      }
    })
  }
}
For SDK v7.0.0 and above, use the following code:
public class MyApplication extends Application implements AnalyticsListener {

  @Override
  public void onCreate() {
    super.onCreate();

    new Localytics.Builder()
    .setAnalyticsListener(this)
    .autoIntegrate(this);

    }

  @Override
  public void localyticsSessionWillOpen(boolean isFirst, boolean isUpgrade, boolean isResume) {
    if (isFirst) {

      Localytics.setCustomDimension(0, "Logged Out");
      Localytics.setCustomDimension(1, "0");
    }
  }

  @Override
  public void localyticsSessionDidOpen(boolean isFirst, boolean isUpgrade, boolean isResume) {
  }

  @Override
  public void localyticsSessionWillClose() {
  }

  @Override
  public void localyticsDidTagEvent(String eventName, Map<String, String> attributes, long customerValueIncrease) {
  }
}
class MyApplication : Application(), AnalyticsListener {
  override fun onCreate() {
    super.onCreate();

    Localytics.Builder()
    .setAnalyticsListener(this)
    .autoIntegrate(this)

  }

  override fun localyticsSessionWillOpen(isFirst: Boolean, isUpgrade: Boolean, isResume: Boolean) {
    if (isFirst) {
      Localytics.setCustomDimension(0, "Logged Out");
      Localytics.setCustomDimension(1, "0");
    }
  }

  override fun localyticsSessionDidOpen(isFirst: Boolean, isUpgrade: Boolean, isResume: Boolean) {}
  override fun localyticsSessionWillClose() {}
  override fun localyticsDidTagEvent(eventName: String, attributes: Map<String, String>, customerValueIncrease: Long) {}
}
Clearing a value
Though it may be more appropriate to set a custom dimension value back to an initial state, sometimes you may need to completely clear the value. Setting an an empty string will NOT clear the value. To clear a value use the following code:
Localytics.setCustomDimension(0, null);
Tracking user acquisition source
Use Localytics to track the origin of your new users and attribute them to a specific acquisition source. Localytics employs a variety of attribution methods, but at the core, all methods work by matching a shared identifier from both before and after app installation.
In order for your app to be able to access the INSTALL_REFERRER Intent that is required for most Android acquisition tracking to work, be sure that you have made the proper modifications to your AndroidManifest.xml as discussed at the beginning of this guide. You've likely already made this modification, but it's worth checking just to be sure.
If your app or another SDK in your app are already listening for the INSTALL_REFERRER Intent that Localytics uses, in part, to track user acquistion source on Android, follow our instructions for using Localytics in addition to another attribution provider.
Testing attribution
Test your Android Attribution integration quickly and easily using test mode and the Android Debug Bridge (ADB) utility.
You can also test Android attribution manually. When you use test mode, Localytics creates a fake Device ID, and then creates a fake Google Advertising ID for that Device ID, so that you can run tests without needing physical data.
- Uninstall any previous installations of your test app on your test device. Then, install your test app.
- Open the test app on your test device.
- In your terminal, confirm that ADB is installed and in your environment path.
-
Run the following command
adb shell am broadcast -a com.android.vending.INSTALL_REFERRER -n YOUR-PACKAGE-NAME/com.localytics
.android.ReferralReceiver --es "referrer" "utm_source%3Dother_src31%26utm_medium%3Dm31%26utm_term%3Dt31%26utm_content
%3Dc31%26utm_campaign%3DC31%26localytics_test_mode%3Dtrue"
- Check the Attribution Dashboard to see if your data appears correctly.
Before you release
Before releasing your app with Localytics, you'll want to ensure all features of the integration are configured properly.1. Setup a production app key
In order to run the Localytics SDK, you must initialize the SDK using your Localytics app key. You can find your app key in the Localytics Dashboard.2. Disable Localytics logging
Logging is disabled by default, but you'll want to make sure it is not enabled in your production build.
Localytics.setLoggingEnabled(false);
3. Ensure test mode is setup on production build
In order to test in-app messages and push notifications on your production build, you'll need test mode setup in your AndroidManifest.xml.
Add the Test mode intent-filter within your MainActivity activity element under the existing intent-filter (i.e. the one for android.intent.action.MAIN). Replace YOUR-LOCALYTICS-APP-KEY with your Localytics app key and be sure to prepend YOUR-LOCALYTICS-APP-KEY with amp as shown below.<intent-filter>
<data android:scheme="ampYOUR-LOCALYTICS-APP-KEY" />
<action android:name="android.intent.action.VIEW" />
<category android:name="android.intent.category.DEFAULT" />
<category android:name="android.intent.category.BROWSABLE" />
</intent-filter>
4. Ensure push notifications work on production build
If you have integrated SDK version 4.1 or later, use the Rapid Push Verification page to confirm that you have integrated push correctly. Be sure to select the correct app in the dropdown at the top of the page.
5. QA analytics on production build
Use a utility such as Charles Proxy to watch the data transmit from your device to Localytics. You should check all analytics tags, such as Events and Customer ID, are being sent with the correct values.
Advanced
Manual Integration
The standard Localytics session management approach relies on the Localytics SDK to automatically listen for indications of state change (e.g. foreground / background transitions) in your app and then to track the state change accordingly. Most apps are able to use the standard approach. If you are unable to use the standard session management approach, the instructions below will help you to initialize the SDK to achieve the same result as the standard approach.
-
If you don't have a custom Application class, create one and specify the name in your AndroidManifest.xml as follows
<application android:name=".MyApplication">
-
In your Application class
-
Import the Localytics package as follows.
import com.localytics.androidx.*;
-
For SDK v6.4.5 and below, use the following code:
@Override public void onCreate() { super.onCreate(); Localytics.integrate(this); }
override fun onCreate() { super.onCreate() Localytics.integrate(this); }
For SDK v7.0.0 and above, use the following code:
@Override public void onCreate() { super.onCreate(); new Localytics.Builder().integrate(this); }
override fun onCreate() { super.onCreate() Localytics.Builder().integrate(this); }
-
-
In every Activity in your app, override onResume() and onPause() to manage the session and uploading. The simplest approach for accomplishing this task is to include this code in a common base Activity that each Activity extends.
-
In onResume, notify the Localytics SDK that the activity has resumed as follows.
@Override protected void onResume() { super.onResume(); Localytics.onActivityResume(this); }
protected override fun onResume() { super.onResume() Localytics.onActivityResume(this) }
-
In onPause, notify the Localytics SDK that the activity has paused as follows.
@Override protected void onPause() { super.onPause(); Localytics.onActivityPause(this); }
protected override fun onPause() { super.onPause(); Localytics.onActivityPause(this); }
-
In onNewIntent, notify the Localytics SDK of the new Intent as follows.
@Override protected void onNewIntent(Intent intent) { super.onNewIntent(intent); Localytics.onNewIntent(this, intent); }
protected override fun onNewIntent(intent: Intent) { super.onNewIntent(intent); Localytics.onNewIntent(this, intent); }
-
-
You are now ready to continue with the next steps.
Localytics.xml Keys
Here is a full list of keys and their descriptions in the localytics.xml file used for integrating Android SDK 5.0 and higher.
| Key | Value Type | Description |
|---|---|---|
| ll_app_key (required) | String | The Localytics App Key as generated on the Localytics Dashboard |
| ll_referral_receiver_enabled (required) | Boolean | Enable/disable the Localytics ReferralReceiver. Enabling this receiver will allow Localytics to track the installation referral source. |
| ll_push_tracking_activity_enabled (required) | Boolean | Enable/disable the Localytics PushTrackingActivity. Enabling this receiver will allow Localytics to track Push opens when Localytics renders notifications. |
| ll_fcm_push_services_enabled (required) | Boolean | Enable/disable the Localytics FirebaseService. Enabling these receivers will allow Localytics to collect push tokens and render FCM notifications and requires that the app must specify the com.google.firebase:firebase-messaging dependency. |
| ll_places_enabled (required) | Boolean | Enable/disable the Localytics LocationUpdateReceiver and BootReceiver for Places integrations. If this value is set to true then the app must specify the com.google.android.gms:play-services-location dependency. |
| ll_places_background_service_enabled (SDK 5.3+ - optional) | Boolean | Enable/disable the Localytics BackgroundService for Places integrations. If this value is set to true then the app must specify the com.google.android.gms:play-services-gcm dependency. |
| ll_wifi_upload_interval_seconds (optional) | Integer | Configure the interval at which the Localytics SDK will attempt to upload data in the case of a WiFi connection. Having a WiFi connection will supersede any mobile data connection. Default value is 5 seconds. To disable scheduled uploading for this connectivity set the value to -1. |
| ll_great_network_upload_interval_seconds (optional) | Integer | Configure the interval at which the Localytics SDK will attempt to upload data in the case of 4G or LTE connections. Default value is 10 seconds. To disable scheduled uploading for this connectivity set the value to -1. |
| ll_decent_network_upload_interval_seconds (optional) | Integer | Configure the interval at which the Localytics SDK will attempt to upload data in the case of a 3G connection. Default value is 30 seconds. To disable scheduled uploading for this connectivity set the value to -1. |
| ll_bad_network_upload_interval_seconds (optional) | Integer | Configure the interval at which the Localytics SDK will attempt to upload data in the case of 2G or EDGE connections. Default value is 90 seconds. To disable scheduled uploading for this connectivity set the value to -1. |
| ll_session_timeout_seconds (optional) | Integer | Configure the Localytics session timeout. This value will be the amount of time in seconds after a close session that subsequent open session calls will resume the old session instead of opening a new one. Default value is 15 seconds. |
| ll_default_push_channel_id (optional) | String | Android 8 and up require that all notifications specify a notification channel to be rendered. This value will be used as the channel id that Localytics renders all push notifications. Default value is localytics_default. |
| ll_default_push_channel_name (optional) | String | Android 8 and up require that all notifications specify a notification channel to be rendered. This value will be used as the name of the default channel both for creation and for reporting of the channel. Default value is Default. |
| ll_default_push_channel_description (optional) | String | Android 8 and up require that all notifications specify a notification channel to be rendered. This value will be used as the description of the default channel by Localytics if it must create the channel. Default value is empty (and no description will be set). |
| ll_default_push_channel_priority (SDK 5.6+ - optional) | String | Android 8 and up require that all notifications specify a notification channel to be rendered. This value will be used as the channel priority that Localytics renders all push notifications. Default value is 4. |
| ll_default_places_channel_id (optional) | String | Android 8 and up require that all notifications specify a notification channel to be rendered. This value will be used as the channel id that Localytics renders all places notifications. Default value is localytics_default. |
| ll_default_places_channel_name (optional) | String | Android 8 and up require that all notifications specify a notification channel to be rendered. This value will be used as the name of the default channel both for creation and for reporting of the channel. Default value is Default. |
| ll_default_places_channel_description (optional) | String | Android 8 and up require that all notifications specify a notification channel to be rendered. This value will be used as the description of the default channel by Localytics if it must create the channel. Default value is empty (and no description will be set). |
| ll_default_places_channel_priority (SDK 5.6+ - optional) | String | Android 8 and up require that all notifications specify a notification channel to be rendered. This value will be used as the channel priority that Localytics renders all places notifications. Default value is 4. |
| ll_ignore_standard_event_clv (optional) | Boolean | Enable/disable Standard Events increasing a user's customer lifetime value (CLV). By default, certain Localytics Standard Events. will increase a user's CLV, setting this to true will leave their CLV unaffected. |
| ll_collect_adid (optional) | Boolean | Enable/Disable the collection of the Android advertising ID on all datapoints. Default value is true. |
| ll_collect_app_set_id (SDK 7.1.3+ - optional) | Boolean | Enable/Disable collection of the Google App Set ID (a scoped, non-advertising identifier) on analytics datapoints. Default value is true. Independent of ll_collect_adid. See App Set ID. |
| ll_max_monitoring_regions (optional) | Integer | Configure the maximum number of geofences localytics can monitor in a places integration. This value should only be changed if multiple geofencing providers are in use, as lowering this value can have negative affects on Places reliability. Default value is the Android maximum of 100. |
| ll_region_throttle_time (optional) | Integer | Configure the minimum amount of time that must elapse between consecutive exits and enters for an individual geofence to trigger a second enter. Default value is 30 (value is in minutes). |
| ll_max_region_dwell_time (optional) | Integer | Configure the maximum amount of time a user can have been continuously inside a geofence to trigger an exit. Default value is 7 (value is in days). |
| ll_min_region_dwell_time (optional) | Integer | Configure the minimum amount of time a user must be continuously inside a geofence to trigger a valid exit. Default value is 30 (value is in seconds). |
| ll_location_update_interval_minutes (SDK 5.1+ - optional) | Integer | Define the interval at which the Android OS should poll for location updates as defined in LocationRequest. Default value is 10 (value is in minutes). |
| ll_location_fastest_update_interval_minutes (SDK 5.1+ - optional) | Integer | Define the quickest interval at which the Android OS will return location updates as defined in LocationRequest. Default value is 6 (value is in minutes). |
| ll_location_max_wait_time_minutes (SDK 5.1+ - optional) | Integer | Define the maximum interval at which the Android OS will return location updates as defined in LocationRequest. Default value is 3 times the ll_location_update_interval_minutes (value is in minutes). |
| ll_location_priority (SDK 5.1+ - optional) | Integer | Define the location update priority which the app will request location updates from the Android OS. This setting will directly affect location accuracy and battery drain within the app as defined in LocationRequest. The Localytics SDK expects a value equal to one of the integer values defined in LocationRequest. Those values are 100 (High Accuracy), 102 (Balanced Power and Accuracy) 104 (Low Power) or 105 (No Power) The Localytics SDK defaults to 102 (Balanced Power and Accuracy) and anything with lower accuracy could have dramatic negative impacts on the reliability of Places. |
| ll_live_logging_enabled (SDK 5.5+ - optional) | Boolean | An optional boolean to opt out of the ability to view logs on live monitor on the Localytics dashboard. |
Privacy
To support privacy regulations such as the EU’s General Data Protection Regulation (GDPR), as well as our customers’ unique privacy policy requirements, Localytics provides various methods, tools, or controls to assist our customers in meeting their obligations.
There are additional considerations to take into account to ensure proper handling across devices, applications, and digital properties. Please be sure to reference all documentation, and consult with your product, privacy, and legal teams to ensure your implementation of our products meets your unique privacy and regulatory requirements. Localytics Support and Services teams may be engaged to assist, and you can refer to Localytics Privacy Approach documentation for additional context.
Opting users out
Many apps may allow their users the ability to opt out of data collection. In order to stop the Localytics SDK from collecting any additional data, customers can call:
Localytics.setOptedOut(true);
Any device that has opted out in Localytics will immediately close the current session (if there is one) and tag an opt out event indicating that the device is no longer reporting any future data. Any subsequent calls that would generate a datapoint (tagEvent and setProfileAttribute for example) will be dropped. Additional detail is available in this Localytics Help article.
The opt out setting in Localytics is device specific, so if your app supports multiple users, you may want to trigger a call to setOptedOut every time a user logs in or out to update the Localytics SDK based on their previous preference.
Suppress data collection until end-user opt in
For some apps, it may be preferable to not collect any data until a user explicitly opts into data collection, or end-user consent is verified. In order to accomplish this, the app will need to update its integration such as the following:
For SDK v6.4.5 and below, use the following code:
//Code from Application class
@Override
public void onCreate() {
super.onCreate();
Localytics.autoIntegrate(this);
// The following method should reference a boolean value in your app that determines if the user has opted into
// data collection or not. The default (if never asked) should be false.
if (!isUserOptedIntoDataCollection()) {
Localytics.setOptedOut(true);
}
}
// Code from Application class
override fun onCreate() {
super.onCreate()
Localytics.autoIntegrate(this)
// The following method should reference a boolean value in your app that determines if the user has opted into
// data collection or not. The default (if never asked) should be false.
if (!isUserOptedIntoDataCollection()) {
Localytics.setOptedOut(true)
}
}
For SDK v7.0.0 and above, use the following code:
//Code from Application class
@Override
public void onCreate() {
super.onCreate();
new Localytics.Builder().autoIntegrate(this);
// The following method should reference a boolean value in your app that determines if the user has opted into
// data collection or not. The default (if never asked) should be false.
if (!isUserOptedIntoDataCollection()) {
Localytics.setOptedOut(true);
}
}
// Code from Application class
override fun onCreate() {
super.onCreate()
Localytics.Builder().autoIntegrate(this)
// The following method should reference a boolean value in your app that determines if the user has opted into
// data collection or not. The default (if never asked) should be false.
if (!isUserOptedIntoDataCollection()) {
Localytics.setOptedOut(true)
}
}
This effectively suppresses the integration until consent is verified.
Methods to support GDPR and other privacy requirements
The Localytics SDK provides the following APIs in SDK v5.1+:
- Localytics.setPrivacyOptedOut(true) This API will delete all of the end user's data in addition to preventing any further data from being collected. This method differs from setOptedOut in that it will additionally cause Localytics to trigger a user's Right To Be Forgotten request in accordance with GDPR. This method is intended to support end user requests to be forgotten, cease data collection, and have all of their historical data deleted. For additional details, please refer to this help document
- Localytics.pauseDataUploading(true) This API will pause any data uploading to Localytics while still collecting information about the end user. It is particularly important to prevent data from being uploaded while the data collection opt-in status of an end user is still unknown. You might want to use this method if your app is configured to solicit user consent on first launch. In this case, you'd want to pause data upload until consent is granted. Once granted, the application can commence with uploads as normal. If consent is declined, you'll want to configure the app to opt-out of data collection as appropriate.
- Localytics.setCustomerIdWithPrivacyOptedOut("CID", true) This API will update the current customer ID and immediately update the data collection opt-out status. This method may be used to support scenarios such as an application that, during login will verify consent via your back-end, and determine their 'forgotten' status. In that scenario this API may be called to set that user’s consent status as appropriate. We recommend you verify the the opt-in status of every user who can sign in to your application.
Getting Started
Because many customers allow their end users to grant/revoke consent through other services outside the client-side application, such as a web page Localytics expects customers to manage data collection opt-out settings for all client-side integrations. As a result, there are additional steps required during the integration process to ensure proper data handling.
While determining the opt-out status of an end user, it is expected that all data uploading should be paused. If the end-user has opted out, then all of the data will be deleted and no upload will occur. If the end-user is not opted out, then all of the data collected will be uploaded and the Localytics SDK can continue to function as normal.
Localytics.pauseDataUploading(true);
Localytics.autoIntegrate(this);
HandlerThread thread = new HandlerThread("opt-out-check", android.os.Process.THREAD_PRIORITY_BACKGROUND);
thread.start();
new android.os.Handler(thread.getLooper()).post(new Runnable() {
@Override
public void run() {
//This will be available even when the end user is opted out.
String customerId = Localytics.getCustomerId();
//Make a request to your servers to see if the end user is opted out.
boolean isUserOptedOutOnServer;
Localytics.setPrivacyOptedOut(isUserOptedOutOnServer);
Localytics.pauseDataUploading(false);
}
}
Localytics.pauseDataUploading(true)
Localytics.autoIntegrate(this)
runBlocking {
val customerId: String = Localytics.getCustomerId()
val isUserOptedOutOnServer: Boolean = // Make a request to your servers to see if the end user is opted out.
Localytics.setPrivacyOptedOut(isUserOptedOutOnServer)
Localytics.pauseDataUploading(false)
}
Authentication
Customers who have authentication in their apps should additionally ensure the privacy opt-out status of end users when they log in.
To log an end user in you should pause all data uploads until you determine data collection opt-out settings for the new user. Additionally, to ensure privacy, we encourage customers to use a new API introduced in SDK v5.1+ that accepts the privacy opt-out status of the user being logged in:
Localytics.pauseDataUploading(true);
HandlerThread thread = new HandlerThread("opt-out-check", android.os.Process.THREAD_PRIORITY_BACKGROUND);
thread.start();
new android.os.Handler(thread.getLooper()).post(new Runnable() {
@Override
public void run() {
//Make a request to your servers to retrieve the end user's customer id and opted out status.
String customerIdFromServer;
boolean isUserOptedOutOnServer;
Localytics.setCustomerIdWithPrivacyOptedOut(customerIdFromServer, isUserOptedOutOnServer);
Localytics.pauseDataUploading(false);
}
}
Localytics.pauseDataUploading(true)
runBlocking {
val customerId: String = Localytics.getCustomerId()
val isUserOptedOutOnServer: Boolean = // Make a request to your servers to see if the end user is opted out.
Localytics.setPrivacyOptedOut(isUserOptedOutOnServer)
Localytics.pauseDataUploading(false)
}
Similarly, to log an end user out you can continue to set the customer ID to null. If the new user should resume collecting data, make sure to opt back into data collection:
Localytics.setCustomerIdWithPrivacyOptedOut(null, false);
Implications for messaging
Forgetting about an end user via the setPrivacyOptedOut API implies that the end user will no longer receive targeted messaging based on their behavior, profile, or personalization data, etc. Therefore, forgetting an end user will initiate the following behavior:
- Forgotten end users will not be targetable by campaigns with an audience criteria. Localytics will begin filtering out forgotten end users from any future campaigns within 8 hours of their request to be forgotten.
- Forgotten end users will no longer be sent Push campaigns. All data for forgotten end users will have been deleted, including their push tokens, so they will become untargetable.
- Forgotten end users will still be able to see messaging campaigns they had previously been sent.
- Historical behavioral data will be deleted for forgotten users so no future sends or conversions will be generated for these users.
- No customer data should be reported to any external services from In-App or Inbox campaigns that are broadcast to all users. In accordance with this, the ADID collected by the Localytics SDK will never be appended to call to action URLs for forgotten users.
- A forgotten user can opt back into being remembered using setPrivacyOptedOut. In this case, all data collected prior to opting in remains forgotten and data collection will start from scratch.
- Once a user opts back into being remembered using setPrivacyOptedOut, a new customer ID must be assigned to the user.
Places
Localytics Places messaging feature takes advantage of location services provided by the OS to display notifications. While this doesn't break any agreement made about data collection (because geofencing is handled by Play Services), end users that have requested to be forgotten and opted-out may feel that location tracking is a breach of their privacy. As such, Localytics SDK will, by default, disable Places monitoring when an end user is privacy opted-out. Localytics expects our customers to determine if Places should continue to be enabled when a user is opted out of data collection. If so, we expect that this is explicitly communicated to that end user.
By default, when opting an end user out of data collection, the Localytics SDK will turn off Places monitoring. As a result, it is expected that any customer who uses Places only does so if the customer is opted into data collection. A sample can be found demonstrating proper integration in our samples repo.
If the customer prefers to enable Places location-based messaging, even when the end user has opted out of data collection, then this should be explicitly communicated to the end user, and Places should be re-enabled after any call to Localytics.setPrivacyOptedOut. A sample can be found demonstrating proper integration in our samples repo.
App Set ID
Beginning in SDK 7.1.3, the Localytics Android SDK can collect the Google App Set ID, a scoped, non-advertising identifier intended for analytics and similar non-ads use cases. When available, the SDK includes it on the analytics event header as app_set_id along with its scope qualifier app_set_scope (app for SCOPE_APP, or developer for SCOPE_DEVELOPER).
- Collection is enabled by default and is gated by ll_collect_app_set_id, independent of ll_collect_adid.
- The value is read from a local Play Services call (no network required), cached in the SDK database, and refreshed once per launch. Transient lookup failures never overwrite a previously cached value.
- If Play Services is unavailable or the lookup fails, the App Set ID keys are simply omitted from the upload. Collection also respects privacy opt-out via setPrivacyOptedOut.
- App Set ID must not be used for ads personalization or ads measurement.
Privacy policy
If App Set ID collection is enabled, update your app’s privacy policy so it accurately describes this practice. At a minimum, disclose that:
- Your app (via Localytics) may collect a device or app identifier such as the Google App Set ID.
- The identifier may be shared with Localytics (and any other analytics providers you use) for analytics / measurement purposes.
- The identifier is not used for advertising personalization or ads measurement.
- Users can request to stop data collection or exercise privacy rights through the controls you provide (for example, in-app opt-out flows that call Localytics privacy APIs).
Also ensure your Google Play Data safety answers remain accurate: declare Device or other IDs as collected and shared, with purpose Analytics, when ll_collect_app_set_id is enabled.
Opting out of App Set ID collection
To disable App Set ID collection while leaving other Localytics collection unchanged, set ll_collect_app_set_id to false in your localytics.xml file:
<bool name="ll_collect_app_set_id">false</bool>
You can also override the value at runtime (this overrides the same key from localytics.xml):
Localytics.setOption("ll_collect_app_set_id", false);
When collection is disabled, the SDK clears any cached App Set ID and omits app_set_id / app_set_scope from subsequent uploads. This is separate from Advertising ID collection (ll_collect_adid) and from full SDK opt-out (setOptedOut / setPrivacyOptedOut).
Callbacks
Analytics callbacks
These analytics callbacks are useful for setting the value of a custom dimension or profile attribute before a session opens, firing an event at the beginning or end of a session, or taking action in your app based on an auto-tagged campaign performance event in the Localytics SDK. All Localytics analytics callbacks are called on an internal background thread.
In your Application class implement the AnalyticsListener interface as follows.
public class MyApplication extends Application implements AnalyticsListener {
@Override
public void onCreate() {
super.onCreate();
Localytics.autoIntegrate(this);
Localytics.setAnalyticsListener(this);
}
@Override
public void localyticsSessionWillOpen(boolean isFirst, boolean isUpgrade, boolean isResume) {
// ... do something ...
}
@Override
public void localyticsSessionDidOpen(boolean isFirst, boolean isUpgrade, boolean isResume) {
// ... do something ...
}
@Override
public void localyticsSessionWillClose() {
// ... do something ...
}
@Override
public void localyticsDidTagEvent(String eventName, Map<String, String> attributes, long customerValueIncrease) {
// ... do something ...
}
}
class MyApplication : Application(), AnalyticsListener {
override fun onCreate() {
super.onCreate()
Localytics.autoIntegrate(this)
Localytics.setAnalyticsListener(this)
}
override fun localyticsSessionWillOpen(isFirst: Boolean, isUpgrade: Boolean, isResume: Boolean) {
// ... do something ...
}
override fun localyticsSessionDidOpen(isFirst: Boolean, isUpgrade: Boolean, isResume: Boolean) {
// ... do something ...
}
override fun localyticsSessionWillClose() {
// ... do something ...
}
override fun localyticsDidTagEvent(eventName: String, attributes: Map<String, String>, customerValueIncrease: Long) {
// ... do something ...
}
}
Alternatively, you can use the AnalyticsListenerAdapter class to listen for specific callbacks.
public class MyApplication extends Application {
@Override
public void onCreate() {
super.onCreate();
Localytics.autoIntegrate(this);
Localytics.setAnalyticsListener(new AnalyticsListenerAdapter() {
@Override
public void localyticsSessionWillOpen(boolean isFirst, boolean isUpgrade, boolean isResume) {
// ... do something ...
}
});
}
}
class MyApplication : Application() {
override fun onCreate() {
super.onCreate()
Localytics.autoIntegrate(this)
Localytics.setAnalyticsListener(AnalyticsListenerAdapter() {
override fun localyticsSessionWillOpen(isFirst: Boolean, isUpgrade: Boolean, isResume: Boolean) {
// ... do something ...
}
})
}
}
Messaging callbacks
Messaging callbacks are useful for understanding when Localytics will display messaging campaigns. This can help you prevent conflicts with other views in your app, as well as potentially suppress the Localytics display. All Localytics messaging callbacks are called on the main thread.
In your Application class implement the MessagingListenerV2 interface as follows.
public class MyApplication extends Application implements MessagingListenerV2 {
@Override
public void onCreate() {
super.onCreate();
Localytics.autoIntegrate(this);
Localytics.setMessagingListener(this);
}
@Override
public boolean localyticsShouldShowInAppMessage(@NonNull final InAppCampaign campaign) {
return true; //return false to suppress the in-app
}
@Override
public boolean localyticsShouldDelaySessionStartInAppMessages() {
return false; // return true to delay the triggering of messages set to display on session start.
// To later trigger these messages call Localytics.triggerSessionStartInAppMessages().
}
@NonNull
@Override
public InAppConfiguration localyticsWillDisplayInAppMessage(@NonNull final InAppCampaign campaign, @NonNull final InAppConfiguration configuration) {
// ... optionally modify the aspect ratio for center in-app campaigns, offset for banner in-app campaigns and background alpha ...
return configuration;
}
@Override
public void localyticsDidDisplayInAppMessage() {
// ... do something ...
}
@Override
public void localyticsWillDismissInAppMessage() {
// ... do something ...
}
@Override
public void localyticsDidDismissInAppMessage() {
// ... do something ...
}
@Override
public boolean localyticsShouldShowPushNotification(@NonNull PushCampaign campaign) {
return true; // return false to suppress the notification
}
@Override
public boolean localyticsShouldShowPlacesPushNotification(@NonNull PlacesCampaign campaign) {
return true; // return false to suppress the notification
}
@NonNull
@Override
public NotificationCompat.Builder localyticsWillShowPlacesPushNotification(@NonNull NotificationCompat.Builder builder, @NonNull PlacesCampaign campaign) {
// ... optionally modify the icon, sound, or defaults ...
return builder;
}
@NonNull
@Override
public NotificationCompat.Builder localyticsWillShowPushNotification(@NonNull NotificationCompat.Builder builder, @NonNull PushCampaign campaign) {
// ... optionally modify the icon, sound, or defaults ...
return builder;
}
boolean localyticsShouldDeeplink(@NonNull String url) {
return true; // return false to stop Localytics from deeplinking
}
}
class MyApplication : Application(), MessagingListenerV2 {
fun onCreate() {
super.onCreate()
Localytics.autoIntegrate(this)
Localytics.setMessagingListener(this)
}
override fun localyticsShouldShowInAppMessage( campaign: InAppCampaign): Boolean {
return true //return false to suppress the in-app
}
override fun localyticsShouldDelaySessionStartInAppMessages(): Boolean {
return false // return true to delay the triggering of messages set to display on session start.
// To later trigger these messages call Localytics.triggerSessionStartInAppMessages().
}
override fun localyticsWillDisplayInAppMessage(campaign: InAppCampaign, configuration: InAppConfiguration): InAppConfiguration { // ... optionally modify the aspect ratio for center in-app campaigns, offset for banner in-app campaigns and background alpha ...
return configuration
}
override fun localyticsDidDisplayInAppMessage() { // ... do something ...
}
override fun localyticsWillDismissInAppMessage() { // ... do something ...
}
override fun localyticsDidDismissInAppMessage() { // ... do something ...
}
override fun localyticsShouldShowPushNotification(campaign: PushCampaign): Boolean {
return true // return false to suppress the notification
}
override fun localyticsShouldShowPlacesPushNotification(campaign: PlacesCampaign): Boolean {
return true // return false to suppress the notification
}
fun localyticsWillShowPlacesPushNotification(builder: NotificationCompat.Builder, campaign: PlacesCampaign?): NotificationCompat.Builder { // ... optionally modify the icon, sound, or defaults ...
return builder
}
fun localyticsWillShowPushNotification(builder: NotificationCompat.Builder, campaign: PushCampaign?): NotificationCompat.Builder { // ... optionally modify the icon, sound, or defaults ...
return builder
}
override fun localyticsShouldDeeplink( url: String): Boolean {
return true // return false to stop Localytics from deeplinking
}
}
Alternatively, you can use the MessagingListenerV2Adapter class to listen for specific callbacks.
public class MyApplication extends Application {
@Override
public void onCreate() {
super.onCreate();
Localytics.autoIntegrate(this);
Localytics.setMessagingListener(new MessagingListenerV2Adapter() {
@Override
public InAppConfiguration localyticsWillDisplayInAppMessage(@NonNull final InAppCampaign campaign, @NonNull final InAppConfiguration configuration) {
// ... optionally modify the aspect ratio for center in-app campaigns, offset for banner in-app campaigns and background alpha ...
return configuration;
}
});
}
}
class MyApplication : Application() {
override fun onCreate() {
super.onCreate()
Localytics.autoIntegrate(this)
Localytics.setMessagingListener(object : com.localytics.androidx.MessagingListenerV2Adapter() {
override fun localyticsWillDisplayInAppMessage(campaign: InAppCampaign, configuration: InAppConfiguration): InAppConfiguration { // ... optionally modify the aspect ratio for center in-app campaigns, offset for banner in-app campaigns and background alpha ...
return configuration
}
})
}
}
Location callbacks
Location callbacks are useful for understanding when Localytics responds location changes. localyticsDidUpdateLocation is called on an internal background thread; the others are called on the main thread.
In your Application class implement the LocationListener interface as follows.
public class MyApplication extends Application implements LocationListener {
@Override
public void onCreate() {
super.onCreate();
Localytics.autoIntegrate(this);
Localytics.setLocationListener(this);
}
@Override
public void localyticsDidUpdateLocation(@Nullable Location location) {
// ... do something ...
}
@Override
public void localyticsDidTriggerRegions(@NonNull List<Region> regions, @NonNull Region.Event event) {
// ... do something ...
}
@Override
public void localyticsDidUpdateMonitoredGeofences(@NonNull List<CircularRegion> added, @NonNull List<CircularRegion> removed) {
// ... do something ...
}
}
class MyApplication : Application(), LocationListener {
override fun onCreate() {
super.onCreate()
Localytics.autoIntegrate(this)
Localytics.setLocationListener(this)
}
override fun localyticsDidUpdateLocation(location: Location?) { // ... do something ...
}
override fun localyticsDidTriggerRegions(regions: List<Region>, event: Region.Event) { // ... do something ...
}
override fun localyticsDidUpdateMonitoredGeofences(added: List<CircularRegion?>, removed: List<CircularRegion?>) { // ... do something ...
}
}
Call To Action callbacks
Added in SDK 5.2, call to action callbacks are useful for understanding when Localytics has triggered a deeplink or internal event through a javascript API. All Localytics Call To Action callbacks are called on the main thread.
In your Application class implement the CallToActionListenerV2 interface as follows.
public class MyApplication extends Application implements CallToActionListenerV2 {
@Override
public void onCreate() {
super.onCreate();
Localytics.autoIntegrate(this);
Localytics.setCallToActionListener(this);
}
@Override
public boolean localyticsShouldDeeplink(@NonNull String url, @Nonnull Campaign campaign) {
return true; // return false to prevent Localytics from deeplinking.
}
@Override
public void localyticsDidOptOut(boolean optOut, @NonNull Campaign campaign) {
// ... do something ...
}
@Override
public void localyticsDidPrivacyOptOut(boolean optOut, @NonNull Campaign campaign) {
// ... do something ...
}
@Override
public void boolean localyticsShouldPromptForNotificationPermissions(Campaign campaign) {
return true; // return false to prevent Localytics from prompting for Notification.
}
@Override
public void boolean localyticsShouldPromptForLocationPermissions(Campaign campaign) {
return true; // return false to prevent Localytics from prompting for Location.
}
@Override
public void boolean localyticsShouldDeeplinkToSettings(Intent intent, Campaign campaign) {
return true; // return false to stop Localytics from from navigating to the settings screen.
}
}
class MyApplication : Application(), CallToActionListenerV2 {
override fun onCreate() {
super.onCreate();
Localytics.autoIntegrate(this);
Localytics.setCallToActionListener(this);
}
override fun localyticsShouldDeeplink(url: String, campaign: Campaign): Boolean {
return true; // return false to prevent Localytics from deeplinking.
}
override fun localyticsDidOptOut(optOut: Boolean, campaign: Campaign) {
// ... do something ...
}
override fun localyticsDidPrivacyOptOut(optOut: Boolean, campaign: Campaign) {
// ... do something ...
}
override fun localyticsShouldPromptForNotificationPermissions(campaign: Campaign): Boolean {
return true; // return false to prevent Localytics from prompting for Notification.
}
override fun localyticsShouldPromptForLocationPermissions(campaign: Campaign): Boolean {
return true; // return false to prevent Localytics from prompting for Location.
}
override fun localyticsShouldDeeplinkToSettings(intent: Intent, campaign: Campaign): Boolean {
return true; // return false to stop Localytics from from navigating to the settings screen.
}
}
Alternatively, you can use the CallToActionListenerAdapterV2 class to listen for specific callbacks.
public class MyApplication extends Application {
@Override
public void onCreate() {
super.onCreate();
Localytics.autoIntegrate(this);
Localytics.setCallToActionListener(new CallToActionListenerAdapterV2() {
@Override
public boolean localyticsShouldDeeplink(@NonNull final String url, @Nonnull Campaign campaign) {
return true; // return false to prevent Localytics from deeplinking.
}
});
}
}
class MyApplication : Application() {
override fun onCreate() {
super.onCreate()
Localytics.autoIntegrate(this)
Localytics.setCallToActionListener(object : CallToActionListenerAdapterV2() {
override fun localyticsShouldDeeplink(url: String, campaign: Campaign): Boolean {
return true // return false to prevent Localytics from deeplinking.
}
})
}
}
Modifying push notifications
If you are using the v3 version of the Localytics SDK, follow our guide for Push notification options in v3 in the Legacy SDKs section.
When using the standad Localytics push integration you can modify several notification properties using MessagingListenerV2, such as the title, LED color, sound, accent color, and icon. Due to the new material design style , we recommend that you at least set the accent color and icon for supporting devices running Lollipop (API 21) and later.
If you haven't created and passed in a MessagingListenerV2 to the Localytics SDK, set one after initializing the SDK and implement the localyticsWillShowPushNotification method to modify the NotificationCompat.Builder. You can also use MessagingListenerV2Adapter to override just the methods that you need. Note: We do not recommend modifying the content intent. However, if you must modify the content intent, follow our guide for Building notifications and tagging push events.
public class MyApplication extends Application {
@Override
public void onCreate() {
super.onCreate();
Localytics.autoIntegrate(this);
Localytics.setMessagingListener(new MessagingListenerV2Adapter() {
@NonNull
@Override
public NotificationCompat.Builder localyticsWillShowPushNotification(@NonNull NotificationCompat.Builder builder,
@NonNull PushCampaign campaign) {
return builder
.setSmallIcon(getSmallIcon())
.setColor(getColor(R.color.accent_color))
.setContentTitle(getString(R.string.notification_title))
.setSound(Uri.parse("android.resource://" + getPackageName() + "/" + R.raw.notification_sound));
}
});
}
private int getSmallIcon() {
if (Build.VERSION.SDK_INT >= Build.VERSION_CODES.LOLLIPOP) {
return R.drawable.ic_launcher_alpha_only;
} else {
return R.drawable.ic_launcher;
}
}
}
class MyApplication : Application() {
override fun onCreate() {
super.onCreate()
Localytics.autoIntegrate(this)
Localytics.setMessagingListener(object : com.localytics.androidx.MessagingListenerV2Adapter() {
override fun localyticsWillShowPushNotification(builder: NotificationCompat.Builder, campaign: PushCampaign): NotificationCompat.Builder {
// Do things
return super.localyticsWillShowPushNotification(builder, campaign)
}
})
}
private val smallIcon: Int
private get() = if (Build.VERSION.SDK_INT >= Build.VERSION_CODES.LOLLIPOP) {
R.drawable.ic_launcher_alpha_only
} else {
R.drawable.ic_launcher
}
}
Custom push configuration
If you are using the v4 version of the Localytics SDK, follow our guide for Custom push configuration in v4 in the Legacy SDKs section.
Whether you are using another push provider or sending pushes with your own system, getting Localytics push messaging working alongside another implementation may take a few additional steps. The sections below will help you setup the correct configuration for your app.
Sending a registration ID to Localytics
If you are already registering with FCM you need to send that registration ID to Localytics.
-
Send the registration ID to Localyics as follows. If this is the first version of your app to include the Localytics SDK, call this method on the first app launch for this version and not just on a token refresh to ensure Localytics gets the current token for users updating from the previous app version.
FirebaseInstanceId.getInstance().getInstanceId().addOnSuccessListener(new OnSuccessListener<InstanceIdResult>() { @Override public void onSuccess(InstanceIdResult instanceIdResult) { // Callback is called on the app's main thread String token = instanceIdResult.getToken(); Localytics.setPushRegistrationId(token); } });
FirebaseInstanceId.getInstance().instanceId.addOnSuccessListener { instanceIdResult -> // Callback is called on the app's main thread val token = instanceIdResult.token Localytics.setPushRegistrationId(token) }
-
After you have successfully set the push registration ID, follow the steps for using Localytics with a standard BroadcastReceiver. By following one this section, notification display and push received and push opened tracking will automatically be handled. If you would prefer to build and display notifications yourself and manually track push received and push opened, follow the steps for building notifications and tagging push events.
Using Custom FCM Services
If you wish to handle your own push notifications or pushes from other providers, you should first set ll_fcm_push_services_enabled to false in your localytics.xml file. Then, extend the following Service classes from Firebase Cloud Messaging:
-
Create a class that extends FirebaseMessagingService:
public class MyFirebaseMessagingService extends FirebaseMessagingService {
class MyFirebaseMessagingService : FirebaseMessagingService()
-
Include your new FirebaseMessagingService class in your AndroidManifest.xml:
<service android:name=".MyFirebaseService" android:exported="true"> <intent-filter> <action android:name="com.google.firebase.MESSAGING_EVENT"/> </intent-filter> </service>
-
Implement the onNewToken callback to listen for when the push token is updated and pass that new token to Localytics:
@Override public void onNewToken(String token) { super.onNewToken(token); Localytics.setPushRegistrationId(token); }
override fun onNewToken(token: String) { super.onNewToken(token); Localytics.setPushRegistrationId(token); }
-
Implement the onMessageReceived callback to listen for when a new push message arrives:
Note: Be aware that on devices with Android 13 and higher, you should handle Notification Permission requesting; otherwise, notifications will not be showing/** * Localytics.handleFirebaseMessage will return true if Localytics identified the message * as one originating from Localytics. If it returns false, you should handle the message yourself. */ @Override public void onMessageReceived(RemoteMessage remoteMessage) { Map<String, String> data = remoteMessage.getData(); if (Localytics.handleFirebaseMessage(data)) { // Localytics handled the message; no need to continue. return; else { // The notification is not from Localytics or the Firebase Dashboard, so the app must handle it. showNotification(data.get("message")); } } private void showNotification(String message) { if (!TextUtils.isEmpty(message)) { Intent intent = new Intent(this, MainActivity.class); intent.addFlags(Intent.FLAG_ACTIVITY_CLEAR_TOP); PendingIntent pendingIntent = PendingIntent.getActivity(this, 0 /* Request code */, intent, PendingIntent.FLAG_ONE_SHOT); NotificationCompat.Builder notificationBuilder = new NotificationCompat.Builder(this, "SOME_CHANNEL_ID") .setSmallIcon(R.mipmap.ic_launcher) .setContentTitle("FCM Message") .setContentText(message) .setAutoCancel(true) .setDefaults(Notification.DEFAULT_SOUND | Notification.DEFAULT_VIBRATE) .setContentIntent(pendingIntent); NotificationManager notificationManager = (NotificationManager) getSystemService(Context.NOTIFICATION_SERVICE); notificationManager.notify(0, notificationBuilder.build()); } }
/** * Localytics.handleFirebaseMessage will return true if Localytics identified the message * as one originating from Localytics. If it returns false, you should handle the message yourself. */ override fun onMessageReceived(remoteMessage: RemoteMessage) { if (Localytics.handleFirebaseMessage(remoteMessage.data)) { // Localytics handled the message; no need to continue. else { // The notification is not from Localytics or the Firebase Dashboard, so the app must handle it. showNotification(remoteMessage.data.get("message")) } } override fun showNotification(message: String) { if (!TextUtils.isEmpty(message)) { val intent: Intent = Intent(this, MainActivity::java.class) intent.addFlags(Intent.FLAG_ACTIVITY_CLEAR_TOP) val pendingIntent = PendingIntent.getActivity(this, 0 /* Request code */, intent, PendingIntent.FLAG_ONE_SHOT); val builder = NotificationCompat.Builder(this, "SOME_CHANNEL_ID") .setSmallIcon(R.mipmap.ic_launcher) .setContentTitle("FCM Message") .setContentText(message) .setAutoCancel(true) .setDefaults(Notification.DEFAULT_SOUND | Notification.DEFAULT_VIBRATE) .setContentIntent(pendingIntent) val manager = (NotificationManager) getSystemService(Context.NOTIFICATION_SERVICE); manager.notify(0, builder.build()); } }
Building notifications and tagging push events
If you would prefer to render your own Localytics notifications, you will need to handle building notifications and tagging the push received and push opened events.
-
Declare a custom FirebaseMessagingService in your AndroidManifest.xml as follows. Additionally, include PushTrackingActivity in your AndroidManifest.xml by setting ll_push_tracking_activity_enabled to true in your localytics.xml file.
<?xml version="1.0" encoding="utf-8"?> <manifest xmlns:android="http://schemas.android.com/apk/res/android" package="com.localytics.android.example" > <service android:name=".MyFirebaseService" android:exported="true"> <intent-filter> <action android:name="com.google.firebase.MESSAGING_EVENT"/> </intent-filter> </service> </manifest>
-
When the RemoteMessage is delivered to your Service, tag the push received event and build and show the notification using PushTrackingActivity as the PendingIntent.
public class MyFirebaseService extends FirebaseMessagingService { @Override public void onMessageReceived(final RemoteMessage remoteMessage) { Map<String, String> data = remoteMessage.getData(); Localytics.tagPushReceivedEvent(); String message = data.get("message"); String title = data.get("title"); if (!TextUtils.isEmpty(message) || !TextUtils.isEmpty(title)) { Intent trackingIntent = new Intent(context, PushTrackingActivity.class); trackingIntent.putExtras(data); // add all extras from received bundle int requestCode = getRequestCode(data); PendingIntent contentIntent = PendingIntent.getActivity(context, requestCode, trackingIntent, PendingIntent.FLAG_UPDATE_CURRENT); NotificationCompat.Builder builder = new NotificationCompat.Builder(context, getLocalyticsChannel(context, data)) .setSmallIcon(R.mipmap.ic_launcher) .setContentTitle(TextUtils.isEmpty(title) ? context.getString(R.string.app_name) : title) .setContentText(message) .setStyle(new NotificationCompat.BigTextStyle().bigText(message)) .setContentIntent(contentIntent) .setDefaults(Notification.DEFAULT_ALL) .setAutoCancel(true); NotificationManager notificationManager = (NotificationManager) context.getSystemService(Context.NOTIFICATION_SERVICE); notificationManager.notify(requestCode, builder.build()); } } /** * Get a unique requestCode so we don't override other unopened pushes. The Localytics SDK * uses the campaign ID (ca) within the 'll' JSON string extra. Use that value if it exists. */ private int getRequestCode(Bundle extras) { int requestCode = 1; if (extras != null && extras.containsKey("ll")) { try { JSONObject llObject = new JSONObject(extras.getString("ll")); requestCode = llObject.getInt("ca"); } catch (JSONException e) { } } return requestCode; } /** * Get the channel as delivered by Localytics */ @Nullable private String getLocalyticsChannel(Context context, Bundle extras) { String channel = null; if (extras != null && extras.containsKey("ll")) { try { JSONObject llObject = new JSONObject(extras.getString("ll")); channel = llObject.optString("channel"); } catch (JSONException e) { } } if (TextUtils.isEmpty(channel)) { // You should ensure this value is filled out in your localytics.xml. If it isn't this should some default value. return context.getResources().getString(R.string.ll_default_push_channel_id); } return channel; } }
class MyFirebaseService : FirebaseMessagingService() { override fun onMessageReceived(remoteMessage: RemoteMessage) { val data: Map<String, String> = remoteMessage.data) Localytics.tagPushReceivedEvent() val message = data["message"] val title = data["title"] if (!TextUtils.isEmpty(message) || !TextUtils.isEmpty(title)) { val trackingIntent = Intent(context, PushTrackingActivity::java.class) trackingIntent.putExtras(data) // add all extras from received bundle val requestCode = getRequestCode(data) val contentIntent = PendingIntent.getActivity(context, requestCode, trackingIntent, PendingIntent.FLAG_UPDATE_CURRENT); val builder = NotificationCompat.Builder(context, getLocalyticsChannel(context, data)) .setSmallIcon(R.mipmap.ic_launcher) .setContentTitle(if(TextUtils.isEmpty(title)) context.getString(R.string.app_name) else title) .setContentText(message) .setStyle(new NotificationCompat.BigTextStyle().bigText(message)) .setContentIntent(contentIntent) .setDefaults(Notification.DEFAULT_ALL) .setAutoCancel(true) val manager = context.getSystemService(Context.NOTIFICATION_SERVICE) as NotificationManager manager.notify(requestCode, builder.build()) } } /** * Get a unique requestCode so we don't override other unopened pushes. The Localytics SDK * uses the campaign ID (ca) within the 'll' JSON string extra. Use that value if it exists. */ private fun getRequestCode(extras: Bundle): Int { var requestCode = 1 if (extras != null && extras.containsKey("ll")) { try { val llObject = JSONObject(extras.getString("ll")) requestCode = llObject.getInt("ca") } catch (e: JSONException) {} } return requestCode } /** * Get the channel as delivered by Localytics */ private fun getLocalyticsChannel(context: Context, extras: Bundle): String? { var channel if (extras != null && extras.containsKey("ll")) { try { val llObject = JSONObject(extras.getString("ll")) channel = llObject.optString("channel") } catch (e: JSONException) {} } if (TextUtils.isEmpty(channel)) { // You should ensure this value is filled out in your localytics.xml. If it isn't this should some default value. return context.resources.getString(R.string.ll_default_push_channel_id) } return channel } }
If you cannot use PushTrackingActivity in the PendingIntent, then you must handle tagging the push opened event when your Activity resumes.
-
When building the notification include the ll key as an extra in the PendingIntent Intent by adding all the extras from the received Intent as follows.
public class MyFirebaseService extends FirebaseMessagingService { @Override public void onMessageReceived(final RemoteMessage remoteMessage) { Map<String, String> data = remoteMessage.getData(); Localytics.tagPushReceivedEvent(data); String message = data.getString("message"); if (!TextUtils.isEmpty(message)) { Intent launchIntent = new Intent(context, MainActivity.class); launchIntent.putExtras(data); // add all extras from received bundle int requestCode = getRequestCode(data); PendingIntent contentIntent = PendingIntent.getActivity(context, requestCode, launchIntent, PendingIntent.FLAG_UPDATE_CURRENT); NotificationCompat.Builder builder = new NotificationCompat.Builder(context, "SOME_CHANNEL_ID") .setSmallIcon(R.mipmap.ic_launcher) .setContentTitle(context.getString(R.string.app_name)) .setContentText(message) .setStyle(new NotificationCompat.BigTextStyle().bigText(message)) .setContentIntent(contentIntent) .setDefaults(Notification.DEFAULT_ALL) .setAutoCancel(true); NotificationManager notificationManager = (NotificationManager) context.getSystemService(Context.NOTIFICATION_SERVICE); notificationManager.notify(requestCode, builder.build()); } } /** * Get a unique requestCode so we don't override other unopened pushes. The Localytics SDK * uses the campaign ID (ca) within the 'll' JSON string extra. Use that value if it exists. */ private int getRequestCode(Bundle extras) { int requestCode = 1; if (extras != null && extras.containsKey("ll")) { try { JSONObject llObject = new JSONObject(extras.getString("ll")); requestCode = llObject.getInt("ca"); } catch (JSONException e) { } } return requestCode; } }
class MyFirebaseService : FirebaseMessagingService() { override fun onMessageReceived(remoteMessage: RemoteMessage) { val data: Map<String, String> = remoteMessage.data Localytics.tagPushReceivedEvent(data) val message = data["message"] if (!TextUtils.isEmpty(message)) { val launchIntent = Intent(context, MainActivity::java.class) launchIntent.putExtras(data) // add all extras from received bundle val requestCode = getRequestCode(data) val contentIntent = PendingIntent.getActivity(context, requestCode, launchIntent, PendingIntent.FLAG_UPDATE_CURRENT) NotificationCompat.Builder builder = new NotificationCompat.Builder(context, "SOME_CHANNEL_ID") .setSmallIcon(R.mipmap.ic_launcher) .setContentTitle(context.getString(R.string.app_name)) .setContentText(message) .setStyle(new NotificationCompat.BigTextStyle().bigText(message)) .setContentIntent(contentIntent) .setDefaults(Notification.DEFAULT_ALL) .setAutoCancel(true) val manager = context.getSystemService(Context.NOTIFICATION_SERVICE) as NotificationManager manager.notify(requestCode, builder.build()) } } /** * Get a unique requestCode so we don't override other unopened pushes. The Localytics SDK * uses the campaign ID (ca) within the 'll' JSON string extra. Use that value if it exists. */ private fun getRequestCode(extras: Bundle): Int { var requestCode = 1 if (extras != null && extras.containsKey("ll")) { try { val llObject = JSONObject(extras.getString("ll")) requestCode = llObject.getInt("ca") } catch (e: JSONException) {} } return requestCode } }
-
When your Activity resumes or receives the new Intent, handle the push opened as follows. We recommend using a base Activity that all Activities in our app extend so any Activity can be used in the PendingIntent.
public class BaseActivity extends FragmentActivity { @Override protected void onResume() { super.onResume(); Localytics.handlePushNotificationOpened(getIntent()); } @Override protected void onNewIntent(Intent intent) { super.onNewIntent(intent); Localytics.handlePushNotificationOpened(intent); } }
class BaseActivity : FragmentActivity() { protected override fun onResume() { super.onResume(); Localytics.handlePushNotificationOpened(this.intent); } protected override fun onNewIntent(intent: Intent) { super.onNewIntent(intent); Localytics.handlePushNotificationOpened(intent); } }
-
You are now ready to continue with adding your server API key to the Localytics Dashboard.
Tracking location
The Localytics SDK will attach a user's location to a datapoint automatically when a user triggers a geofence (via Places) or whenever you manually set a user's location. Since most apps don't track user geolocation, Localytics also uses an IP-to-location lookup service as a backup measure if no other data is provided. Localytics will always attach the most recently provided location to each datapoint, similar to custom dimensions. Location data is available in the export logs.
You can set the user’s current location in the class that implements the LocationListener callback as follows.
@Override
public void onLocationChanged(Location location) {
Localytics.setLocation(location);
}
override fun onLocationChanged(location: Location) {
Localytics.setLocation(location)
}
Custom Places integration
With the standard Places integration the Localytics SDK will automatically monitor geofences and update the device's location using the lowest power setting. However, if you prefer to get location updates yourself and monitor geofences, you can use the APIs described below to notify the Localytics SDK when geofences are entered and exited.
1. Getting geofences to monitor
On each location update get the closest 20 geofences to monitor for the given location as follows. The CircularRegion object contains a unique ID, name, radius, latitude, longitude, and attributes.
List<CircularRegion> geofences = Localytics.getGeofencesToMonitor(location.getLatitude(), location.getLongitude());
val geofences: List<CircularRegion> = Localytics.getGeofencesToMonitor(location.latitude, location.longgitude)
2. Notifying the SDK of geofence enter and exit triggers
For Places analytics and messaging functionality, notify the SDK when a geofence is entered or exited as follows.
CircularRegion geofence = new CircularRegion.Builder()
.setUniqueId(uniqueId)
.build();
Localytics.triggerRegion(geofence, Region.Event.ENTER, triggeringLocation);
val geofence = CircularRegion.Builder()
.setUniqueId(uniqueId)
.build()
Localytics.triggerRegion(geofence, Region.Event.ENTER, triggeringLocation)
3. Notifying the SDK of location updates
Get more accurate location data for your events and sessions by setting the current location of the device by following the steps in Tracking location.
4. Resume location updates and region monitoring on device boot
The Android OS won't automatically resume location updates and geofence monitoring after a device is powered off and back on. Therefore, you must create a BroadcastReceiver for the BOOT_COMPLETED Intent to resume location services.
-
Add the RECEIVE_BOOT_COMPLETED permission above the application element of your AndroidManifest.xml.
<uses-permission android:name="android.permission.RECEIVE_BOOT_COMPLETED" />
-
Add a declaration for a BroadcastReceiver that receives the BOOT_COMPLETED Intent within the application element of your AndroidManifest.xml
<receiver android:name=".MyBootReceiver" > <intent-filter> <action android:name="android.intent.action.BOOT_COMPLETED" /> </intent-filter> </receiver>
-
Implement MyBootReceiver to resume location updates and geofence monitoring. When the first location update is returned, get the closest geofences from the Localytics SDK and begin monitoring them as described in getting geofences to monitor.
public class MyBootReceiver extends BroadcastReceiver { @Override public void onReceive(final Context context, Intent intent) { // TODO: Create a GoogleApiClient and a LocationRequest // to resume location updates with a balanced power/accuracy priority. // When the first location update is returned, get the geofences // to monitor from the Localytics SDK and add them using a GeofencingRequest } }
class MyBootReceiver : BroadcastReceiver() { override fun onReceive(context: Context, intent: Intent) { // TODO: Create a GoogleApiClient and a LocationRequest // to resume location updates with a balanced power/accuracy priority. // When the first location update is returned, get the geofences // to monitor from the Localytics SDK and add them using a GeofencingRequest } }
Setting a custom identifier
Once a custom identifier is set, it is attached to each subsequent datapoint, similar to the behavior of custom dimensions. Unlike custom dimensions, however, custom identifiers only end up in export data. They are useful for attaching multiple unique identifiers to a given datapoint for use in joining your Localytics export data with other sources in an enterprise data warehouse. Custom identifiers are not used by the Localytics backend or Dashboard for anything and are just passed through to the export data.
Localytics.setIdentifier("Hair Color", "Black");
Advertising Info
By default, Localytics will use Google Mobile Ads SDK to check for Google's advertising identifier and for the Limit Ad Tracking preference. You can choose not to include Google Mobile Ads SDK by removing compile 'com.google.android.gms:play-services-ads-identifier:18.2.0' from your build.gradle dependencies.
Using Localytics with other attribution providers
Android only supports one BroadcastReceiver for the INSTALL_REFERRER IntentFilter. Therefore, if you need to use Localytics alongside other attribution providers, you need to follow the instructions below to delegate the referrer Intent to the other relevant BroadcastReceivers.
-
Create a BroadcastReceiver class and delegate the referrer Intent to the Localytics ReferralReceiver and any other relevant BroadcastReceivers as follows.
public class MyReferralReceiver extends BroadcastReceiver { @Override public void onReceive(Context context, Intent intent) { ReferralReceiver localyticsReferralReceiver = new ReferralReceiver(); localyticsReferralReceiver.onReceive(context, intent); OtherReceiver1 otherReceiver1 = new OtherReceiver1(); otherReceiver1.onReceive(context, intent); OtherReceiver2 otherReceiver2 = new OtherReceiver2(); otherReceiver2.onReceive(context, intent); } }
class MyReferralReceiver : BroadcastReceiver() { override fun onReceive(context: Context, intent: Intent) { val localyticsReferralReceiver = ReferralReceiver() localyticsReferralReceiver.onReceive(context, intent) val otherReceiver1 = OtherReceiver1() otherReceiver1.onReceive(context, intent) val otherReceiver2 = OtherReceiver2() otherReceiver2.onReceive(context, intent) } }
-
In your AndroidManifest.xml, include your custom BroadcastReceiver within the application tag as follows.
<receiver android:name=".MyReferralReceiver" android:exported="true"> <intent-filter> <action android:name="com.android.vending.INSTALL_REFERRER" /> </intent-filter> </receiver>
Update Google Play Services
The latest Google Play Services update must be installed on the user's device for functionality to work properly. Ensure that the user has the latest update as follows.
-
In your MainActivity create a unique request code as follows.
private static final int REQUEST_GOOGLE_PLAY_SERVICES = 100;
-
In onResume() of your MainActivity, check for Google API availability and prompt the user to update if neccessary as follows.
@Override protected void onResume() { super.onResume(); GoogleApiAvailability api = GoogleApiAvailability.getInstance(); int code = api.isGooglePlayServicesAvailable(this); if (code == ConnectionResult.SUCCESS) { // The device's Google Play Services version is up to date // If you are integrating Places, add the following line: Localytics.setLocationMonitoringEnabled(true); // If you are integating Push, uncomment the following line: // Localytics.registerPush(); } else if (api.isUserResolvableError(code)) { if (!api.showErrorDialogFragment(this, code, REQUEST_GOOGLE_PLAY_SERVICES)) { Toast.makeText(this, api.getErrorString(code), Toast.LENGTH_LONG).show(); } } else { Toast.makeText(this, api.getErrorString(code), Toast.LENGTH_LONG).show(); } }
protected override fun onResume() { super.onResume(); val api = GoogleApiAvailability.getInstance() val code = api.isGooglePlayServicesAvailable(this) if (code == ConnectionResult.SUCCESS) { // The device's Google Play Services version is up to date // If you are integrating Places, add the following line: Localytics.setLocationMonitoringEnabled(true) // If you are integating Push, uncomment the following line: // Localytics.registerPush() } else if (api.isUserResolvableError(code)) { if (!api.showErrorDialogFragment(this, code, REQUEST_GOOGLE_PLAY_SERVICES)) { Toast.makeText(this, api.getErrorString(code), Toast.LENGTH_LONG).show() } } else { Toast.makeText(this, api.getErrorString(code), Toast.LENGTH_LONG).show() } }
-
Handle the Google Play Services request code as follows.
@Override protected void onActivityResult(int requestCode, int resultCode, Intent data) { super.onActivityResult(requestCode, resultCode, data); switch(requestCode) { case REQUEST_GOOGLE_PLAY_SERVICES: if (resultCode == Activity.RESULT_OK) { // The device's Google Play Services version is up to date // If you are integrating Places, add the following line: Localytics.setLocationMonitoringEnabled(true); // If you are integating Push, add the following line: Localytics.registerPush(); } break; } }
protected override fun onActivityResult(requestCode: Int, resultCode: Int, data: Intent) { super.onActivityResult(requestCode, resultCode, data); when(requestCode) { REQUEST_GOOGLE_PLAY_SERVICES -> if (resultCode == Activity.RESULT_OK) { // The device's Google Play Services version is up to date // If you are integrating Places, add the following line: Localytics.setLocationMonitoringEnabled(true); // If you are integating Push, uncomment the following line: // Localytics.registerPush(); } break; } }
Sending a test mode push from the Dashboard
After completing push integration you can create a test campaign to send yourself a push message to be sure that everything is properly configured.
- Login to the Localytics Dashboard, navigate to Messaging, select your app key from the dropdown at the top of the screen, and click the + button at the top right of the screen.
- Name your campaign, e.g. "Push Test", and click Continue to Creatives.
- Under Message Body, enter a sample push alert message, e.g. "Push test example message".
- Select One Time and Immediately then click Continue and Confirm.
- Click Test on Device.
- Click Enable Test Mode.
- Use one of the options mentioned on the screen to open the test mode URL on your connected device. If the URL doesn't cause your app to open at this point, please ensure that you have completed all steps of Getting Started, especially the test mode step.
- Your test push message will appear on your connected device. If the push does not immediately appear, check that your server API key is correct, then wait a few minutes and retry.
Delaying Session Start In-Apps
There are certain scenarios (like when presenting a splash screen) in which In-apps set to trigger on Session Start should be delayed. In order to delay those messages you must implement the messaging callback. An example of how to delay those in-apps would look as follows:
@Override
public boolean localyticsShouldDelaySessionStartInAppMessages() {
return this.isSplashScreenShowing();
}
override fun localyticsShouldDelaySessionStartInAppMessages(): Boolean {
return this.isSplashScreenShowing()
}
Then in the future when in-apps that are triggered by Session Start are valid, call:
Localytics.triggerInAppMessagesForSessionStart();
Troubleshooting
To gain more insights into whether your Localytics tagging is occurring when expected, you can use the live monitor (requiring SDK 5.5 and later) and make sure that all analytics tags, such as Events and Customer ID, are being sent with the correct values.
You can also enable logging in your app using the code below. When looking at logs, a 202 response code indicates that an upload was successful. Be sure to disable logging in production builds. Localytics log output is required when contacting support.
Localytics.setLoggingEnabled(true);
Available in SDK 4.5 or higher. You can also save logs to your device in order to test devices on the go and view the logs afterward.
Localytics.redirectLogsToDisk(external, context);
If you wish to opt out of live monitor, you can disable the feature in the app delegate:
Localytics.setOption("ll_live_logging_enabled", false);
Updating the SDK
This section contains guides to help developers using older Localytics SDK versions to update their Localytics integration since a breaking change occurred.
Most Localytics SDK updates do not change existing interfaces and dependencies, though sometimes might add new interfaces. Because these are not breaking changes, you can effortlessly update to the latest Localytics SDK version before each of your app releases.
Localytics will infrequently introduce breaking changes as part of the introduction of new functionality or to lay a better foundation for future feature development.
Migrating to SDK v7
Update your build.gradle
In your project's app-level build.gradle, update your dependencies for Localytics, Firebase-Messaging (if using), and any Play Services libraries (if using) to at least the following:
dependencies {
implementation 'com.localytics.androidx:library:7.1.3'
implementation 'com.android.installreferrer:installreferrer:2.2'
implementation 'com.google.android.gms:play-services-ads-identifier:18.2.0'
implementation 'com.google.firebase:firebase-messaging'
}
Introducing the Builder Pattern to Our SDKs
Simplifying SDK Integration
new Localytics.Builder()
.setPauseDataUpload(false) // or true
.setLoggingEnabled(true) // or false
.setOptedOut(false) // or true
.setPrivacyOptedOut(false) // or true
.setLocationMonitoringEnabled(true) // or false
.setLocationMonitoringPersist(true) // or false
.redirectLogsToDisk(true, this)
.setTestModeEnabled(false) // or true
.autoIntegrate(this);
Localytics.Builder()
.setPauseDataUpload(false) // or true
.setLoggingEnabled(true) // or false
.setOptedOut(false) // or true
.setPrivacyOptedOut(false) // or true
.setLocationMonitoringEnabled(true) // or false
.setLocationMonitoringPersist(true) // or false
.redirectLogsToDisk(true, this)
.setTestModeEnabled(false) // or true
.autoIntegrate(this)
Localytics.setPushRegistrationId(token); or
Localytics.onNewIntent(this, intent); that need to be called at a later stage
from an Activity/Fragment or a Composable, still work as is for the flexibility.
Just make sure the integration has been called from the Application class.
Migrating to SDK v6
Update your build.gradle
In your project's app-level build.gradle, update your dependencies for Localytics, Firebase-Messaging (if using), and any Play Services libraries (if using) to at least the following:
dependencies {
implementation 'com.localytics.androidx:library:7.1.3'
implementation 'com.android.installreferrer:installreferrer:2.2'
implementation 'com.google.android.gms:play-services-ads-identifier:18.2.0'
implementation 'com.google.firebase:firebase-messaging'
}
Push Token Collection
For users who use the default integration and allow Localytics to handle token collection, nothing needs to be changed. However for customers who have used custom integrations, please continue reading.
While not something that has specifically changed in Localytics, the updated requirements within Firebase may cause you to change the way you have been collecting push tokens. For users who had been using a FirebaseInstanceIdService, remove all references to your FirebaseInstanceIdService, and instead add the following code to your FirebaseMessagingService:
@Override
public void onNewToken(String token) {
super.onNewToken(token);
Localytics.setPushRegistrationId(token);
}
override fun onNewToken(token: String) {
super.onNewToken(token)
Localytics.setPushRegistrationId(token)
}
Additionally, if your app code had been calling:
String token = FirebaseInstanceId.getInstance().getToken();
Localytics.setPushRegistrationId(token);
val token: String = FirebaseInstanceId.getInstance().token
Localytics.setPushRegistrationId(token);
Replace it with the new code as provided by Firebase:
FirebaseInstanceId.getInstance().getInstanceId().addOnSuccessListener(new OnSuccessListener<InstanceIdResult>() {
@Override
public void onSuccess(InstanceIdResult instanceIdResult) {
// Callback is called on the app's main thread
String token = instanceIdResult.getToken();
Localytics.setPushRegistrationId(token);
}
});
FirebaseInstanceId.getInstance().instanceId.addOnSuccessListener { instanceIdResult ->
// Callback is called on the app's main thread
val token = instanceIdResult.token
Localytics.setPushRegistrationId(token)
}
For more information on these changes, see the FirebaseInstanceId deprecation notes in the Firebase documentation
v5 to v6 API changes
If you are still using the following deleted method, please update it as appropriate:
Localytics.getInboxCampaigns(); -> Localytics.getDisplayableInboxCampaigns();
Updating to the new Google Attribution Library
As of March 2020, Google will be deprecating it's current Attribution install referrer. With this change, it is imperative that customers update their Localytics integration to ensure the Localytics SDK is able to properly collect attribution information.
In your build.gradle, simply update the version number for the Localytics SDK and include the new attribution library as a dependency:
implementation 'com.localytics.android:library:5.9.0'
implementation 'com.android.installreferrer:installreferrer:1.1'
Updating to v5.6.1
SDK 5.6.1 introduces a new required local token to help validate the source of custom intents. For customers who use the key ll_launch_intent in their push delivery, you will need to update your integration. Now, there is a required token that needs to be attached to the Intent to ensure Localytics will open it.
Intent trackingIntent = new Intent(this, PushTrackingActivity.class);
trackingIntent.putExtras(bundle);
trackingIntent.putExtra("ll_launch_intent", deeplinkIntent);
trackingIntent.putExtra("ll_launch_intent_token", Localytics.getLocalAuthenticationToken());
PendingIntent pendingIntent = PendingIntent.getActivity(this, campaignId, trackingIntent, PendingIntent.FLAG_UPDATE_CURRENT);
NotificationCompat.Builder notificationBuilder = new NotificationCompat.Builder(this, pushChannelId)
.setSmallIcon(R.mipmap.ic_launcher)
.setContentTitle(title)
.setContentText(message)
.setAutoCancel(true)
.setDefaults(Notification.DEFAULT_SOUND | Notification.DEFAULT_VIBRATE)
.setContentIntent(pendingIntent);
val trackingIntent = Intent(this, PushTrackingActivity::java.class)
trackingIntent.putExtras(bundle)
trackingIntent.putExtra("ll_launch_intent", deeplinkIntent)
trackingIntent.putExtra("ll_launch_intent_token", Localytics.getLocalAuthenticationToken())
val pendingIntent = PendingIntent.getActivity(this, campaignId, trackingIntent, PendingIntent.FLAG_UPDATE_CURRENT)
val notificationBuilder = NotificationCompat.Builder(this, pushChannelId)
.setSmallIcon(R.mipmap.ic_launcher)
.setContentTitle(title)
.setContentText(message)
.setAutoCancel(true)
.setDefaults(Notification.DEFAULT_SOUND | Notification.DEFAULT_VIBRATE)
.setContentIntent(pendingIntent)
If your integration is not updated, or if the token is not properly added to your intent, then the Localytics SDK will fallback to opening the app's Launcher activity.
A sample containing this flow can be found in our samples repo.
Updating to v5.3
SDK 5.3 introduces a new required localytics.xml key value pair. For customers who had been using Places and the Places BackgroundService, this value should be set to true.
<bool name="ll_places_background_service_enabled">true</bool>
Updating from v4 to v5
Update your gradle
Installing with Maven
In your project's app-level build.gradle, update your dependencies for Localytics, Android Support v4, and Google Mobile Ads.
dependencies {
implementation 'com.android.support:support-compat:26.0.2'
implementation 'com.google.android.gms:play-services-ads-identifier:18.2.0'
implementation 'com.android.installreferrer:installreferrer:1.1'
implementation 'com.localytics.android:library:5.0+'
}
Manual Installation
dependencies {
implementation files('libs/localytics.jar')
implementation 'com.android.support:support-compat:26.0.2'
implementation 'com.google.android.gms:play-services-ads-identifier:18.2.0'
implementation 'com.android.installreferrer:installreferrer:1.1'
}
Localytics.xml
Localytics Android SDK 5.0 includes a major upgrade in how the SDK is integrated. There is now a new and easier format for generating your integration files, which takes advantage of manifest merging in Android.
To use manifest merging, the Localytics SDK now relies on the presence of a localytics.xml file in the res/values directory of your project. You can download a sample localytics.xml file here.
If you have been using Localytics.setOptions(), you should set those same options in localytics.xml instead using the new key names and remove them from setOptions(). Old setOptions() keys used before SDK 5.0 will no longer work.
Review the full list of possible keys and how they are used. Modify any required values as needed for your integration.
When you compile your app, a section of the manifest will be modified by the Localytics SDK to include a number of services, receivers, activities, permissions and metadata elements. If you previously had these elements in your SDK then merge conflicts can arise and cause compiler errors. To avoid these merge conflicts you can do the following:
- If there is nothing custom about your Localytics integration, you can simply remove all the Localytics specific elements from your AndroidManifest.xml except for your test mode scheme and manifest merging should work automatically.
- If you are using Localytics elements in your manifest, but have modified some of the attributes on an element, consider adding tools:replace="THE_MODIFIED_ATTRIBUTE" on the element that is in question. This will ensure that the element you created is what is used in your app (and will ignore the Localytics value). For more about Push integrations, see the section on Push below. For more about Places integrations, see the section on Places below.
Push Updates in v5
Default Notification Channels
If you were previously setting options for a default notification channel with Localytics.setDefaultNotificationChannel(...), this method is removed and the new way to set one is through keys available in localytics.xml.
Firebase Cloud Messaging Updates
If you were calling Localytics.registerPush(YOUR_SENDER_ID), the method has been updated to remove the Sender ID argument.
If you are using Localytics to send all your push notifications and have not customized the Firebase Service classes, you can remove any receivers in your AndroidManifest.xml and set ll_fcm_push_services_enabled to true in your localytics.xml.
If you are using another push provider and you have customized the Firebase Service classes to handle pushes sent by them, you should set ll_fcm_push_services_enabled to false.
Check the current section on integrating Firebase Cloud Messaging for more information.
Places Updates in v5
For customers who are using Places and had the GeofenceTransitionService or BackgroundService in their AndroidManifest.xml, these must now be removed.
Also, please set ll_places_enabled to true in your localytics.xml, and Localytics will insert BootReceiver and LocationUpdateReceiver into the final app manifest.
v4 to v5 API changes
Please update any of the following methods:
Localytics.registerPush(senderId);
Localytics.handlePushNotificationReceived(data);
Localytics.setInboxCampaignRead(campaignId, read);
Localytics.triggerRegion(region, event);
Localytics.triggerRegions(regions, event);
Localytics.setMessagingListener(new MessagingListener() { ... });
Localytics.setMessagingListener(new MessagingListenerAdapter() { ... });
public void localyticsWillDisplayInAppMessage() { ... }
Localytics.onActivityPaused(activity);
To the following:
Localytics.registerPush();
Localytics.tagPushReceivedEvent(data);
Localytics.setInboxCampaignRead(campaign, read);
Localytics.triggerRegion(region, event, location);
Localytics.triggerRegions(regions, event, location);
Localytics.setMessagingListener(new MessagingListenerV2() { ... });
Localytics.setMessagingListener(new MessagingListenerV2Adapter() { ... });
public InAppConfiguration localyticsWillDisplayInAppMessage(@NonNull final InAppCampaign campaign,
@NonNull final InAppConfiguration configuration) {
// ...
return configuration;
}
Localytics.onActivityPause(activity);
Updating from v4.4 to v4.5+
Notification Channels
Android O introduced support for notification channels. These are displayed as "categories" throughout the system interface and are ways for users to subscribe to certain types of notifications that you specify.
If you do not specify a channel in your push campaign, Localytics SDK (v4.5 and up) will create and use a default channel for Localytics messages for all apps targeting and running on Android O. On SDK 5.0, the default channel can be configured using the localytics.xml file.
To set the proper channel id, name, and description, use the ll_default_push_channel_id, ll_default_push_channel_name, and ll_default_push_channel_description keys respectively. You can still support channels on versions of the SDK below v5.0 by modifying your app code.
Updating from v4.3 to v4.4+
BackgroundService
SDK 4.4 of the Android SDK adds a BackgroundService to help streamline Places and other updates in the background, particularly to support Android O.
Inbox
SDK 4.4 introduced a new public API (inboxListItemTapped) for handling Inbox list items that don't include a creative. In your app's activity that contains the list of inbox items, make sure that the onItemClick method now looks like the following:@Override
public void onItemClick(AdapterView<?> parent, View view, int position, long id) {
InboxListAdapter inboxListAdapter = (InboxListAdapter) parent.getAdapter();
InboxCampaign campaign = inboxListAdapter.getItem(position);
campaign.setRead(true);
inboxListAdapter.notifyDataSetChanged();
if (campaign.hasCreative()) {
Intent intent = new Intent(this, MyInboxDetailActivity.class);
intent.putExtra("campaign", campaign);
startActivity(intent);
} else {
Localytics.inboxListItemTapped(campaign);
}
}
Updating from v3 to v4
v4 of the Localytics Android SDK includes several public API changes, support for standard events, and improvements to its interface with the Google Play Services APIs. v4 also includes the new Places product and drops support for In-App Messaging on devices running Gingerbread (API level 9 and 10).
Follow the steps in each section below to make the appropriate adjustments for updating to v4.
Integration
In your MainActivity or your app's base Activity class that all extend, instead of setting the new Intent in onNewIntent, call the Localytics.onNewIntent(Activity activity, Intent intent); method.
Update the following
@Override
protected void onNewIntent(Intent intent) {
super.onNewIntent(intent);
setIntent(intent);
}
to
@Override
protected void onNewIntent(Intent intent) {
super.onNewIntent(intent);
Localytics.onNewIntent(this, intent);
}
Callbacks
v4 only supports a single callback for the AnalyticsListener interface and the MessagingListener interface. Therefore, the API has changed from add to set. If you are using one of these listeners, confirm that you are only setting this listener in one place in your app.
Replace the following method calls:
Localytics.addAnalyticsListener(this);
Localytics.addMessagingListener(this);
with the set versions as follows.
Localytics.setAnalyticsListener(this);
Localytics.setMessagingListener(this);
Push messaging
Within v4 push messaging has been updated to use InstanceID for Google Cloud Messaging registration and GcmReceiver from Play Services for handling receiving messages.
To migrate to these new APIs, you need to remove the previous Localytics PushReceiver and add the Play Services GcmReceiver, the Localytics GcmListenerService, and the Localytics InstanceIDListenerService to your AndroidManifest.xml. Replace YOUR-PACKAGE-NAME with your application's package wherever you see it.
-
Remove the Localytics PushReceiver from the application element.
<!-- Delete this receiver --> <receiver android:name="com.localytics.android.PushReceiver" android:permission="com.google.android.c2dm.permission.SEND" > <intent-filter> <action android:name="com.google.android.c2dm.intent.REGISTRATION" /> <action android:name="com.google.android.c2dm.intent.RECEIVE" /> <category android:name="YOUR-PACKAGE-NAME" /> </intent-filter> </receiver>
-
Add the Google Play Services GcmReceiver, Localytics GcmListenerService, and Localytics InstanceIDListenerService within the application element. If you are already using GCM or another push provider, follow our custom push configuration instructions.
<receiver android:name="com.google.android.gms.gcm.GcmReceiver" android:exported="true" android:permission="com.google.android.c2dm.permission.SEND" > <intent-filter> <action android:name="com.google.android.c2dm.intent.RECEIVE" /> <category android:name="YOUR-PACKAGE-NAME" /> </intent-filter> </receiver> <service android:name="com.localytics.android.GcmListenerService" android:exported="false" > <intent-filter> <action android:name="com.google.android.c2dm.intent.RECEIVE" /> </intent-filter> </service> <service android:name="com.localytics.android.InstanceIDListenerService" android:exported="false" > <intent-filter> <action android:name="com.google.android.gms.iid.InstanceID" /> </intent-filter> </service>
App inbox
v4 includes 2 Fragment classes for displaying inbox message detail views: InboxDetailFragment that extends android.app.Fragment and InboxDetailSupportFragment that extends android.support.v4.app.Fragment.
-
Update your Fragment class to use InboxDetailSupportFragment instead of InboxDetailFragment as follows. For more information on which Fragment class to use, see displaying an inbox messsage detail view.
Replace the following instance creation:
InboxDetailFragment fragment = InboxDetailFragment.newInstance(campaign);
with InboxDetailSupportFragment as follows.
InboxDetailSupportFragment fragment = InboxDetailSupportFragment.newInstance(campaign);
-
If you were using the onCreativeLoadError() callback method to handle message detail errors, the interface has changed from InboxDetailFragment.Callback to InboxDetailCallback.
Update the following
public class MyInboxActivity extends Activity implements InboxDetailFragment.Callback
to
public class MyInboxActivity extends Activity implements InboxDetailCallback
Options
If you were previously changing the default session timeout interval, use the new setOptions method.
Update the following
Localytics.setSessionTimeoutInterval(30);
to
HashMap<String, Object> options = new HashMap<>;
options.put("session_timeout", 30);
Localytics.setOptions(options);
Updating from v3.0 to v3.1+
Use this guide if you have integrated the Localytics library 3.0 into your app and are ready to upgrade to 3.1.
To ensure proper initialization and push message tracking, we made several important changes in SDK 3.1. These changes require a few adjustments to how the SDK is integrated into your app. If you are migrating from 3.0, please follow the steps below to make the appropriate adjustments.
-
If your integration is automatic, make the following changes.
-
In your main Activity, remove the call to registerActivityLifecycleCallbacks() in the Activity's onCreate() method. This method call should be removed in all other Activity classes as well.
public void onCreate(Bundle savedInstanceState) { super.onCreate(savedInstanceState); setContentView(R.layout.main); // Remove the next 2 lines getApplication().registerActivityLifecycleCallbacks( new LocalyticsActivityLifecycleCallbacks(this)); }
-
If you don't have a custom Application class, create one, and specify the name in your AndroidManifest.xml.
<application android:name=".MyApplication" android:icon="@drawable/ic_launcher" android:label="@string/app_name">
-
In your Application's onCreate() method, register LocalyticsActivityLifecycleCallbacks.
public class MyApplication extends Application { @Override public void onCreate() { super.onCreate(); // Register LocalyticsActivityLifecycleCallbacks registerActivityLifecycleCallbacks( new LocalyticsActivityLifecycleCallbacks(this)); } }
-
In your main Activity, remove the call to registerActivityLifecycleCallbacks() in the Activity's onCreate() method. This method call should be removed in all other Activity classes as well.
-
If your integration is manual, make the following changes.
-
In your main Activity, remove the call to Localytics.integrate() in the Activity's onCreate() method. This method call should be removed in all other Activity classes as well.
public void onCreate(Bundle savedInstanceState) { super.onCreate(savedInstanceState); setContentView(R.layout.main); // Remove this line Localytics.integrate(this); }
-
If you don't have a custom Application class, create one, and specify the name in your AndroidManifest.xml.
<application android:name=".MyApplication" android:icon="@drawable/ic_launcher" android:label="@string/app_name">
-
In your Application's onCreate() method, integrate Localytics.
public class MyApplication extends Application { @Override public void onCreate() { super.onCreate(); // Integrate Localytics Localytics.integrate(this); } }
-
In your main Activity, remove the call to Localytics.integrate() in the Activity's onCreate() method. This method call should be removed in all other Activity classes as well.
- Add Google Play Services in your project for GCM support. More information on Play Services can be found here.
-
Add the PushTrackingActivity to your AndroidManifest.xml. This Activity is used to track open rates for push notifications.
<activity android:name="com.localytics.android.PushTrackingActivity"/>
Legacy SDKs
This section contains a reference for some older Localytics SDK version integrations, APIs, and code snippets.
v4 SDK
Getting started
1. Install the SDK
The fastest and easiest way to use Localytics in your project is with Maven. If you cannot use Maven, use the manual installation approach.
-
Update your project’s build.gradle script to include the Localytics Maven repository.
apply plugin: 'com.android.application' repositories { jcenter() maven { url 'https://maven.localytics.com/public' } }
-
Add dependencies for Localytics, Android Support v4, and Google Play Services Ads.
dependencies { compile 'com.android.support:support-compat:26.0.2' compile 'com.google.android.gms:play-services-ads-identifier:18.2.0' compile 'com.localytics.android:library:4.5+' }
2. Modify AndroidManifest.xml
Add the following to your AndroidManifest.xml.
-
Your Localytics app key within the application element
<meta-data android:name="LOCALYTICS_APP_KEY" android:value="YOUR-LOCALYTICS-APP-KEY" />
-
Localytics ReferralReceiver within the application element
<receiver android:name="com.localytics.android.ReferralReceiver"> <intent-filter> <action android:name="com.android.vending.INSTALL_REFERRER" /> </intent-filter> </receiver>
-
Test mode intent-filter within your MainActivity activity element under the existing intent-filter (i.e. the one for android.intent.action.MAIN). Replace YOUR-LOCALYTICS-APP-KEY with your Localytics app key and be sure to prepend YOUR-LOCALYTICS-APP-KEY with amp as shown below.
<intent-filter>
  <data android:scheme="ampYOUR-LOCALYTICS-APP-KEY" />
  <action android:name="android.intent.action.VIEW" />
  <category android:name="android.intent.category.DEFAULT" />
  <category android:name="android.intent.category.BROWSABLE" />
</intent-filter>
-
Permissions above the application element
<uses-permission android:name="android.permission.INTERNET" /> <uses-permission android:name="android.permission.WAKE_LOCK" />
3. Modify your MainActivity
Override onNewIntent in your MainActivity as follows.
@Override
protected void onNewIntent(Intent intent) {
super.onNewIntent(intent);
Localytics.onNewIntent(this, intent);
}
4. Initialize the SDK
-
If you don't have a custom Application class, create one and specify the name in your AndroidManifest.xml as follows.
<application
  android:name=".MyApplication">
-
Make the following modifications to your Application class.
-
Import the Localytics package.
import com.localytics.androidx.*;
-
Integrate the Localytics SDK. If you support Android API levels less than 14 (Ice Cream Sandwich), then use alternative session management.
@Override public void onCreate() { super.onCreate(); Localytics.autoIntegrate(this); }
-
5. Next steps
Congratulations! You have successfully performed the basic Localytics integration and are now sending session data to Localytics. You can also use Localytics In-App Messaging to message users in your app, and you have everything you need to track where your most highly engaged users are coming from.
Note that it may take a few minutes for your first datapoints to show up within the Localytics Dashboard. In the meantime, we suggest reading the next few sections to learn how to:
- Track one user action as an event
- Track one user property as a profile attribute
- Integrate push messaging
We recommend doing these things before releasing your app for the first time with Localytics.
Push Integration
Firebase Cloud Messaging Integration
A sample project for using Localytics with Firebase Cloud Messaging is available in our Android samples Github repository.
1. Add Firebase to your Android project
Follow the instructions for Adding Firebase to your Android project. Ensure that you have followed both steps for Adding Firebase to your app and Adding the SDK.
2. Add the Firebase Cloud Messaging dependency
Add the dependency for Firebase Cloud Messaging (FCM) as follows.
dependencies {
compile 'com.android.support:support-compat:26.0.2'
compile 'com.google.android.gms:play-services-ads-identifier:18.2.0'
compile 'com.google.firebase:firebase-messaging:11.4.2'
compile 'com.localytics.android:library:4.5+'
}
3. Extend Firebase Service classes
-
Create a class that extends FirebaseInstanceIdService and pass the token to Localytics as follows.
public class MyFirebaseInstanceIDService extends FirebaseInstanceIdService { @Override public void onTokenRefresh() { String refreshedToken = FirebaseInstanceId.getInstance().getToken(); Localytics.setPushRegistrationId(refreshedToken); } }
-
Create a class that extends FirebaseMessagingService, and call Localytics.handleFirebaseMessage(Bundle data) with the received message to see if Localytics will handle it. Otherwise, handle the message yourself.
public class MyFirebaseMessagingService extends FirebaseMessagingService { /** * Localytics.handleFirebaseMessage will return true if Localytics identified the message * as one originating from Localytics. If it returns false, you should handle the message yourself. */ @Override public void onMessageReceived(RemoteMessage remoteMessage) { Map<String, String> data = remoteMessage.getData(); if (Localytics.handleFirebaseMessage(data)) { // Localytics handled the message; no need to continue. return; else { // The notification is not from Localytics or the Firebase Dashboard, so the app must handle it. showNotification(data.get("message")); } } private void showNotification(String message) { if (!TextUtils.isEmpty(message)) { Intent intent = new Intent(this, MainActivity.class); intent.addFlags(Intent.FLAG_ACTIVITY_CLEAR_TOP); PendingIntent pendingIntent = PendingIntent.getActivity(this, 0 /* Request code */, intent, PendingIntent.FLAG_ONE_SHOT); NotificationCompat.Builder notificationBuilder = new NotificationCompat.Builder(this, "SOME_CHANNEL_ID") .setSmallIcon(R.mipmap.ic_launcher) .setContentTitle("FCM Message") .setContentText(message) .setAutoCancel(true) .setDefaults(Notification.DEFAULT_SOUND | Notification.DEFAULT_VIBRATE) .setContentIntent(pendingIntent); NotificationManager notificationManager = (NotificationManager) getSystemService(Context.NOTIFICATION_SERVICE); notificationManager.notify(0, notificationBuilder.build()); } } }
4. Modify AndroidManifest.xml
Add declarations for your FirebaseInstanceIdService and FirebaseMessagingService and the Localytics PushTrackingActivity to the application element of your AndroidManifest.xml.
<service
android:name=".MyFirebaseInstanceIDService">
<intent-filter>
<action android:name="com.google.firebase.INSTANCE_ID_EVENT"/>
</intent-filter>
</service>
<service
android:name=".MyFirebaseMessagingService">
<intent-filter>
<action android:name="com.google.firebase.MESSAGING_EVENT"/>
</intent-filter>
</service>
<activity android:name="com.localytics.android.PushTrackingActivity"/>
5. Add your server API key to the Localytics Dashboard
-
Retrieve your server API key from your Firebase project's settings as shown in the steps in the image below.
-
Log in to the Localytics Dashboard, navigate to Settings > Apps, and input your server API key within Add Certs as shown in the steps in the image below.
6. Test push integration
If you have integrated SDK version 4.1 or later, use the Rapid Push Verification page to confirm that you have integrated push correctly. Be sure to select the correct app in the dropdown at the top of the page.
7. Next steps
Since the release of Lollipop (API 21), the material design style dictates that all non-alpha channels in notification icons be ignored. Therefore, depending on the shape of your app icon, your notification icon may not appear as desired on devices running Lollipop or later. To change the notification icon and accent color, use MessagingListener#localyticsWillShowPushNotification to modify the NotificationCompat.Builder to meet your UI needs by following the steps in Modifying push notifications.
Google Cloud Messaging Integration
A sample project for using Localytics with Google Cloud Messaging is available in our Android samples Github repository.
1. Create a Google API project and enable GCM
- Visit the Google services page.
- Create or choose your app and package name and click Choose and configure services.
- Click the Cloud Messaging button.
- Note your Server API Key and Sender ID.
2. Add the Google Cloud Messaging dependency
Add the dependency for Google Cloud Messaging (GCM).
dependencies {
compile 'com.android.support:support-compat:26.0.2'
compile 'com.google.android.gms:play-services-ads-identifier:18.2.0'
compile 'com.google.android.gms:play-services-gcm:11.4.2'
compile 'com.localytics.android:library:4.5+'
}
3. Modify AndroidManifest.xml
Add the following to your AndroidManifest.xml. Replace YOUR-PACKAGE-NAME with your application's package wherever you see it.
-
Push permissions above the application element.
<uses-permission android:name="com.google.android.c2dm.permission.RECEIVE" /> <permission android:name="YOUR-PACKAGE-NAME.permission.C2D_MESSAGE" android:protectionLevel="signature" /> <uses-permission android:name="YOUR-PACKAGE-NAME.permission.C2D_MESSAGE" />
-
The Google Play Services GcmReceiver, Localytics GcmListenerService, and Localytics InstanceIDListenerService within the application element. If you are already using GCM or another push provider, follow our custom push configuration instructions.
<receiver android:name="com.google.android.gms.gcm.GcmReceiver" android:exported="true" android:permission="com.google.android.c2dm.permission.SEND" > <intent-filter> <action android:name="com.google.android.c2dm.intent.RECEIVE" /> <category android:name="YOUR-PACKAGE-NAME" /> </intent-filter> </receiver> <service android:name="com.localytics.android.GcmListenerService" android:exported="false" > <intent-filter> <action android:name="com.google.android.c2dm.intent.RECEIVE" /> </intent-filter> </service> <service android:name="com.localytics.android.InstanceIDListenerService" android:exported="false" > <intent-filter> <action android:name="com.google.android.gms.iid.InstanceID" /> </intent-filter> </service>
-
The Localytics PushTrackingActivity within the application element.
<activity android:name="com.localytics.android.PushTrackingActivity"/>
4. Register for push notifications in your app
Register for push within onCreate() of your app's MainActivity.
Localytics.registerPush();
Also, make sure that the user's device has the latest version of Google Play Services installed by following our guide for updating Play Services.
5. Add your server API Key to the Localytics Dashboard
-
Log in to the Localytics Dashboard, navigate to Settings > Apps, and input your server API key within Add Certs as shown in the steps in the image below.
6. Test push integration
If you have integrated SDK version 4.1 or later, use the Rapid Push Verification page to confirm that you have integrated push correctly. Be sure to select the correct app in the dropdown at the top of the page.
7. Next steps
Since the release of Lollipop (API 21), the material design style dictates that all non-alpha channels in notification icons be ignored. Therefore, depending on the shape of your app icon, your notification icon may not appear as desired on devices running Lollipop or later. To change the notification icon and accent color, use MessagingListener#localyticsWillShowPushNotification to modify the NotificationCompat.Builder to meet your UI needs by following the steps in Modifying push notifications.
Places Integration
One of the unique aspects of mobile is that users always have their devices with them. Places lets you take advantage of this by sending users content that's personalized to their current location. With Places, you can send notifications to users the instant they enter or exit a specific location. Additionally, you can analyze data about visits to physical locations, giving you access to insights that have never before been available. Read more about setting up Places geofences.
Before continuing, please be sure that you have completed all of the steps in Getting Started. If you want to manually monitor geofences, follow our custom places integration instructions.
1. Add the Google Play Services Location dependency
Update your project's build.gradle to include the Google Play Services location dependency as follows.
dependencies {
compile 'com.android.support:support-compat:26.0.2'
compile 'com.google.android.gms:play-services-ads-identifier:18.2.0'
compile 'com.google.android.gms:play-services-location:11.4.2'
compile 'com.localytics.android:library:4.5+'
}
2. Modify AndroidManifest.xml
Add the following to your AndroidManifest.xml as follows.
-
Permissions for accessing fine location and receiving boot completed intents above the application element.
<uses-permission android:name="android.permission.ACCESS_FINE_LOCATION" /> <uses-permission android:name="android.permission.RECEIVE_BOOT_COMPLETED" />
-
The Google Play Services version within the application element.
<meta-data android:name="com.google.android.gms.version" android:value="@integer/google_play_services_version" />
-
If using SDK v4.4 or lower include the Localytics GeofenceTransitionsService within the application element.
//SDK v4.4 and below <service android:name="com.localytics.android.GeofenceTransitionsService"/>
-
The Localytics BootReceiver within the application element.
<receiver android:name="com.localytics.android.BootReceiver" > <intent-filter> <action android:name="android.intent.action.BOOT_COMPLETED" /> </intent-filter> </receiver>
-
The Localytics PushTrackingActivity within the application element for tracking Places campaign performance.
<activity android:name="com.localytics.android.PushTrackingActivity"/>
-
The BackgroundService was added in SDK 4.4 and relies on GCM. The service depends on GCMTaskService to help Localytics ensure proper downloading and updating of Places geofences when the app is in the background, particularly on Android O. While the service is not required, it is highly recommended to ensure efficient and timely downloading and monitoring of geofences.
3. Enable location monitoring
Enable location monitoring in your Application class after integrating Localytics as follows.
@Override
public void onCreate() {
super.onCreate();
Localytics.autoIntegrate(this);
Localytics.setLocationMonitoringEnabled(true);
}
4. Make sure user has latest Google Play Services
Follow the guide on updating Google Play Services.
5. Request location permissions for Android Marshmallow
If you app is targeting Marshmallow (targetSdkVersion of 23 or higher), you need to request location permissions at runtime. If the reason that your app needs location permissions is not obvious, we recommend showing the user an explanation before presenting the permission prompt.
Request the location permission at runtime as follows.
-
Create a unique request code for your Activity as follows.
private static final int REQUEST_LOCATION_PERMISSION = 101;
-
In your Activity check for the location permission and request it if it is not granted as follows.
if (ActivityCompat.checkSelfPermission(this, Manifest.permission.ACCESS_FINE_LOCATION) != PackageManager.PERMISSION_GRANTED) { ActivityCompat.requestPermissions( this, new String[] {Manifest.permission.ACCESS_FINE_LOCATION}, REQUEST_LOCATION_PERMISSION ); }
-
In your Activity handle the permissions request result as follows.
@Override public void onRequestPermissionsResult( int requestCode, @NonNull String[] permissions, @NonNull int[] grantResults) { super.onRequestPermissionsResult(requestCode, permissions, grantResults); switch (requestCode) { case REQUEST_LOCATION_PERMISSION: if (permissions.length > 0 && permissions[0].equals(Manifest.permission.ACCESS_FINE_LOCATION) && grantResults[0] == PackageManager.PERMISSION_GRANTED) { Localytics.setLocationMonitoringEnabled(true); } else { // Show an explanation toast or dialog Toast.makeText(this, "The app needs location permissions to continue.", Toast.LENGTH_LONG).show(); } break; } }
Custom push configuration
Whether you are using another push provider or sending pushes with your own system, getting Localytics push messaging working alongside another implementation may take a few additional steps. The sections below will help you setup the correct configuration for your app.
Sending a registration ID to Localytics
If you are already registering with GCM you need to send that registration ID to Localytics.
-
Send the registration ID to Localyics as follows. If this is the first version of your app to include the Localytics SDK, call this method on the first app launch for this version and not just on a token refresh to ensure Localytics gets the current token for users updating from the previous app version.
When using GoogleCloudMessaging:
GoogleCloudMessaging gcm = GoogleCloudMessaging.getInstance(context); String registrationId = gcm.register(SENDER_ID); Localytics.setPushRegistrationId(registrationId);
When using InstanceID:
InstanceID instanceID = InstanceID.getInstance(context); String token = instanceID.getToken(SENDER_ID, GoogleCloudMessaging.INSTANCE_ID_SCOPE, null); Localytics.setPushRegistrationId(token);
When using Firebase:
String token = FirebaseInstanceId.getInstance().getToken(); Localytics.setPushRegistrationId(token);
-
After you have successfully set the push registration ID, follow the steps for using Localytics with GcmReceiver and a GcmListenerService or using Localytics with a standard BroadcastReceiver. By following one of these sections, notification display and push received and push opened tracking will automatically be handled. If you would prefer to build and display notifications yourself and manually track push received and push opened, follow the steps for building notifications and tagging push events.
Using Localytics with GcmReceiver and a GcmListenerService
Problems may arise when declaring multiple push BroadcastReceivers or Services because other receivers or services may not properly ignore pushes sent by Localytics. This can cause issues with how notifications are displayed (duplicates) and/or how push opens are tracked.
If you are using com.google.android.gms.gcm.GcmReceiver and a GcmListenerService that extends com.google.android.gms.gcm.GcmListenerService, change the parent class of your GcmListenerService to be com.localytics.android.GcmListenerService and add PushTrackingActivity to your AndroidManifest.xml.
A sample project for using Localytics with a custom GcmListenerService is available in our Android samples Github repository.
-
Extend com.localytics.android.GcmListenerService in your GcmListenerService and pass the message to the super class only if the received message is from Localytics. Otherwise, handle the message yourself as follows.
public class MyGcmIntentService extends com.localytics.android.GcmListenerService { /** * All pushes received from Localytics will contain an 'll' string extra which can be parsed into * a JSON object. This JSON object contains performance tracking information, such as a campaign * ID. Any push received containing this 'll' string extra, should be handled by the Localytics * super class. Any other push can be handled as you see fit. */ @Override public void onMessageReceived(String from, Bundle data) { if (data.containsKey("ll")) { super.onMessageReceived(from, data); } else { String message = data.getString("message"); if (!TextUtils.isEmpty(message)) { Intent mainIntent = new Intent(this, MainActivity.class); PendingIntent launchIntent = PendingIntent.getActivity(this, 1, mainIntent, PendingIntent.FLAG_UPDATE_CURRENT); NotificationCompat.Builder builder = new NotificationCompat.Builder(this, "SOME_CHANNEL_ID") .setSmallIcon(R.mipmap.ic_launcher) .setContentTitle(getString(R.string.app_name)) .setContentText(message) .setStyle(new NotificationCompat.BigTextStyle().bigText(message)) .setContentIntent(launchIntent) .setDefaults(Notification.DEFAULT_ALL) .setAutoCancel(true); NotificationManager notificationManager = (NotificationManager) getSystemService(Context.NOTIFICATION_SERVICE); notificationManager.notify(0, builder.build()); } } } }
-
Add declarations for the Google Play Services GcmReceiver, your GcmIntentService, and the Localytics PushTrackingActivity to the application element of your AndroidManifest.xml.
<receiver android:name="com.google.android.gms.gcm.GcmReceiver" android:exported="true" android:permission="com.google.android.c2dm.permission.SEND" > <intent-filter> <action android:name="com.google.android.c2dm.intent.RECEIVE" /> <category android:name="YOUR-PACKAGE-NAME" /> </intent-filter> </receiver> <service android:name=".MyGcmListenerService" android:exported="false" > <intent-filter> <action android:name="com.google.android.c2dm.intent.RECEIVE" /> </intent-filter> </service> <activity android:name="com.localytics.android.PushTrackingActivity"/>
-
You are now ready to continue with adding your server API key to the Localytics Dashboard.
Using Localytics with a standard BroadcastReceiver
Problems may arise when declaring multiple push BroadcastReceivers or Services because other receivers or services may not properly ignore pushes sent by Localytics. This can cause issues with how notifications are displayed (duplicates) and/or how push opens are tracked.
If you are using a standard BroadcastReceiver, forward the received Intent's Bundle to the Localytics SDK and add PushTrackingActivity to your AndroidManifest.xml.
A sample project for using Localytics with a standard BroadcastReceiver is available in our Android samples Github repository.
-
If the received message is from Localytics, call Localytics.displayPushNotification(Bundle data) with the received message's Bundle. Othwerwise, handle the intent yourself as follows.
public class MyBroadcastReceiver extends BroadcastReceiver { /** * All pushes received from Localytics will contain an 'll' string extra which can be parsed into * a JSON object. This JSON object contains performance tracking information, such as a campaign * ID. Any push received containing this 'll' string extra, should be handled by the Localytics * SDK. Any other push can be handled as you see fit. */ @Override public void onReceive(Context context, Intent intent) { if (intent.hasExtra("ll")) { Localytics.displayPushNotification(intent.getExtras()); } else { String message = intent.getStringExtra("message"); if (!TextUtils.isEmpty(message)) { Intent mainIntent = new Intent(context, MainActivity.class); PendingIntent launchIntent = PendingIntent.getActivity(context, 1, mainIntent, PendingIntent.FLAG_UPDATE_CURRENT); NotificationCompat.Builder builder = new NotificationCompat.Builder(context, "SOME_CHANNEL_ID") .setSmallIcon(R.mipmap.ic_launcher) .setContentTitle(context.getString(R.string.app_name)) .setContentText(message) .setStyle(new NotificationCompat.BigTextStyle().bigText(message)) .setContentIntent(launchIntent) .setDefaults(Notification.DEFAULT_ALL) .setAutoCancel(true); NotificationManager notificationManager = (NotificationManager) context.getSystemService(Context.NOTIFICATION_SERVICE); notificationManager.notify(0, builder.build()); } } } }
-
Add your BroadcastReceiver and the Localytics PushTrackingActivity to the application element of your AndroidManifest.xml.
<receiver android:name=".MyBroadcastReceiver" android:permission="com.google.android.c2dm.permission.SEND" > <intent-filter> <action android:name="com.google.android.c2dm.intent.RECEIVE" /> <category android:name="YOUR-PACKAGE-NAME" /> </intent-filter> </receiver> <activity android:name="com.localytics.android.PushTrackingActivity"/>
-
You are now ready to continue with adding your server API key to the Localytics Dashboard.
Building notifications and tagging push events
If you would prefer to not use the Localytics GcmListenerService, you will need to handle building notifications and tagging the push received and push opened events.
-
Declare the Google Play Services GcmReceiver, the Localytics PushTrackingActivity, and your GcmListenerService in your AndroidManifest.xml as follows.
<?xml version="1.0" encoding="utf-8"?> <manifest xmlns:android="http://schemas.android.com/apk/res/android" package="com.localytics.android.example" > <uses-permission android:name="com.google.android.c2dm.permission.RECEIVE" /> <permission android:name="com.localytics.android.example.permission.C2D_MESSAGE" android:protectionLevel="signature" /> <uses-permission android:name="com.localytics.android.example.permission.C2D_MESSAGE" /> <application> <activity android:name="com.localytics.android.PushTrackingActivity"/> <receiver android:name="com.google.android.gms.gcm.GcmReceiver" android:exported="true" android:permission="com.google.android.c2dm.permission.SEND" > <intent-filter> <action android:name="com.google.android.c2dm.intent.RECEIVE" /> <category android:name="com.localytics.android.example" /> </intent-filter> </receiver> <service android:name=".MyGcmListenerService" android:exported="false" > <intent-filter> <action android:name="com.google.android.c2dm.intent.RECEIVE" /> </intent-filter> </service> <service android:name="com.localytics.android.InstanceIDListenerService" android:exported="false" > <intent-filter> <action android:name="com.google.android.gms.iid.InstanceID" /> </intent-filter> </service> </application> </manifest>
-
When the Bundle is delivered to your Service, tag the push received event and build and show the notification using PushTrackingActivity as the PendingIntent.
public class MyGcmListenerService extends com.google.android.gms.gcm.GcmListenerService { @Override public void onMessageReceived(String from, Bundle data) { Localytics.tagPushReceivedEvent(data); String message = data.getString("message"); if (!TextUtils.isEmpty(message)) { Intent trackingIntent = new Intent(context, PushTrackingActivity.class); trackingIntent.putExtras(data); // add all extras from received bundle int requestCode = getRequestCode(data); PendingIntent contentIntent = PendingIntent.getActivity(context, requestCode, trackingIntent, PendingIntent.FLAG_UPDATE_CURRENT); NotificationCompat.Builder builder = new NotificationCompat.Builder(context, "SOME_CHANNEL_ID") .setSmallIcon(R.mipmap.ic_launcher) .setContentTitle(context.getString(R.string.app_name)) .setContentText(message) .setStyle(new NotificationCompat.BigTextStyle().bigText(message)) .setContentIntent(contentIntent) .setDefaults(Notification.DEFAULT_ALL) .setAutoCancel(true); NotificationManager notificationManager = (NotificationManager) context.getSystemService(Context.NOTIFICATION_SERVICE); notificationManager.notify(requestCode, builder.build()); } } /** * Get a unique requestCode so we don't override other unopened pushes. The Localytics SDK * uses the campaign ID (ca) within the 'll' JSON string extra. Use that value if it exists. */ private int getRequestCode(Bundle extras) { int requestCode = 1; if (extras != null && extras.containsKey("ll")) { try { JSONObject llObject = new JSONObject(extras.getString("ll")); requestCode = llObject.getInt("ca"); } catch (JSONException e) { } } return requestCode; } }
If you cannot use PushTrackingActivity in the PendingIntent, then you must handle tagging the push opened event when your Activity resumes.
-
When building the notification include the ll key as an extra in the PendingIntent Intent by adding all the extras from the received Intent as follows.
public class MyGcmListenerService extends com.google.android.gms.gcm.GcmListenerService { @Override public void onMessageReceived(String from, Bundle data) { Localytics.tagPushReceivedEvent(data); String message = data.getString("message"); if (!TextUtils.isEmpty(message)) { Intent launchIntent = new Intent(context, MainActivity.class); launchIntent.putExtras(data); // add all extras from received bundle int requestCode = getRequestCode(data); PendingIntent contentIntent = PendingIntent.getActivity(context, requestCode, trackingIntent, PendingIntent.FLAG_UPDATE_CURRENT); NotificationCompat.Builder builder = new NotificationCompat.Builder(context, "SOME_CHANNEL_ID") .setSmallIcon(R.mipmap.ic_launcher) .setContentTitle(context.getString(R.string.app_name)) .setContentText(message) .setStyle(new NotificationCompat.BigTextStyle().bigText(message)) .setContentIntent(contentIntent) .setDefaults(Notification.DEFAULT_ALL) .setAutoCancel(true); NotificationManager notificationManager = (NotificationManager) context.getSystemService(Context.NOTIFICATION_SERVICE); notificationManager.notify(requestCode, builder.build()); } } /** * Get a unique requestCode so we don't override other unopened pushes. The Localytics SDK * uses the campaign ID (ca) within the 'll' JSON string extra. Use that value if it exists. */ private int getRequestCode(Bundle extras) { int requestCode = 1; if (extras != null && extras.containsKey("ll")) { try { JSONObject llObject = new JSONObject(extras.getString("ll")); requestCode = llObject.getInt("ca"); } catch (JSONException e) { } } return requestCode; } }
-
When your Activity resumes or receives the new Intent, handle the push opened as follows. We recommend using a base Activity that all Activities in our app extend so any Activity can be used in the PendingIntent.
public class BaseActivity extends FragmentActivity { @Override protected void onResume() { super.onResume(); Localytics.handlePushNotificationOpened(getIntent()); } @Override protected void onNewIntent(Intent intent) { super.onNewIntent(intent); Localytics.handlePushNotificationOpened(intent); } }
-
You are now ready to continue with adding your server API key to the Localytics Dashboard.
v3 SDK
Getting started
1. Install the SDK
The fastest and easiest way to use Localytics in your project is with Maven. If you cannot use Maven, use the manual installation approach.
-
Update your project’s build.gradle script to include the Localytics Maven repository.
apply plugin: 'com.android.application' repositories { jcenter() maven { url 'https://maven.localytics.com/public' } }
-
Add dependencies for Localytics, Android Support v4, and Google Play Services.
dependencies { compile 'com.android.support:support-v4:23.1.0' compile 'com.google.android.gms:play-services-gcm:8.4.0' compile 'com.google.android.gms:play-services-ads-identifier:18.2.0' compile 'com.localytics.android:library:3.8+' }
2. Modify AndroidManifest.xml
Add the following to your AndroidManifest.xml.
-
Your Localytics app key within the application tag
<meta-data android:name="LOCALYTICS_APP_KEY" android:value="YOUR-LOCALYTICS-APP-KEY" />
-
Localytics ReferralReceiver within the application tag
<receiver android:name="com.localytics.android.ReferralReceiver" android:exported="true"> <intent-filter> <action android:name="com.android.vending.INSTALL_REFERRER" /> </intent-filter> </receiver>
-
Test mode intent-filter within your MainActivity activity tag under the existing intent-filter (i.e. the one for android.intent.action.MAIN). Replace YOUR-LOCALYTICS-APP-KEY with your Localytics
app key.
<intent-filter> <data android:scheme="ampYOUR-LOCALYTICS-APP-KEY" /> <action android:name="android.intent.action.VIEW" /> <category android:name="android.intent.category.DEFAULT" /> <category android:name="android.intent.category.BROWSABLE" /> </intent-filter>
-
Permissions above the application tag
<uses-permission android:name="android.permission.INTERNET" /> <uses-permission android:name="android.permission.WAKE_LOCK" />
3. Modify your MainActivity
Override onNewIntent in your MainActivity as follows.
@Override
protected void onNewIntent(Intent intent) {
super.onNewIntent(intent);
setIntent(intent);
}
4. Subclass FragmentActivity
Subclass FragmentActivity in every Activity as follows.
public class Activity extends FragmentActivity
5. Initialize the SDK
-
If you don't have a custom Application class, create one and specify the name in your AndroidManifest.xml as follows.
<application android:name=".MyApplication">
-
Make the following modifications to your Application class.
-
Import the Localytics package.
import com.localytics.androidx.*;
-
Register LocalyticsActivityLifecycleCallbacks. If you support Android API levels less than 14 (Ice Cream Sandwich), then use alternative session management.
@Override public void onCreate() { super.onCreate(); registerActivityLifecycleCallbacks( new LocalyticsActivityLifecycleCallbacks(this)); }
-
6. Next steps
Congratulations! You have successfully performed the basic Localytics integration and are now sending session data to Localytics. You can also use Localytics In-App Messaging to message users in your app, and you have everything you need to track where your most highly engaged users are coming from.
Note that it may take a few minutes for your first datapoints to show up within the Localytics Dashboard. In the meantime, we suggest reading the next few sections to learn how to:
- Track one user action as an event
- Track one user property as a profile attribute
- Integrate push messaging
We recommend doing these things before releasing your app for the first time with Localytics.
In-app messaging
Dependencies
To use Localytics In-App Messaging within your Android app, you need to extend android.support.v4.app.FragmentActivity in every Activity in which you plan on showing in-app messages. This requirement is necessary because the Localytics SDK uses the android.support.v4.app.DialogFragment class to display campaigns within your app. Using a DialogFragment is the best way to present UI on top of your app; we don't want to try to inject a View directly into your the layout of your Activity. If you're not already using FragmentActivity or any of it's subclasses in your app (i.e. ActionBarActivity or AppCompatActivity), all you need to do to enable in-app messaging is to follow our Getting Started which includes instructions to extend FragmentActivity instead of Activity in all of your app's Activities.
Push messaging
Before continuing, please be sure that you have completed all of the steps in Getting Started. If you are already using GCM for push in your app, follow our custom push configuration instructions.
1. Create a Google API project and enable GCM
- Visit the Google services page.
- Create or choose your app and package name and click Choose and configure services.
- Click the Cloud Messaging button.
- Note your Server API Key and Sender ID.
2. Modify AndroidManifest.xml
Add the following to your AndroidManifest.xml. Replace YOUR-PACKAGE-NAME with your application's package wherever you see it.
-
Push permissions above the application element.
<uses-permission android:name="com.google.android.c2dm.permission.RECEIVE" /> <permission android:name="YOUR-PACKAGE-NAME.permission.C2D_MESSAGE" android:protectionLevel="signature" /> <uses-permission android:name="YOUR-PACKAGE-NAME.permission.C2D_MESSAGE" />
-
The Localytics PushReceiver within the application element. If you are already using GCM or another push provider, follow our custom push configuration instructions.
<receiver android:name="com.localytics.android.PushReceiver" android:permission="com.google.android.c2dm.permission.SEND" > <intent-filter> <action android:name="com.google.android.c2dm.intent.REGISTRATION" /> <action android:name="com.google.android.c2dm.intent.RECEIVE" /> <category android:name="YOUR-PACKAGE-NAME" /> </intent-filter> </receiver>
-
The Localytics PushTrackingActivity within the application element.
<activity android:name="com.localytics.android.PushTrackingActivity"/>
3. Register for push notifications in your app
Register for push within onCreate() of your app's MainActivity.
Localytics.registerPush();
4. Add your Server API Key to the Localytics Dashboard
-
Log in to the Localytics Dashboard, navigate to Settings > Apps, and input your server API key within Add Certs as shown in the steps in the image below.
5. Send yourself a test push message
After completing push integration you can create a test campaign to send yourself a push message to be sure that everything is properly configured.
- Login to the Localytics Dashboard, navigate to Messaging, select your app key from the dropdown at the top of the screen, and click the + button at the top right of the screen.
- Name your campaign, e.g. "Push Test", and click Continue to Creatives.
- Under Message Body, enter a sample push alert message, e.g. "Push test example message".
- Select One Time and Immediately then click Continue and Confirm.
- Click Test on Device.
- Click Enable Test Mode.
- Use one of the options mentioned on the screen to open the test mode URL on your connected device. If the URL doesn't cause your app to open at this point, please ensure that you have completed all steps of Getting Started, especially the test mode step.
- Your test push message will appear on your connected device. If the push does not immediately appear, check that your server API key is correct, then wait a few minutes and retry.
6. Next steps
After you have setup push notifications, configure your notification options. We recommend that you set at least set the accent color and icon for supporting Lollipop (API 21) and above.
App Inbox
Display an inbox message detail view
You must use InboxDetailFragment to display an inbox message detail view. Create a new InboxDetailFragment using an InboxCampaign object as follows.
InboxCampaign campaign = /* campaign from InboxListAdapter or Localytics.getInboxCampaigns */;
InboxDetailFragment fragment = InboxDetailFragment.newInstance(campaign);
If you are using InboxListAdapter, you should add an AdapterView.OnItemClickListener to your ListView that handles marking the campaign as read, refreshing the adapter, and showing the detail view in a separate Activity or Fragment as follows. The InboxCampaign class implements the Parcelable interface so you can add it to any Intent.
public class MyInboxActivity extends FragmentActivity implements AdapterView.OnItemClickListener {
@Override
protected void onCreate(Bundle savedInstanceState) {
super.onCreate(savedInstanceState);
setContentView(R.layout.activity_inbox);
ListView listView = (ListView) findViewById(R.id.lv_inbox);
listView.setOnItemClickListener(this);
InboxListAdapter inboxListAdapter = new InboxListAdapter(this);
listView.setAdapter(inboxListAdapter);
inboxListAdapter.getData(null);
}
@Override
public void onItemClick(AdapterView<?> parent, View view, int position, long id) {
InboxListAdapter inboxListAdapter = (InboxListAdapter) parent.getAdapter();
InboxCampaign campaign = inboxListAdapter.getItem(position);
campaign.setRead(true);
inboxListAdapter.notifyDataSetChanged();
if (campaign.hasCreative()) {
Intent intent = new Intent(this, MyInboxDetailActivity.class);
intent.putExtra("campaign", campaign);
startActivity(intent);
}
}
}
public class MyInboxDetailActivity extends FragmentActivity {
@Override
protected void onCreate(Bundle savedInstanceState) {
super.onCreate(savedInstanceState);
setContentView(R.layout.activity_inbox_detail);
if (savedInstanceState == null) {
InboxCampaign campaign = getIntent().getParcelableExtra("campaign");
InboxDetailFragment fragment = InboxDetailFragment.newInstance(campaign);
getSupportFragmentManager().beginTransaction()
.add(R.id.container, fragment)
.commit();
}
}
}
<?xml version="1.0" encoding="utf-8"?>
<FrameLayout
xmlns:android="http://schemas.android.com/apk/res/android"
android:id="@+id/container"
android:layout_width="match_parent"
android:layout_height="match_parent"/>
Handling detail message errors
In rare cases the inbox message detail view may fail to load. By default, InboxDetailFragment will display a gray "X" in the center of the view when this occurs. To provide your own custom error view, implement the InboxDetailFragment.Callback interface in the attached Activity as follows.
public class MyInboxActivity extends FragmentActivity implements InboxDetailFragment.Callback {
@Override
protected void onCreate(Bundle savedInstanceState) {
super.onCreate(savedInstanceState);
setContentView(R.layout.activity_inbox_campaign);
if (savedInstanceState == null) {
InboxCampaign campaign = getIntent().getParcelableExtra("campaign");
InboxDetailFragment fragment = InboxDetailFragment.newInstance(campaign);
getSupportFragmentManager().beginTransaction()
.add(R.id.container, fragment)
.commit();
}
}
@Override
public void onCreativeLoadError() {
findViewById(R.id.error_view).setVisibility(View.VISIBLE);
}
}
Alternative Session Management
The standard Localytics session management approach relies on the Localytics SDK to automatically listen for indications of state change (e.g. foreground / background transitions) in your app and then to track the state change accordingly. Most apps are able to use the standard approach. If you are unable to use the standard session management approach, the instructions below will help you to initialize the SDK to achieve the same result as the standard approach.
-
If you don't have a custom Application class, create one and specify the name in your AndroidManifest.xml as follows
<application android:name=".MyApplication">
-
In your Application class
-
Import the Localytics package
import com.localytics.android.*;
-
Initialize Localytics.
@Override
      public void onCreate() {
        super.onCreate();
        Localytics.integrate(this);
      }
-
-
In every Activity in your app, override onResume() and onPause() to manage the session and uploading. The simplest approach for accomplishing this task is to include this code in a common base Activity that each Activity extends.
-
In onResume, open a session, start an upload, and register the activity for messaging as follows.
@Override protected void onResume() { super.onResume(); Localytics.openSession(); Localytics.upload(); if (activity instanceof FragmentActivity) { Localytics.setInAppMessageDisplayActivity((FragmentActivity) activity); } Localytics.handleTestMode(activity.getIntent()); }
-
In onPause, close the session, upload data, and unregister the activity from messaging as follows.
@Override protected void onPause() { super.onPause(); if (activity instanceof FragmentActivity) { Localytics.dismissCurrentInAppMessage(); Localytics.clearInAppMessageDisplayActivity(); } Localytics.closeSession(); Localytics.upload(); }
-
Set the new Intent in onNewIntent() as follows.
@Override protected void onNewIntent(Intent intent) { super.onNewIntent(intent); setIntent(intent); }
-
-
You are now ready to continue with the next steps.
Callbacks
Analytics callbacks
These analytics callbacks are useful for setting the value of a custom dimension or profile attribute before a session opens, firing an event at the beginning or end of a session, or taking action in your app based on an auto-tagged campaign performance event in the Localytics SDK. All Localytics analytics callbacks are called on an internal background thread.
In your Application class implement the AnalyticsListener interface as follows.
public class MyApplication extends Application implements AnalyticsListener {
@Override
public void onCreate() {
super.onCreate();
registerActivityLifecycleCallbacks(
new LocalyticsActivityLifecycleCallbacks(this));
Localytics.addAnalyticsListener(this);
}
@Override
public void localyticsSessionWillOpen(boolean isFirst, boolean isUpgrade, boolean isResume) {
// ... do something ...
}
@Override
public void localyticsSessionDidOpen(boolean isFirst, boolean isUpgrade, boolean isResume) {
// ... do something ...
}
@Override
public void localyticsSessionWillClose() {
// ... do something ...
}
@Override
public void localyticsDidTagEvent(String eventName, Map<String, String> attributes, long customerValueIncrease) {
// ... do something ...
}
}
Alternatively, you can use the AnalyticsListenerAdapter class to listen for specific callbacks.
public class MyApplication extends Application {
@Override
public void onCreate() {
super.onCreate();
registerActivityLifecycleCallbacks(
new LocalyticsActivityLifecycleCallbacks(this));
Localytics.addAnalyticsListener(new AnalyticsListenerAdapter() {
@Override
public void localyticsSessionWillOpen(boolean isFirst, boolean isUpgrade, boolean isResume) {
// ... do something ...
}
});
}
}
Messaging callbacks
Messaging callbacks are useful for understanding when Localytics will display messaging campaigns. This can help you prevent conflicts with other views in your app, as well as potentially suppress the Localytics display. All Localytics messaging callbacks are called on the main thread.
In your Application class implement the MessagingListener interface as follows.
public class MyApplication extends Application implements MessagingListener {
@Override
public void onCreate() {
super.onCreate();
registerActivityLifecycleCallbacks(
new LocalyticsActivityLifecycleCallbacks(this));
Localytics.addMessagingListener(this);
}
@Override
public void localyticsWillDisplayInAppMessage() {
// ... do something ...
}
@Override
public void localyticsDidDisplayInAppMessage() {
// ... do something ...
}
@Override
public void localyticsWillDismissInAppMessage() {
// ... do something ...
}
@Override
public void localyticsDidDismissInAppMessage() {
// ... do something ...
}
}
Alternatively, you can use the MessagingListenerAdapter class to listen for specific callbacks.
public class MyApplication extends Application {
@Override
public void onCreate() {
super.onCreate();
registerActivityLifecycleCallbacks(
new LocalyticsActivityLifecycleCallbacks(this));
Localytics.addMessagingListener(new MessagingListenerAdapter() {
@Override
public void localyticsWillDisplayInAppMessage() {
// ... do something
}
});
}
}
Push notification options
When using the Localytics PushReceiver you can configure several notification options, such as the title, LED color, sound, accent color, and icon. We recommend that you at least set the accent color and icon for supporting Lollipop (API 21) and above.
To configure these options build a PushNotificationOptions object and set it on the Localytics SDK just after initializing as follows. Note: These options will apply to all notifications.
public class MyApplication extends Application {
@Override
public void onCreate() {
super.onCreate();
Localytics.autoIntegrate(this);
Localytics.setPushNotificationOptions(new PushNotificationOptions.Builder()
.setSmallIcon(getSmallIcon())
.setAccentColor(getColor(R.color.accent_color))
.setTitle(getString(R.string.notification_title))
.setSound(Uri.parse("android.resource://" + getPackageName() + "/" + R.raw.notification_sound);)
.build());
}
private int getSmallIcon() {
if (Build.VERSION.SDK_INT >= Build.VERSION_CODES.LOLLIPOP) {
return R.drawable.lollipop_icon;
} else {
return R.drawable.ic_launcher;
}
}
}
Custom push configuration
Whether you are using another push provider or sending pushes with your own system, getting Localytics push messaging working alongside another implementation may take a few additional steps. The sections below will help you setup the correct configuration for your app.
Sending a registration ID to Localytics
If you are already registering with GCM using the GoogleCloudMessaging or InstanceID APIs, you need to send that registration ID to Localytics.
-
Send the registration ID to Localyics as follows.
When using GoogleCloudMessaging:
GoogleCloudMessaging gcm = GoogleCloudMessaging.getInstance(context); String registrationId = gcm.register(SENDER_ID); Localytics.setPushRegistrationId(registrationId);
When using InstanceID:
InstanceID instanceID = InstanceID.getInstance(context); String token = instanceID.getToken(SENDER_ID, GoogleCloudMessaging.INSTANCE_ID_SCOPE, null); Localytics.setPushRegistrationId(token);
-
After you have successfully set the push registration ID, follow the steps for using multiple push broadcast receivers. By following the multiple push receivers steps, notification display and push received and push opened tracking will automatically be handled. If you would prefer to build and display notifications yourself and manually track push received and push opened, follow the steps for building notifications and tagging push events.
Using multiple push broadcast receivers
Problems may arise when declaring multiple push BroadcastReceivers because other receivers may not properly ignore pushes sent by Localytics. This can cause issues with how notifications are displayed (duplicates) and/or how push opens are tracked. For these reasons we recommend that you declare only one BroadcastReceiver in your AndroidManifest.xml for the com.google.android.c2dm.intent.RECEIVE IntentFilter. This receiver should then send the Intent to the appropriate BroadcastReceiver in code.
-
Declare PushTrackingActivity and your custom BroadcastReceiver in your AndroidManifest.xml as follows.
<?xml version="1.0" encoding="utf-8"?> <manifest xmlns:android="http://schemas.android.com/apk/res/android" package="com.localytics.android.example" > <uses-permission android:name="com.google.android.c2dm.permission.RECEIVE" /> <permission android:name="com.localytics.android.example.permission.C2D_MESSAGE" android:protectionLevel="signature" /> <uses-permission android:name="com.localytics.android.example.permission.C2D_MESSAGE" /> <application> <activity android:name="com.localytics.android.PushTrackingActivity"/> <receiver android:name=".MyPushReceiver" android:permission="com.google.android.c2dm.permission.SEND" > <intent-filter> <action android:name="com.google.android.c2dm.intent.REGISTRATION" /> <action android:name="com.google.android.c2dm.intent.RECEIVE" /> <category android:name="com.localytics.android.example" /> </intent-filter> </receiver> </application> </manifest>
-
Implement your custom BroadcastReceiver to send the Intent to the Localytics receiver and other appropriate BroadcastReceivers as follows.
public class MyPushReceiver extends BroadcastReceiver { /** * All pushes received from Localytics will contain an 'll' string extra which can be parsed into * a JSON object. This JSON object contains performance tracking information, such as a campaign * ID. Any push received containing this 'll' string extra, should be passed on to the Localytics * PushReceiver. Any other push can be handled as you see fit. */ @Override public void onReceive(Context context, Intent intent) { if (intent.getAction().equals("com.google.android.c2dm.intent.REGISTRATION")) { String registrationId = intent.getStringExtra("registration_id"); if (!TextUtils.isEmpty(registrationId)) { Localytics.setPushRegistrationId(registrationId); } } else if (intent.getExtras().containsKey("ll")) { new PushReceiver().onReceive(context, intent); } else if (/* check for other provider */) { new OtherPushReceiver().onReceive(context, intent); } else { String message = intent.getStringExtra("message"); if (!TextUtils.isEmpty(message)) { Intent mainIntent = new Intent(context, MainActivity.class); PendingIntent launchIntent = PendingIntent.getActivity(context, 1, mainIntent, PendingIntent.FLAG_UPDATE_CURRENT); NotificationCompat.Builder builder = new NotificationCompat.Builder(context, "SOME_CHANNEL_ID") .setSmallIcon(R.mipmap.ic_launcher) .setContentTitle(context.getString(R.string.app_name)) .setContentText(message) .setStyle(new NotificationCompat.BigTextStyle().bigText(message)) .setContentIntent(launchIntent) .setDefaults(Notification.DEFAULT_ALL) .setAutoCancel(true); NotificationManager notificationManager = (NotificationManager) context.getSystemService(Context.NOTIFICATION_SERVICE); notificationManager.notify(0, builder.build()); } } } }
-
You are now ready to continue with adding your server API key to the Localytics Dashboard.
Building notifications and tagging push events
If you would prefer to not use the Localytics PushReceiver, you will need to handle building notifications and tagging the push received and push opened events.
-
Declare PushTrackingActivity and your BroadcastReceiver in your AndroidManifest.xml as follows.
<?xml version="1.0" encoding="utf-8"?> <manifest xmlns:android="http://schemas.android.com/apk/res/android" package="com.localytics.android.example" > <uses-permission android:name="com.google.android.c2dm.permission.RECEIVE" /> <permission android:name="com.localytics.android.example.permission.C2D_MESSAGE" android:protectionLevel="signature" /> <uses-permission android:name="com.localytics.android.example.permission.C2D_MESSAGE" /> <application> <activity android:name="com.localytics.android.PushTrackingActivity"/> <receiver android:name=".MyPushReceiver" android:permission="com.google.android.c2dm.permission.SEND" > <intent-filter> <action android:name="com.google.android.c2dm.intent.REGISTRATION" /> <action android:name="com.google.android.c2dm.intent.RECEIVE" /> <category android:name="com.localytics.android.example" /> </intent-filter> </receiver> </application> </manifest>
-
When the Intent is delivered to your BroadcastReceiver, tag the push received event and build and show the notification using PushTrackingActivity as the PendingIntent.
public class MyPushReceiver extends BroadcastReceiver { @Override public void onReceive(Context context, Intent intent) { Localytics.handlePushNotificationReceived(intent); // tag push received event String message = intent.getStringExtra("message"); if (!TextUtils.isEmpty(message)) { Intent trackingIntent = new Intent(context, PushTrackingActivity.class); trackingIntent.putExtras(intent); // add all extras from received intent int requestCode = getRequestCode(intent.getExtras()); PendingIntent contentIntent = PendingIntent.getActivity(context, requestCode, trackingIntent, PendingIntent.FLAG_UPDATE_CURRENT); NotificationCompat.Builder builder = new NotificationCompat.Builder(context, "SOME_CHANNEL_ID") .setSmallIcon(R.mipmap.ic_launcher) .setContentTitle(context.getString(R.string.app_name)) .setContentText(message) .setStyle(new NotificationCompat.BigTextStyle().bigText(message)) .setContentIntent(contentIntent) .setDefaults(Notification.DEFAULT_ALL) .setAutoCancel(true); NotificationManager notificationManager = (NotificationManager) context.getSystemService(Context.NOTIFICATION_SERVICE); notificationManager.notify(requestCode, builder.build()); } } /** * Get a unique requestCode so we don't override other unopened pushes. The Localytics SDK * uses the campaign ID (ca) within the 'll' JSON string extra. Use that value if it exists. */ private int getRequestCode(Bundle extras) { int requestCode = 1; if (extras != null && extras.containsKey("ll")) { try { JSONObject llObject = new JSONObject(extras.getString("ll")); requestCode = llObject.getInt("ca"); } catch (JSONException e) { } } return requestCode; } }
If you cannot use PushTrackingActivity in the PendingIntent, then you must handle tagging the push opened event when your Activity resumes.
-
When building the notification include the ll key as an extra in the PendingIntent Intent by adding all the extras from the received Intent as follows.
public class MyPushReceiver extends BroadcastReceiver { @Override public void onReceive(Context context, Intent intent) { Localytics.handlePushNotificationReceived(intent); // tag push received event String message = intent.getStringExtra("message"); if (!TextUtils.isEmpty(message)) { Intent launchIntent = new Intent(context, MainActivity.class); launchIntent.putExtras(intent); // add all extras from received intent int requestCode = getRequestCode(intent.getExtras()); PendingIntent contentIntent = PendingIntent.getActivity(context, requestCode, launchIntent, PendingIntent.FLAG_UPDATE_CURRENT); NotificationCompat.Builder builder = new NotificationCompat.Builder(context, "SOME_CHANNEL_ID") .setSmallIcon(R.mipmap.ic_launcher) .setContentTitle(context.getString(R.string.app_name)) .setContentText(message) .setStyle(new NotificationCompat.BigTextStyle().bigText(message)) .setContentIntent(contentIntent) .setDefaults(Notification.DEFAULT_ALL) .setAutoCancel(true); NotificationManager notificationManager = (NotificationManager) context.getSystemService(Context.NOTIFICATION_SERVICE); notificationManager.notify(requestCode, builder.build()); } } /** * Get a unique requestCode so we don't override other unopened pushes. The Localytics SDK * uses the campaign ID (ca) within the 'll' JSON string extra. Use that value if it exists. */ private int getRequestCode(Bundle extras) { int requestCode = 1; if (extras != null && extras.containsKey("ll")) { try { JSONObject llObject = new JSONObject(extras.getString("ll")); requestCode = llObject.getInt("ca"); } catch (JSONException e) { } } return requestCode; } }
-
When your Activity resumes or receives the new Intent, handle the push opened as follows. We recommend using a base Activity that all Activities in our app extend so any Activity can be used in the PendingIntent.
public class BaseActivity extends FragmentActivity {
    @Override
    protected void onResume() {
        super.onResume();

        Localytics.handlePushNotificationOpened(getIntent());
    }

    @Override
    protected void onNewIntent(Intent intent) {
        super.onNewIntent(intent);

        Localytics.handlePushNotificationOpened(intent);
    }
}
-
You are now ready to continue with adding your server API key to the Localytics Dashboard.
Reference
Our full code-level Javadocs are available in Gradle/Maven as well as online.