Web
Getting Started
1. Integrate the SDK
In each page you want to track, include the following code at the end of the <head> section.
<script>
    + function(l, y, t, i, c, s) {
        l['LocalyticsGlobal'] = i;
        l[i] = function() {
            (l[i].q = l[i].q || []).push(arguments)
        };
        l[i].t = +new Date;
        (s = y.createElement(t)).type = 'text/javascript';
        s.src = '//web.localytics.com/v4/localytics.min.js';
        (c = y.getElementsByTagName(t)[0]).parentNode.insertBefore(s, c);
        ll('init', 'YOUR-LOCALYTICS-APP-KEY', {} /* Options */ );
    }(window, document, 'script', 'll');
</script>
2. Next steps
Congratulations! You have successfully performed the basic Localytics integration and are now sending session data to Localytics.
Note that it may take a few minutes for your first datapoints to show up within the Localytics Dashboard. In the meantime, we suggest reading about how to tag events.
Session lifecycle
With just the basic integration above, the Localytics SDK automatically measures user engagement and retention by tracking interactions with your site. On page load, the Localytics SDK creates and uploads a "start session" datapoint that captures many details about the user (e.g., Browser, Operating System, Country) that can be used to split and filter charts in the Localytics Dashboard.
After a period of inactivity, the SDK marks the current session as closed. If the user returns to your site within a timeout period (30 minutes by default) the session will be resumed as if the user never left. Otherwise, the session is finalized and uploaded the next time the user visits your site. In the Localytics Web SDK a user is considered active every time they load a page or perform an action that results in an event being tagged.
Session lifecycle tracking allows Localytics to calculate number of sessions, average session length, time between sessions, and a number of other core engagement metrics in the Localytics Dashboard.
Tagging events
Track user actions in your app using events in Localytics. All events must have a name, but you can also track the details of the action with event attributes. Event attributes help to provide context about why and how the action occurred. Every event can have up to 50 attributes unique to that event with each attribute having a limit of 255 characters.
Simple event
ll('tagEvent', 'Item Purchased');
Event with attributes
ll('tagEvent', 'Item Purchased', {'Item Name': 'Stickers', 'Aisle': 'Knick-knacks'});
Identifying users
The Localytics SDK automatically captures and uploads device IDs which the Localytics backend uses to uniquely identify users. Some apps connect to their own backend systems that use different IDs for uniquely identifying users. There is often additional identifying information, such as name and email address, connected with the external IDs. Localytics provides various setters for passing this information to Localytics when it is available in your app. Using these setters ensures that you will be able to properly connect Localytics IDs to the IDs available in other systems.
User ID
ll('setCustomerId', '3neRKTxbNWYKM4NJ')
User first name
ll('setCustomerFirstName', 'John')
User last name
ll('setCustomerLastName', 'Smith')
User full name
ll('setCustomerFullName', 'Sir John Smith, III')
User email address
ll('setCustomerEmail', 'sir.john@smith.com')
User profiles
Track user properties using profile attributes in Localytics. Each profile has one or more named properties that describe that user. Because they contain rich user data, profiles are excellent for creating audiences to target with personalized messaging. Each profile is identified by a unique user ID that you provide to Localytics via the SDK. If you do not set a known user ID, then the Localytics SDK automatically generates an anonymous profile ID.
Each time you set the value of a profile attribute, you can set the scope to "app-level" or "org-level". App-level profile attributes are only stored in relation to that specific Localytics app key, so they can only be used for building audiences for that one app. Org-level profile attributes are available to all apps in the org, so they can be used across multiple Localytics app keys, which might represent the same app on a different platform or multiple apps produced by your company. If you choose not to set a scope, the SDK defaults to "app-level" scope.
If you repeatedly set the same profile attribute value, the Localytics SDK and backend will take care of deduplicating the values for you so only the most recent value gets stored for that profile.
Best Practices
We upload data on Profiles as soon as you tag it to ensure that data is not lost when users close tabs or navigate to different sites. Unlike Dimensions, that data is sent up in individual HTTP requests and is not tied to a session or event uploaded afterwards. To minimize traffic for your users, we recommend tagging most user attributes after a login event or when those attributes change, rather than on every page on your site.
For example, if you are setting the user's last viewed news section in a Profile, consider tagging that only in the Category page, or even using the referrer URL to avoid setting that profile attribute if category for an individual article is the same as the previous page's.
Setting a profile attribute value
Numeric value
ll('setProfileAttribute', 'Age', 45, 'org');
Numeric values in a set
ll('setProfileAttribute', 'Lucky Numbers', [8, 12], 'app');
Date value
ll('setProfileAttribute', 'Last Purchase Date', new Date(), 'org');
Date values in a set
ll('setProfileAttribute', 'Upcoming Milestone Dates', [new Date('2015-10-01'), new Date('2016-03-14')], 'app');
String value
ll('setProfileAttribute', 'Hometown', 'New York, New York', 'org');
String values in a set
ll('setProfileAttribute', 'States Visited', ['New York', 'California', 'South Dakota'], 'app');
Removing a profile attribute
ll('deleteProfileAttribute', 'Days until graduation', 'org');
Adding to a set of profile attribute values
Adding a numeric value to a set
ll('addProfileAttributesToSet', 'Lucky numbers', [8], 'app');
Adding a date value to a set
ll('addProfileAttributesToSet', 'Upcoming Milestone Dates', [new Date('2015-04-19')], 'org');
Adding a string value to a set
ll('addProfileAttributesToSet', 'States visited', ['North Dakota'], 'app');
Removing from a set of profile attribute values
Removing numeric values from a set
ll('removeProfileAttributesFromSet', 'Lucky numbers', [8, 9], 'org');
Removing date values from a set
ll('removeProfileAttributesFromSet', 'Upcoming Milestone Dates', [new Date('2016-03-14')], 'app');
Removing string values from a set
ll('removeProfileAttributesFromSet', 'States visited', ['California'], 'org');
Incrementing a numeric profile attribute value
ll('incrementProfileAttribute', 'Age', 1, 'app');
Decrementing a numeric profile attribute value
ll('decrementProfileAttribute', 'Days Until Graduation', 3, 'app');
Push Messaging
Push messaging allows you to keep your users up-to-date and reengage them with your app after periods of inactivity.
Before continuing, please be sure that you have completed all of the steps in Getting Started. instructions.
SDK Integration
Localytics provides a number of different ways to integrate the SDK to support web push, ranging from the basic to more advanced solutions. In any web push integration, there are a few required steps:
- Registering a service worker
- Prompting the user for push permissions
- Storing the push subscription
This section will dive into some of the ways to accomplish this with the API's provided to you. If you prefer to use the simplest integration strategy that will require the fewest code changes, you may prefer to opt into basic integration. If you have multiple providers, or feel that you need more specific control over any of the aforementioned steps in push integration, you may prefer to opt into advanced integration.
Basic Integration
Basic integration allows for the simplest and easiest way to integrate the Localytics Web SDK with web push. Opting for basic integration will minimize your required changes while still providing all the benefits of web push.
To get started, first update your initialization options with the workerPath, workerName, and publicKey like the following:
ll('init', 'YOUR_APP_KEY', {
  workerPath: '/',
  workerName: 'worker.js',
  publicKey: 'YOUR_PUBLIC_KEY_AS_PROVIDED_TO_LOCALYTICS_DASHBOARD'
});
Fill out each key with the appropriate values. These values will be discussed more in depth in the following sections on service workers and web push certificates.
Next, you will have to ask your users for permissions to deliver them notifications. In the basic integration this is as simple as a single API call:
ll('registerPush',
  () => console.log('Successfully registered for push!'),
  (e) => console.error('Failed to register for push', e))
);
This method will fail if the publicKey, workerPath or workerName provided during initialization are invalid or missing. However, if everything is valid, this method will register the service worker with the browser, prompt your users for permission to display notifications, and store a push token within Localytics if that prompt was accepted. This method is safe to call on every session. If any of the steps have been previously completed, they will be a no-op on subsequent calls.
Advanced Integration
Advanced integration allows requires a slightly more complex approach, but provides much more flexibility. Opting for advanced integration may be right for you if you have multiple push providers on the web, or you prefer to have more control over the service worker registration and push prompt.
Regardles of how you prefer to register your service worker or prompt the user, the Localytics SDK will always need to be initialized with the workerPath, workerName, and publicKey like the following:
ll('init', 'YOUR_APP_KEY', {
  workerPath: 'YOUR_WEB_SERVICE_WORKER_HOST',
  workerName: 'YOUR_WEB_SERVICE_WORKER_FILE_NAME',
  publicKey: 'YOUR_PUBLIC_KEY_AS_PROVIDED_TO_LOCALYTICS_DASHBOARD'
});
Fill out each key with the appropriate values. These values will be discussed more in depth in the following sections on service workers and web push certificates.
Next, you will have to register the service worker. This can be accomplished using standard methods, but Localytics provides a convenience method to help you accomplish that:
ll('registerServiceWorker',
  (swRegistration) => console.log('Successfully registered service worker!'),
  (e) => console.error('Failed to register service worker', e)
);
Registering the service worker has no visible impact or effect to the end user, so regardless of how you intend to prompt your users, we suggest that you always register your service worker at the beginning of your session.
Once you have registered a service worker, you can then prompt the user for push permissions. This can also be accomplished using standard methods, but Localytics provides another convenience method:
ll('subscribeToWebPush',
  (subscription) => console.log('Successfully retrieved a push token!'),
  (e) => console.error('Failed to register for a push token - the user may have denied the permission', e)
);
Calling this method will show the user the browser prompt if they haven't previously seen it. Assuming they accept the prompt, the success callback will be called with the push subscription. If there is any error, or the user has denied permissions, the failure callback will be called. If you prefer to use the standard methods provided by the browser, make sure to call this method as well. If you don't, Localytics may not be able to retrieve the push subscription until the following session.
All of the above methods rely on the publicKey, workerPath and workerName provided during initialization to be present and valid. If everything is valid, this process will register the service worker with the browser, prompt your users for permission to display notifications, and store a push token within Localytics if that prompt was accepted. For each step, if any of the steps have been previously completed, they will be a no-op on subsequent calls.
Service Worker Integration
Service workers are scripts that your browser runs in the background, separate from a web page, opening the door to features that don't need a web page or user interaction. Service workers are required to support push messaging.
Localytics provides a number of different ways to integrate with a service worker, ranging from the basic to more advanced solutions. In any service worker integration, there are a few required steps:
- Initialize Localytics
- Register a callback for receiving push messages and forward them to Localytics for rendering
- Register a callback for push messages being opened and forward them to Localytics to handle deeplinking
- Register a callback for push subscription changes and forward them to Localytics to store it and update internally
This section will dive into some of the ways to accomplish this with the API's provided to you. If you prefer to use the simplest integration strategy that requires no code changes, you may prefer to opt into basic integration. If you have multiple providers, or feel that you need more specific control over any of the aforementioned steps in push integration, you may prefer to opt into advanced integration.
Basic Integration
In the basic integration, we suggest you take advantage of the Localytics service worker to handle all of the aforementioned steps. Create a new file named worker.js and in it include the following code:
self.appKey = 'YOUR_APP_KEY';
self.importScripts('https://web.localytics.com/v4/worker.js');
Make sure to replace YOUR_APP_KEY with your web page's app key. This service worker will handle tagging performance events, receiving push messages, rendering notifications, and deeplinking. Serve this file from the root of your domain.
Finally, update the initialization of the Localytics SDK as appropriate:
ll('init', 'YOUR_APP_KEY', {
  workerPath: '/',
  workerName: 'worker.js',
  publicKey: 'YOUR_VAPID_PUBLIC_KEY_AS_DEFINED_IN_LOCALYTICS_DASHBOARD'
});
Advanced Integration
In advanced integration, you will prefer to create and serve your own service worker. Following the next steps, you will be able to integrate Localytics fully into the service worker:
-
Import and initialize the Localytics SDK into the service worker:
importScripts('https://web.localytics.com/v4/localytics.min.js');
Localytics.initFromServiceWorker('YOUR_APP_KEY', {});
-
Register a callback for when a push notification is delivered to the browser. This callback allows you the opportunity to render the notification that came in. There are two possible approaches to rendering the notification:
-
The first approach allows Localytics to handle the notification entirely. If this notificaton originated from the Localytics system, the notification will be rendered and a Localytics Push Received event will be tagged:
self.addEventListener("push", event => {
  try {
    const success = Localytics.handleNotificationReceived(event);
    if (!success) {
      console.log('Failed to render push notification');
    }
  } catch (err) {
    console.error("Unable to render push notification", err, event);
  }
});
-
The second approach has Localytics parse the payload. If the push originated from the Localytics system, Localytics Push Received will be tagged and a proper payload will be returned. If not, then an empty object will be returned. You can then modify the push payload as you like, but for simplicity, this sample will render the notification:
self.addEventListener("push", event => {
  try {
    const {title, ...rest} = this.parseNotification(event.data.json());
    if (title) {
      // this push originated in the Localytics system.
      self.registration.showNotification(title, { ...rest });
    }
    // this push did not originate in the Localytics system - handle it yourself.
  } catch (err) {
    console.error("Unable to render push notification", err, event);
  }
});
-
-
Register a callback for when a push notification is opened by the user. This callback allows you the opportunity to determine how to act upon the user interaction. Once again there are two ways this integration can be handled:
-
The first approach allows Localytics to handle the event entirely. Pass the event to Localytics and allow Localytics to tag Localytics Push Opened as well as handle deeplinking:
self.addEventListener("notificationclick", (event) => {
  event.notification.close();
  var success = Localytics.handleNotificationOpened(event);
  if (success) {
    // Localytics handled the notification
  }
  // Localytics could not handle the notification.
});
-
The second approach prevents Localytics from doing it's default deeplinking. Use this approach if you would like to add some custom logic to your deeplinking behavior, but make sure to always attempt to tag Localytics Push Opened. In this example we just allow the event to open the original webpage:
self.addEventListener("notificationclick", (event) => {
  event.notification.close();
  Localytics.tagPushOpened(event);
  event.waitUntil(
    clients.openWindow(self.location.origin)
  );
});
-
-
Register a callback for when the push subscription has changed. This will allow Localytics to keep the push subscription up to date, and ensure the user stays push addressable:
self.addEventListener('pushsubscriptionchange', e => {
  e.waitUntil(self.registration.pushManager.subscribe(e.oldSubscription.options)
    .then(subscription => {
      Localytics.savePushSubscription(subscription)
    }));
});
Finally, save this file as worker.js, serve if from the root of your domain, and update the initialization of the Localytics SDK as appropriate:
ll('init', 'YOUR_APP_KEY', {
  workerPath: '/',
  workerName: 'worker.js',
  publicKey: 'YOUR_VAPID_PUBLIC_KEY_AS_DEFINED_IN_LOCALYTICS_DASHBOARD'
});
Web Push Certificates
In order for Localytics to be able to send pushes on your behalf, you must provide Localytics with a set of public and private keys. The public key must be additionally added to your webpage to request push tokens from the browser's push provider.
To generate web push certificates, Localytics provides two options:
-
Allow Localytics to generate the push certificates for you
If Localytics is your only provider of web push, this allows you to simply ask Localytics to generate valid VAPID standard public and private keys. To do so, navigate to the Localytics Dashboard's Settings page, find your app, and from the gear icon select "Add Certs". Then use the "Generate keys" button and hit "Save":
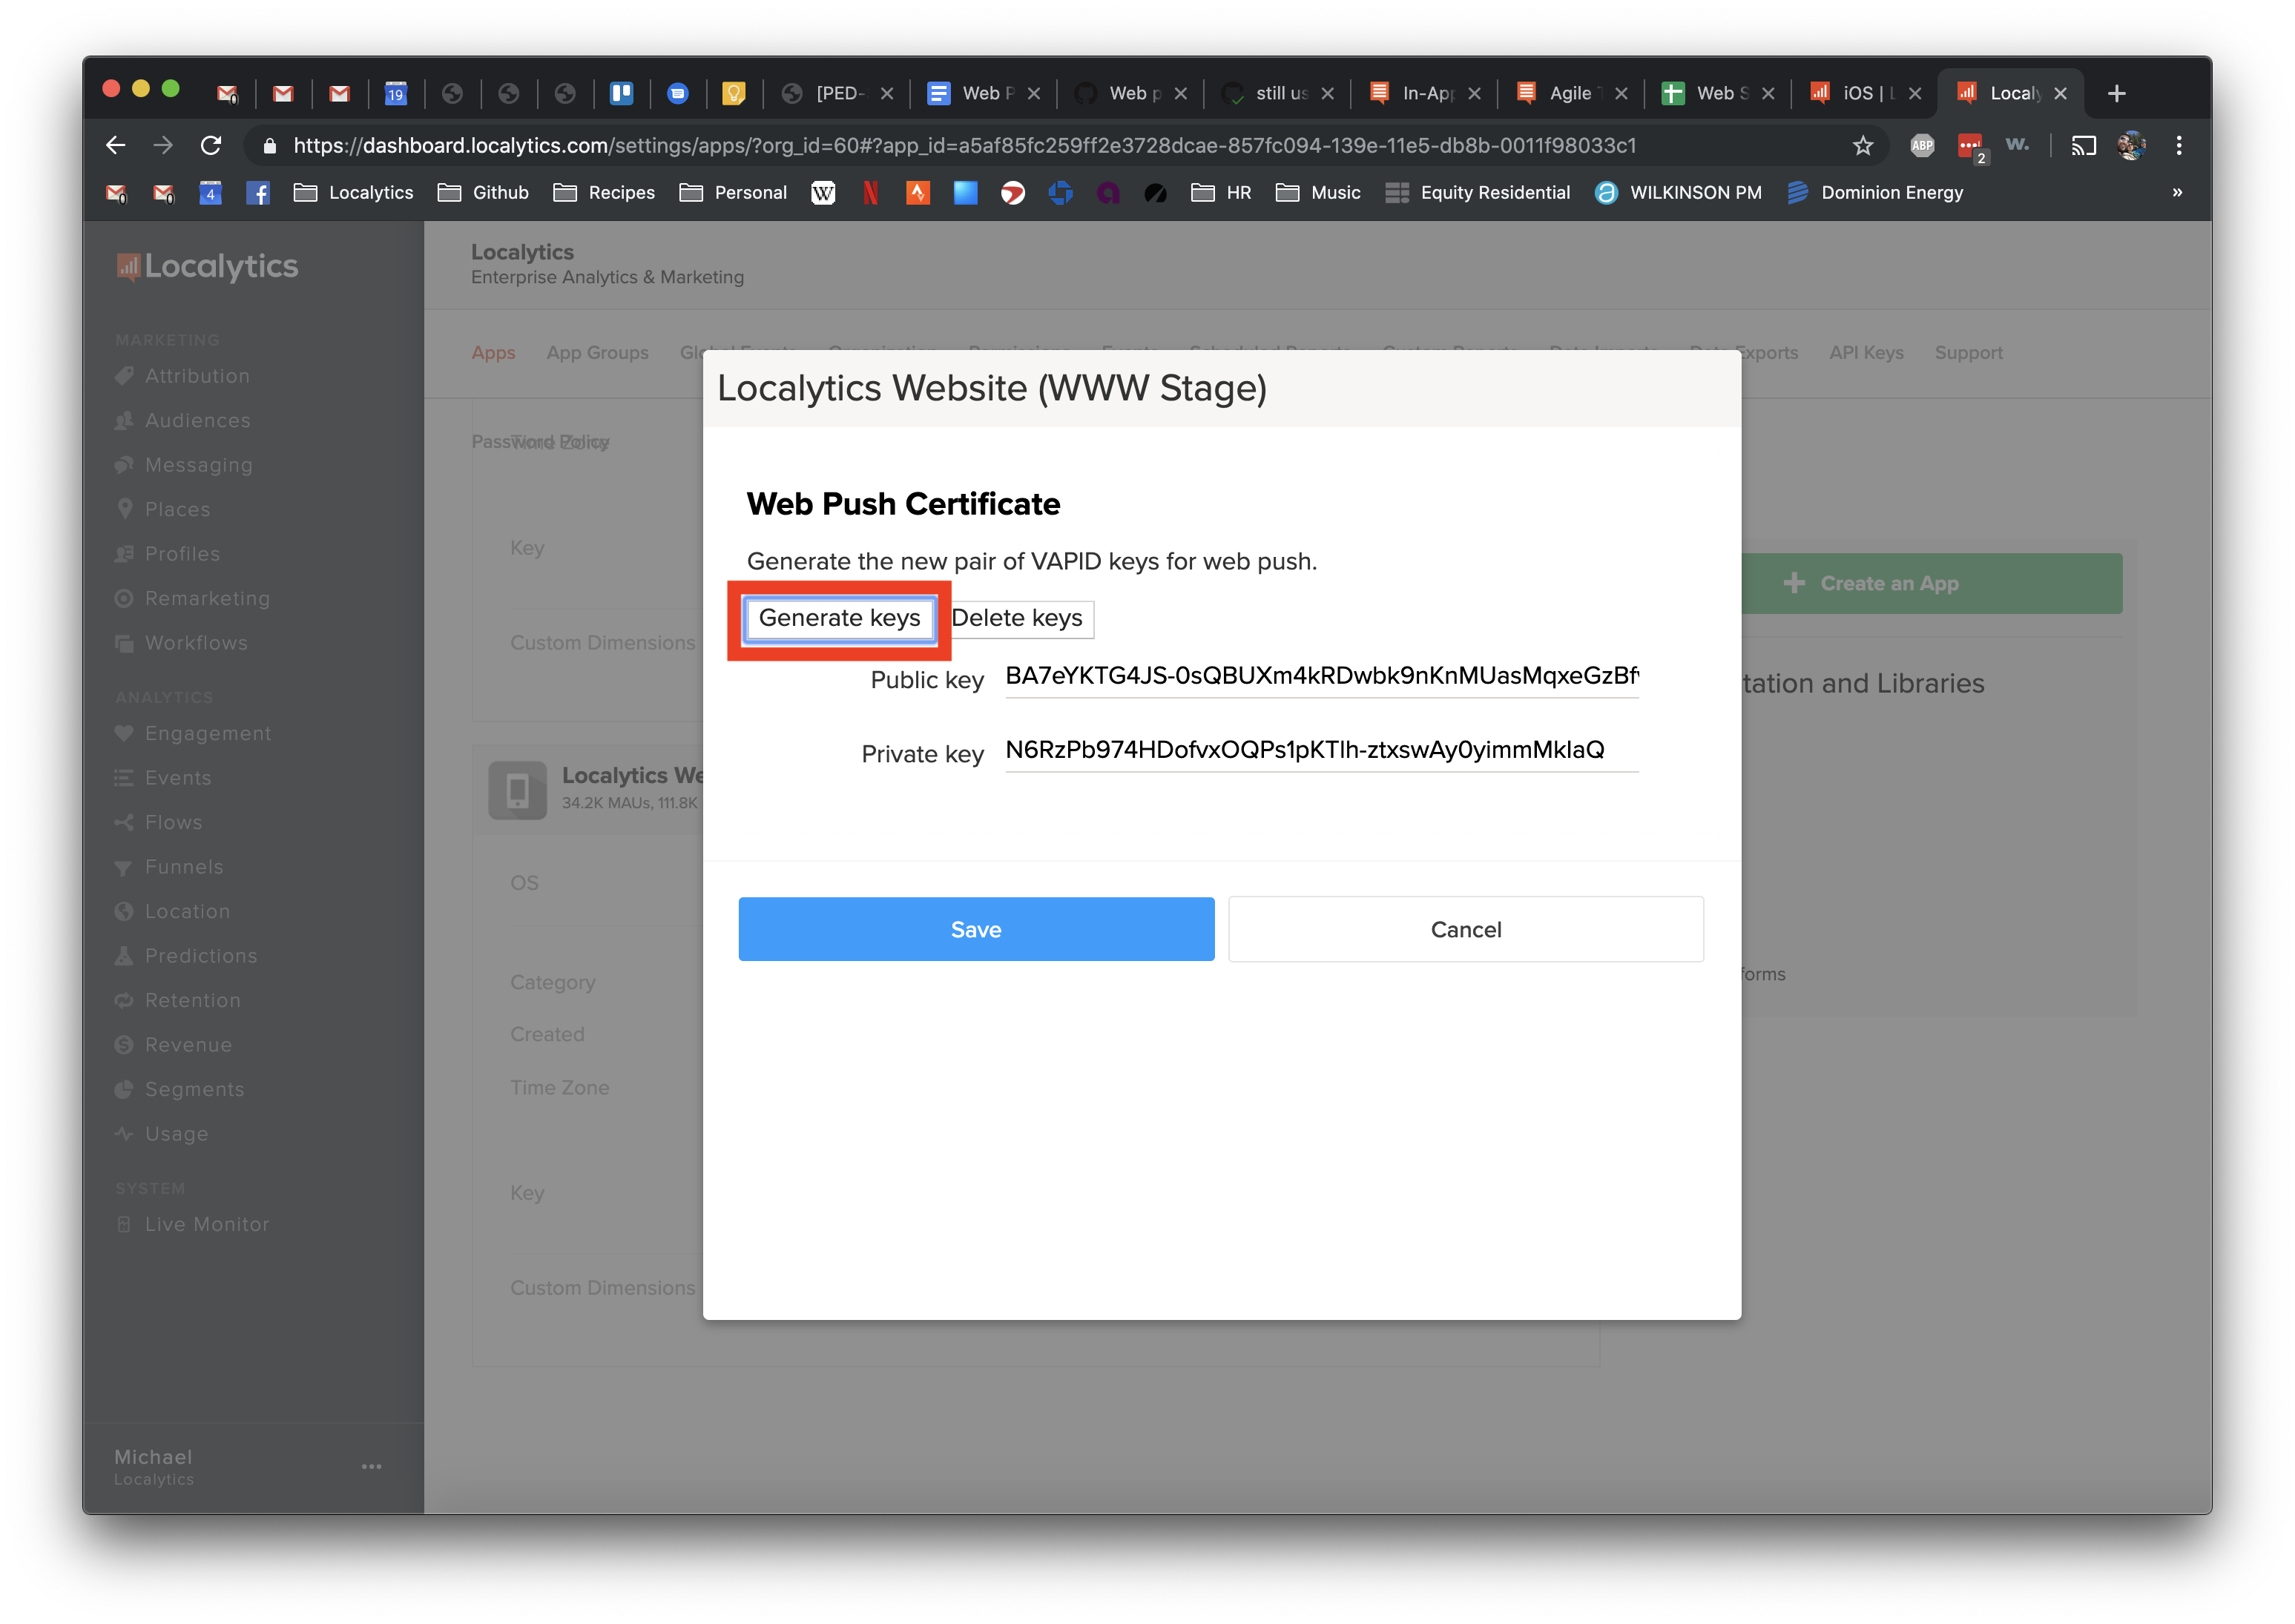
-
Generate your own push keys
If Localtyics is not your only provider of web push, or if you simply prefer manage your own keys, you may generate your own push keys using the VAPID standard. Once you have generated your own keys make sure to save them by navigating to the Localytics Dashboard's Settings page, find your app, and from the gear icon select "Add Certs". Finally upload the generated keys in the public and private textfields and click "Save".
Now that you have successfully uploaded certificates to the Localytics dashboard, return to your integration and ensure that the public keys are provided to the Localytics Web SDK at integration. Make sure your initialization code has at a minimum the following options:
ll('init', 'YOUR_APP_KEY', {
  workerPath: 'YOUR_WEB_SERVICE_WORKER_HOST',
  workerName: 'YOUR_WEB_SERVICE_WORKER_FILE_NAME',
  publicKey: 'YOUR_PUBLIC_KEY_AS_PROVIDED_TO_LOCALYTICS_DASHBOARD'
});
Tracking user flow
Track screens or views within your app so you can visualize user flow within the Localytics Dashboard. We recommend exhaustively tagging every visible view in your app.
The Localytics SDK will perform duplicate suppression on two identical tagged screens that occur in a row within a single session. For example, in the set of screens {"Screen 1", "Screen 1"}, the second screen would be suppressed. However, in the set {"Screen 1", "Screen 2", "Screen 1"}, no duplicate suppression would occur.
ll('tagScreen', 'Item List')
Tracking revenue
There are two ways to think about Lifetime Value (LTV) in Localytics: monetary and non-monetary. If your app allows real currency transactions, our Dashboard can show LTV in USD. If your app uses virtual currencies like coins or tokens, you can configure your app to report LTV as the raw data you pass in.
You can configure each Mobile App in Localytics to have either a monetary value or raw data for Lifetime Value:
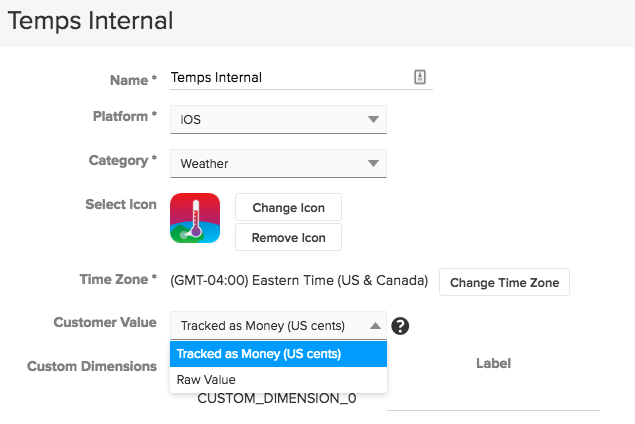
Tracking Monetary LTV
If you'd like to track LTV as monetary-based revenue, you should increment the value upon the completion of a purchase by the purchase amount. Make sure to configure your app in Localytics to show LTV as "Tracked as Money (US cents)".
LTV must be an integer amount, and the Localytics system requires you pass the number of USD cents as the LTV value in order to track money. For example, if the purchase amount is "USD $2.99", you should pass the integer "299" as the LTV. If the cents don't matter to you, feel free to round up to whole dollar values, but continue to pass the value as cents. If you want to track the rounded value of "USD $3.00", you should pass "300" as the value.
Currently, Localyics only allows LTV tracking in USD. If you want to track other currencies, you could convert the monetary amount to USD on the device before sending to Localytics.
Tracking Non-Monetary LTV
Another way to measure LTV is to track a non-monetary value important to your app. Examples include the number seconds spent engaged with content, or the amount of virtual currency earned. To track these values, send the corresponding integer value to Localytics. Make sure to configure your app in Localytics to show LTV as "Raw Value". Otherwise, Localytics will automatically divide your values by 100 and display a "$" in front of the values in the Dashboard.
LTV Examples
Increment user lifetime value (LTV) on any event using the optional LTV incrementer parameter as seen below.
ll('tagEvent', 'Item Purchased', {'Item Name': 'Stickers', 'Aisle': 'Knick-knacks'}, 499);
Setting custom dimensions
Custom dimensions are special fields that are used for splitting and filtering data within the Localytics Dashboard and are useful for storing user-level information. Custom dimensions are like sticky event attributes in the sense that once their value is set, it remains set until the value is changed again. Unlike event attributes, custom dimension values are attached to all three types of datapoints (session start, session close, and event) the same way that standard dimensions are which makes their values available within almost every report in the Localytics Dashboard.
Your app can have up to 20 custom dimensions, and they will be indexed between 0 and 19. Name all of your custom dimensions in the Localytics Dashboard > Settings > Apps > (find app) > Gear icon > Custom Dimensions.
Whenever a datapoint is created, all custom dimension values are attached to the datapoint. Therefore, it is ideal to set custom dimensions as soon as their value is known in all code paths in your app. See initialization options for instructions on how to set custom dimension values during initialization.
Set value
ll('setCustomDimension', 0, 'Trial');
Clear value
ll('setCustomDimension', 0, null);
Advanced
Privacy
To support privacy regulations such as the EU’s General Data Protection Regulation (GDPR), as well as our customers’ unique privacy policy requirements, Localytics provides various methods, tools, or controls to assist our customers in meeting their obligations.
There are additional considerations to take into account to ensure proper handling across devices, applications, and digital properties. Please be sure to reference all documentation, and consult with your product, privacy, and legal teams to ensure your implementation of our products meets your unique privacy and regulatory requirements. Localytics Support and Services teams may be engaged to assist, and you can refer to Localytics Privacy Approach documentation for additional context.
Opting users out
Many apps may allow their users the ability to opt out of data collection. In order to stop the Localytics SDK from collecting any additional data, customers can call:
ll("setOptedOut", true);
Any device that has opted out in Localytics will immediately close the current session (if there is one) and tag an opt out event indicating that the device is no longer reporting any future data. Any subsequent calls that would generate a datapoint (tagEvent and setProfileAttribute for example) will be dropped. Additional detail is available in this Localytics Help article.
The opt out setting in Localytics is device specific, so if your app supports multiple users, you may want to trigger a call to setOptedOut every time a user logs in or out to update the Localytics SDK based on their previous preference.
Methods to support GDPR and other privacy requirements
You will be expected to set the privacy status of end users when they enter your website or are authenticated. setPrivacyOptedOut API facilitates setting privacy status.
- ll('setPrivacyOptedOut', true) This API will result in the deletion of all the end user's data in addition to halting collection of that users data going forward.
An example of opting out a user is included below.
var optedOut = false;
// make a request to your servers to retrieve the end user's customer id and opted out status.
ll('setCustomerId', customerId)
ll('setPrivacyOptedOut', optedOut);
Initialization options
You can pass a number of options to the init method of your Localytics instance.
| Option | Description |
|---|---|
| appVersion | Your app's version number |
| sessionTimeout | Time in seconds until Localytics marks the session as closed. Default: 1800 |
| customDimensions | An array of custom dimension values. Use this to set custom dimensions before the first session. |
| customerId | A String representing the customer ID. Use this to set the customer ID before the first session. |
| customerEmail | A String representing the customer's email. Use this to set the customer email before the first session. |
| customerName | A String representing the customer's name. Use this to set the customer name before the first session. |
| domain | Changes the domain used for cookies. Use this to track users across subdomains. |
| trackPageView | Automatically track page view events. The default value is false. |
| cacheOffline | Set to true to enable offline caching, which will automatically retry analytics uploads on subsequent pages if the device is offline. IE 8 and browsers without CORS support ignore this flag. Events will be stored in localStorage if possible (unless the cookies override is set to true), and fall back to cookies if not. Devices with cacheOffline enabled will also upload using the useXHR option if possible. |
| cookies | Always store all data in cookies and not localStorage. The default value is false, unless localStorage is not supported in the browser. |
| useXHR | When uploading data, use XHR (Post) requests. Defaults to false unless cacheOffline is set to true. Always false on IE 8 and browsers without CORS support. |
| autoUpload | Automatically upload events as they are created. The default value is true. If this value is false, then ll('upload') will have to be called to pass data to the Localytics Dashboard. |
| workerPath | The hostname and relevant path to your webpage's service worker. This is required for supporting web push. |
| workerName | The file name of your service worker. This is required for supporting web push. |
| publicKey | The public key that should be used to register web push.This is required for supporting web push and must match the value for your app in the Localytics dashboard. |
| allowLogs | An option to enable some logging from Localytics to the console. This value should be set to false in all production environments. |
| disableAnalyticsTracking | An option to prevent Localytics from uploading analytics data for this user. This value defaults to false. |
| optedOut | An option to prevent Localytics from storing or uploading any data for this specific user. |
| privacyOptedOut | An option to prevent Localytics from storing or uploading any data for this specific user in addition to deleting any data associated with this device. |
Example:
ll('init', 'YOUR-LOCALYTICS-APP-KEY', {trackPageView: true, domain: 'localytics.com'});
Tracking a subset of users
Some customers find that it isn't valuable to them to track all users within their webpage due to the sheer volume of data that would amass. For customers who prefer to track only a subset of users, the Localytics SDK allows you to turn of the tracking of analytics data.
To do so, first start by updating your initialization code to disable uploading of analytics data. If you don't include a value here, the default is false, and therefore datapoints like session open will be tracked automatically:
// Replace this variable with your own internal logic.
// One example could be checking a cookie to determine if the user is logged in.
var shouldDisableUserData = true;
ll('init', 'YOUR-LOCALYTICS-APP-KEY', {
	'disableAnalyticsTracking': shouldDisableUserData
});
Next, when the user meets the criteria to start being tracked, update the Localytics SDK to start tracking that user's data:
ll('setDisableAnalyticsTracking', false);
While the user has analytics tracking disabled, all calls to open, close, and tagEvent, will result in a no-op. It is therefore safe to leave all event tagging code throughout your codebase and simply update this value.
To view a sample of this working in a real webpage, please visit our samples repo
Integrating with AMD
This modified integration code produces an AMD-compatible integration.
<script>
    +function(l,y,t,i,c,s) {
           l['LocalyticsGlobal'] = i;
           l[i] = function() { (l[i].q = l[i].q || []).push(arguments) };
           l[i].t = +new Date;
           (s = y.createElement(t)).type = 'text/javascript';
           s.src = '//web.localytics.com/v4/localytics.min.js';
           (c = y.getElementsByTagName(t)[0]).parentNode.insertBefore(s, c);

           ll('init', 'YOUR-LOCALYTICS-APP-KEY', {} /* Options */);
           define('localytics', function(){ return ll; });
    }(window, document, 'script', 'll');
</script>
Integrating with CommonJS
Use our standard web integration, plus these instructions, to create a CommonJS-compatible integration.
In your package.json, include the following snippet.
"browserify-shim": {
    "localytics": "global:ll"
},
"browserify": {
    "transform": [
        "browserify-shim"
    ]
}
Multiple instances
Multiple instances of the Localytics Web SDK can be intialized on the same page using namespaces. You can use any alphanumeric string as a namespace name in place of ns1 and ns2 in the examples below.
ll('init.ns1', 'YOUR-LOCALYTICS-APP-KEY', {} /* Options */);
ll('init.ns2', 'YOUR-LOCALYTICS-APP-KEY', {} /* Options */);
Be sure to specify the matching namespace name in all SDK calls as follows.
ll('tagEvent.ns1', 'Some Event');
ll('tagEvent.ns2', 'Another Event');